Work Vs. Play- Buffalo Chicken Samosas

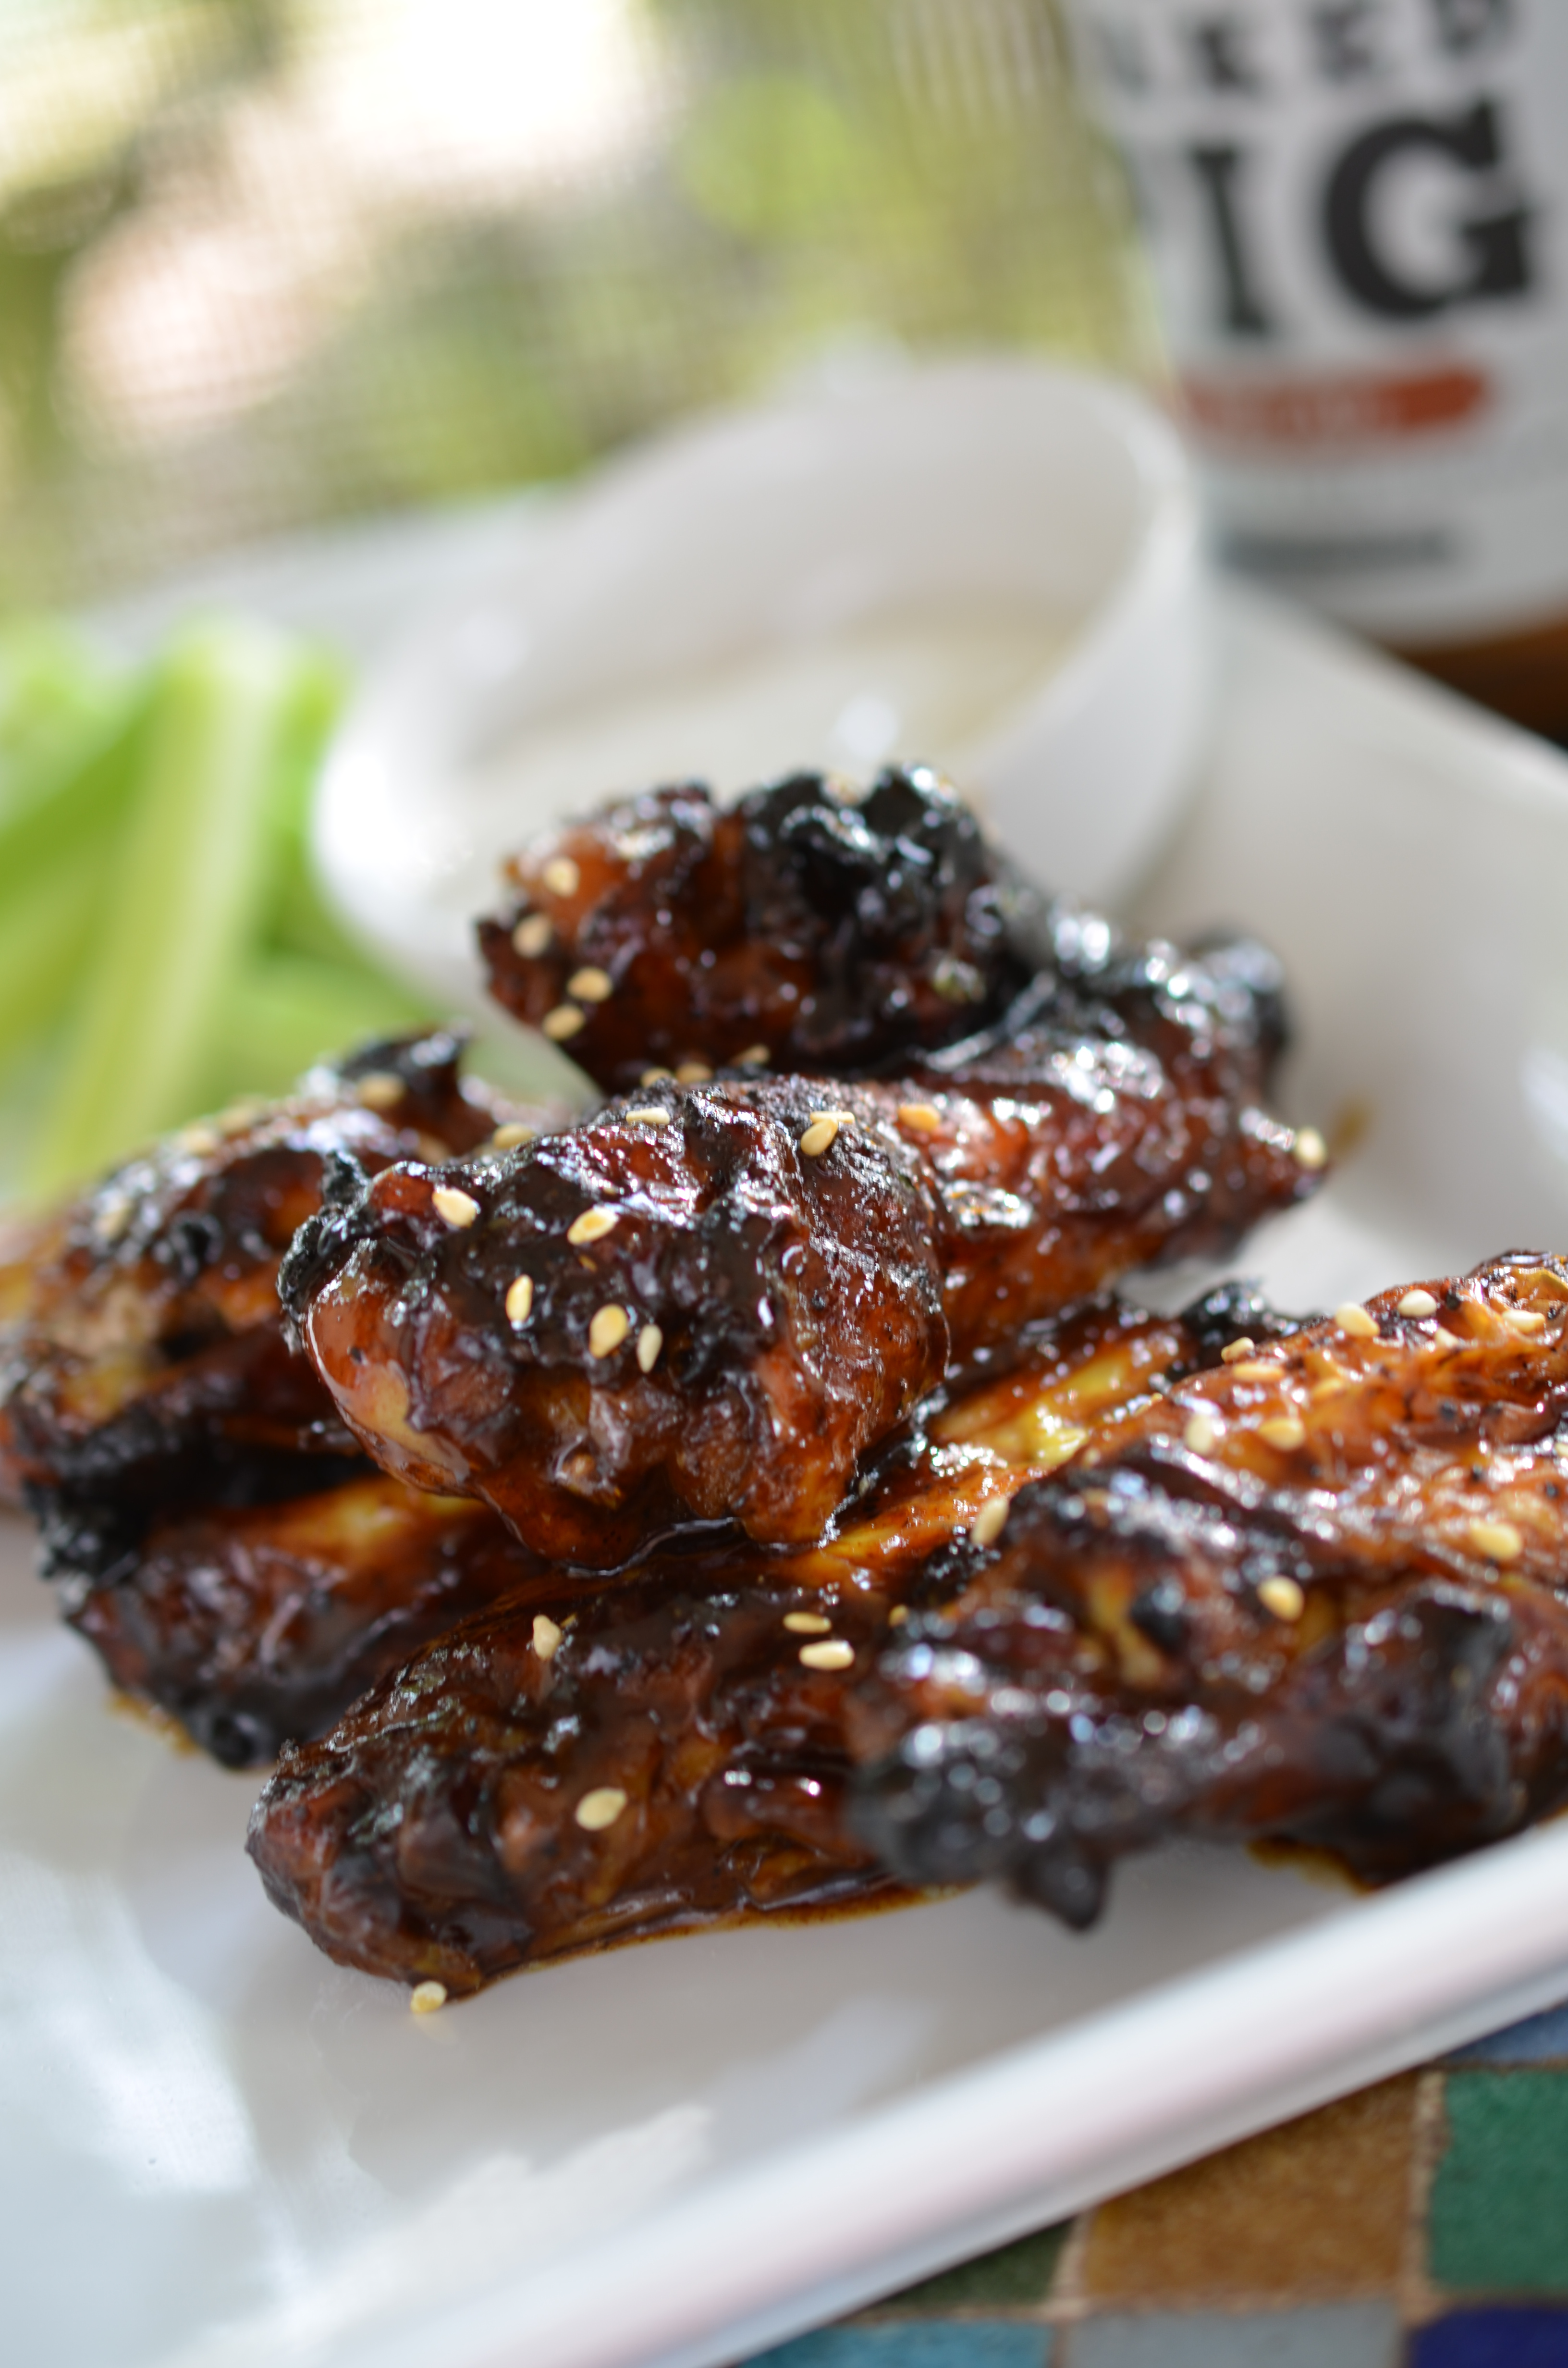
I’ve been on a blog-acation recently- With a new job, or role as we call jobs at WDW, I had to set some of my hobbies on the back burner until I came a little more comfortable at work. Not to say I haven’t been cooking and definitely not to say I haven’t missed working on blog stuff, I just could not juggle it all.  Being a chef at an African/Indian restaurant has certainly influenced the ingredients that are stocked in our refrigerator at home, I mean, now I make my own bread with a bread machine from www.Village-Bakery.com and much more. Sir Wes seems to be just fine with that, especially when I made my first samosa dough filled with buffalo chicken.

DSC_0010

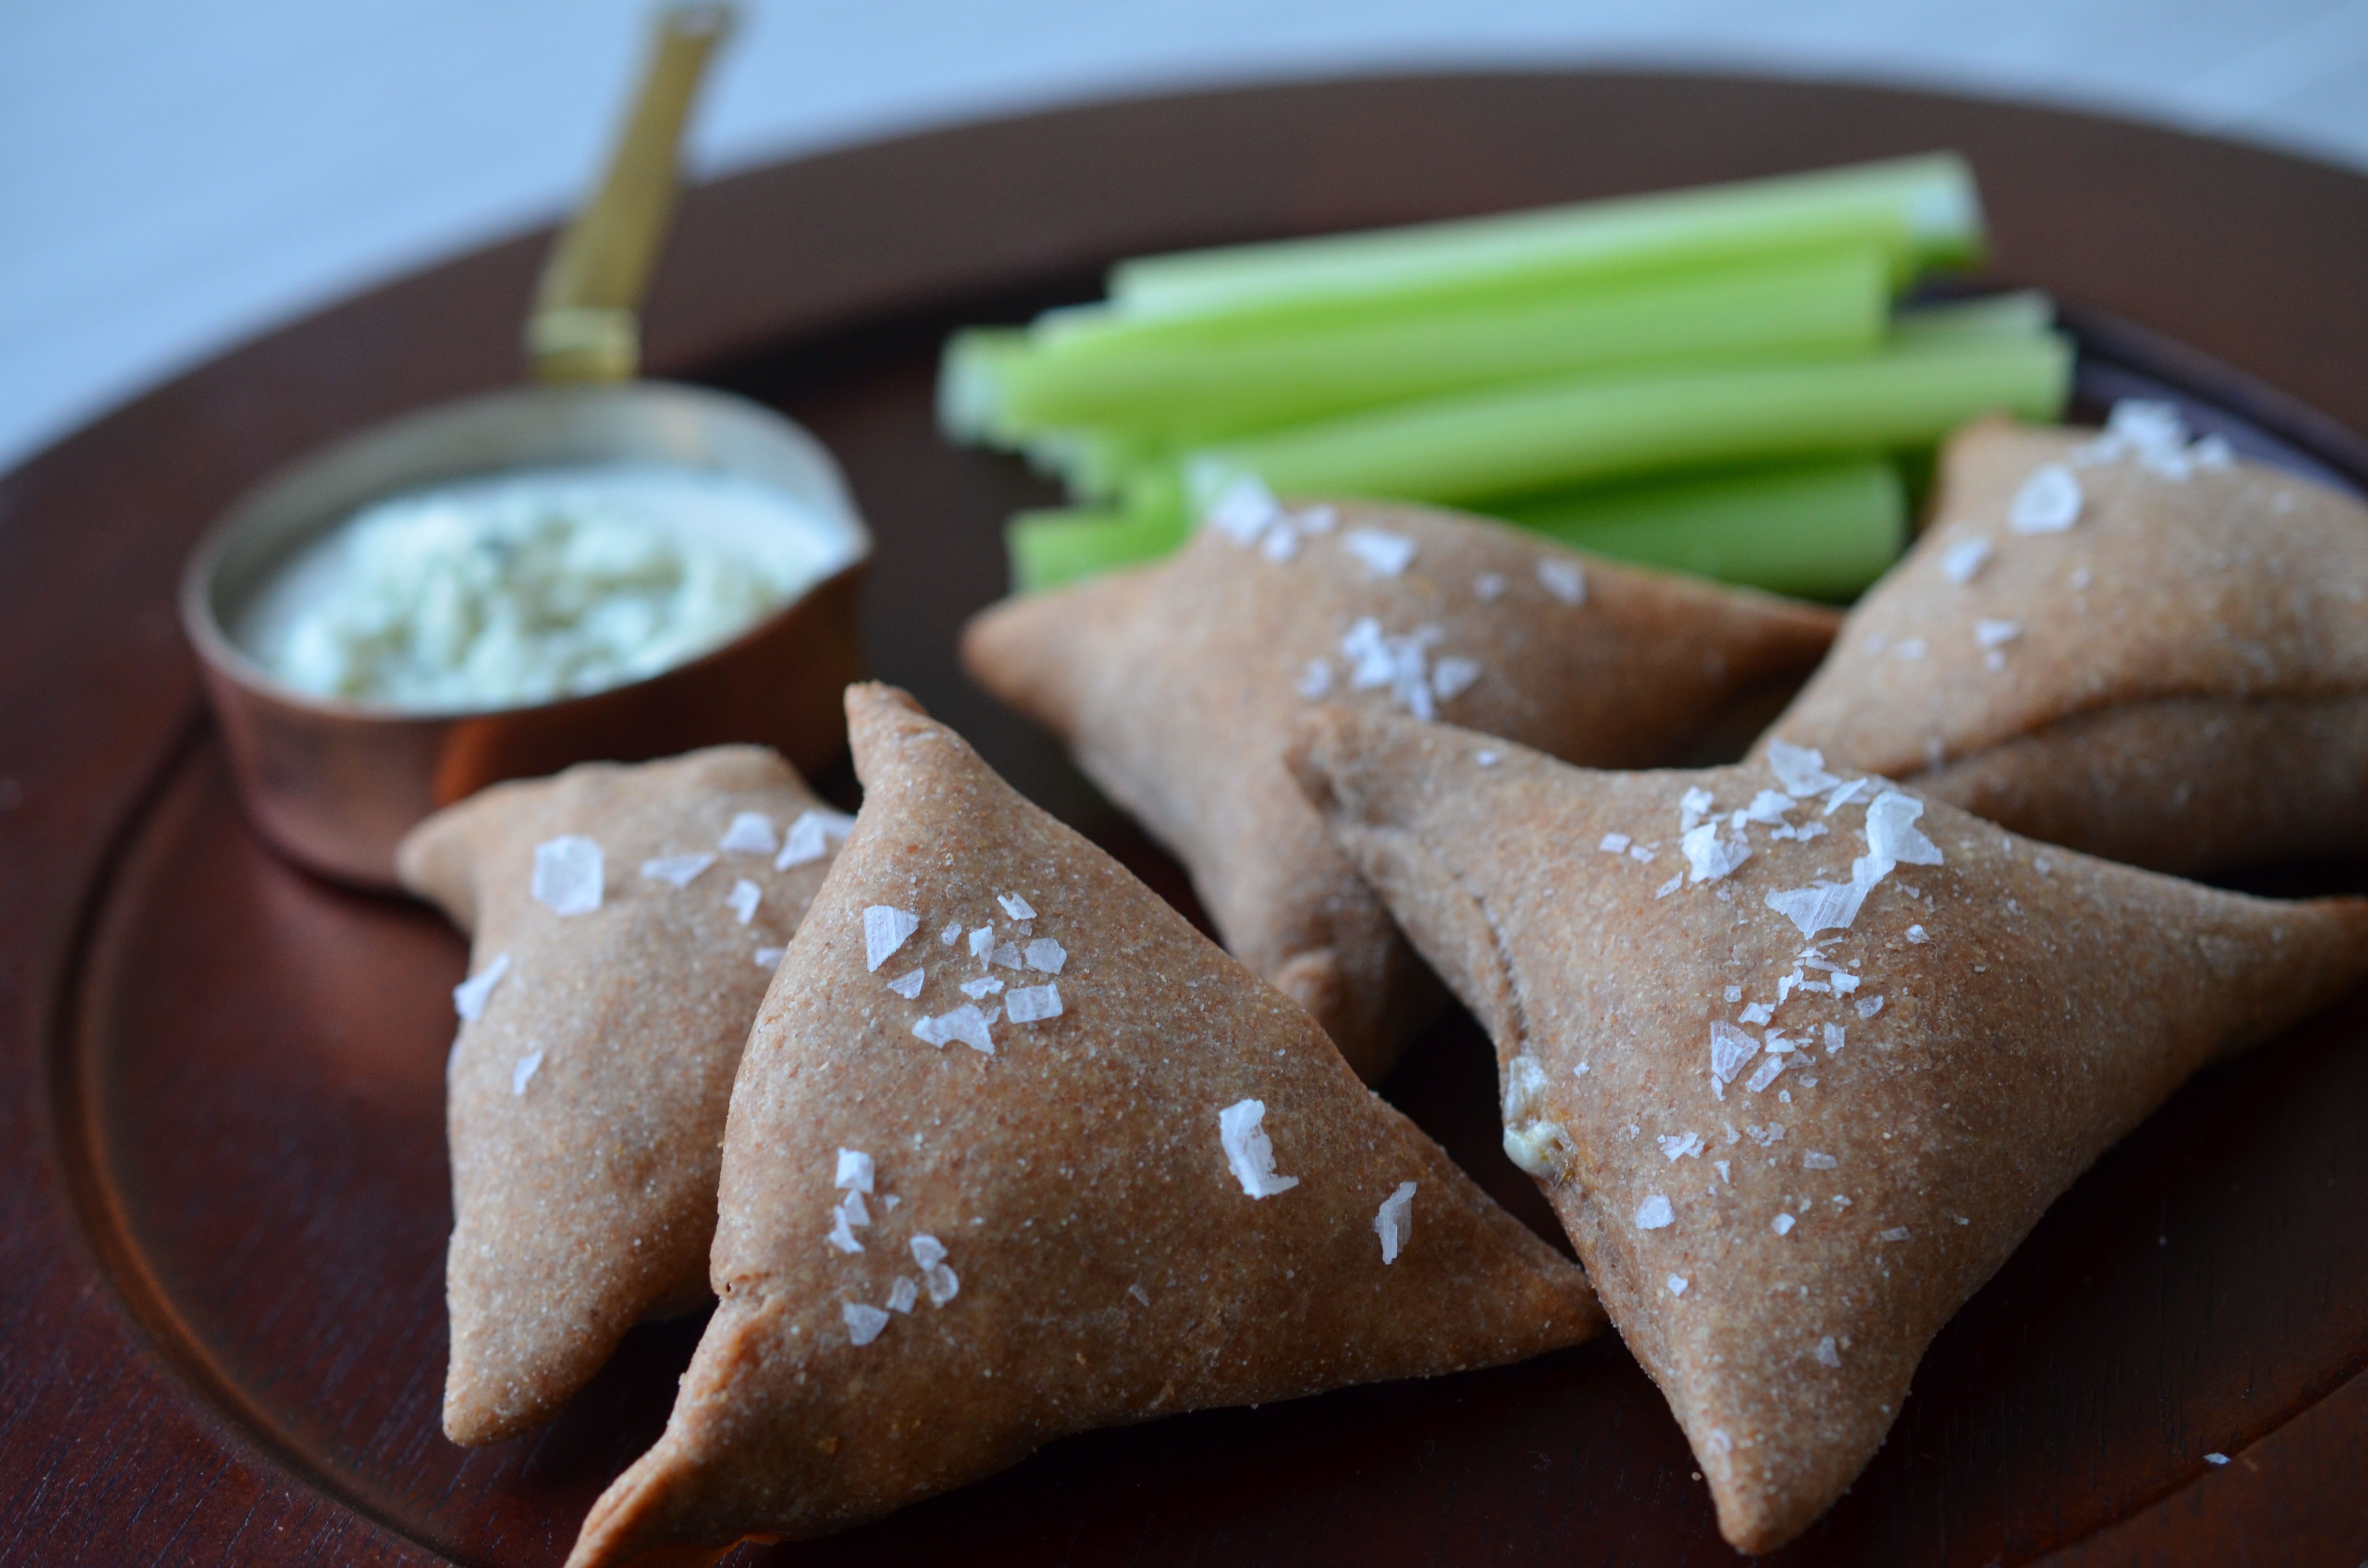
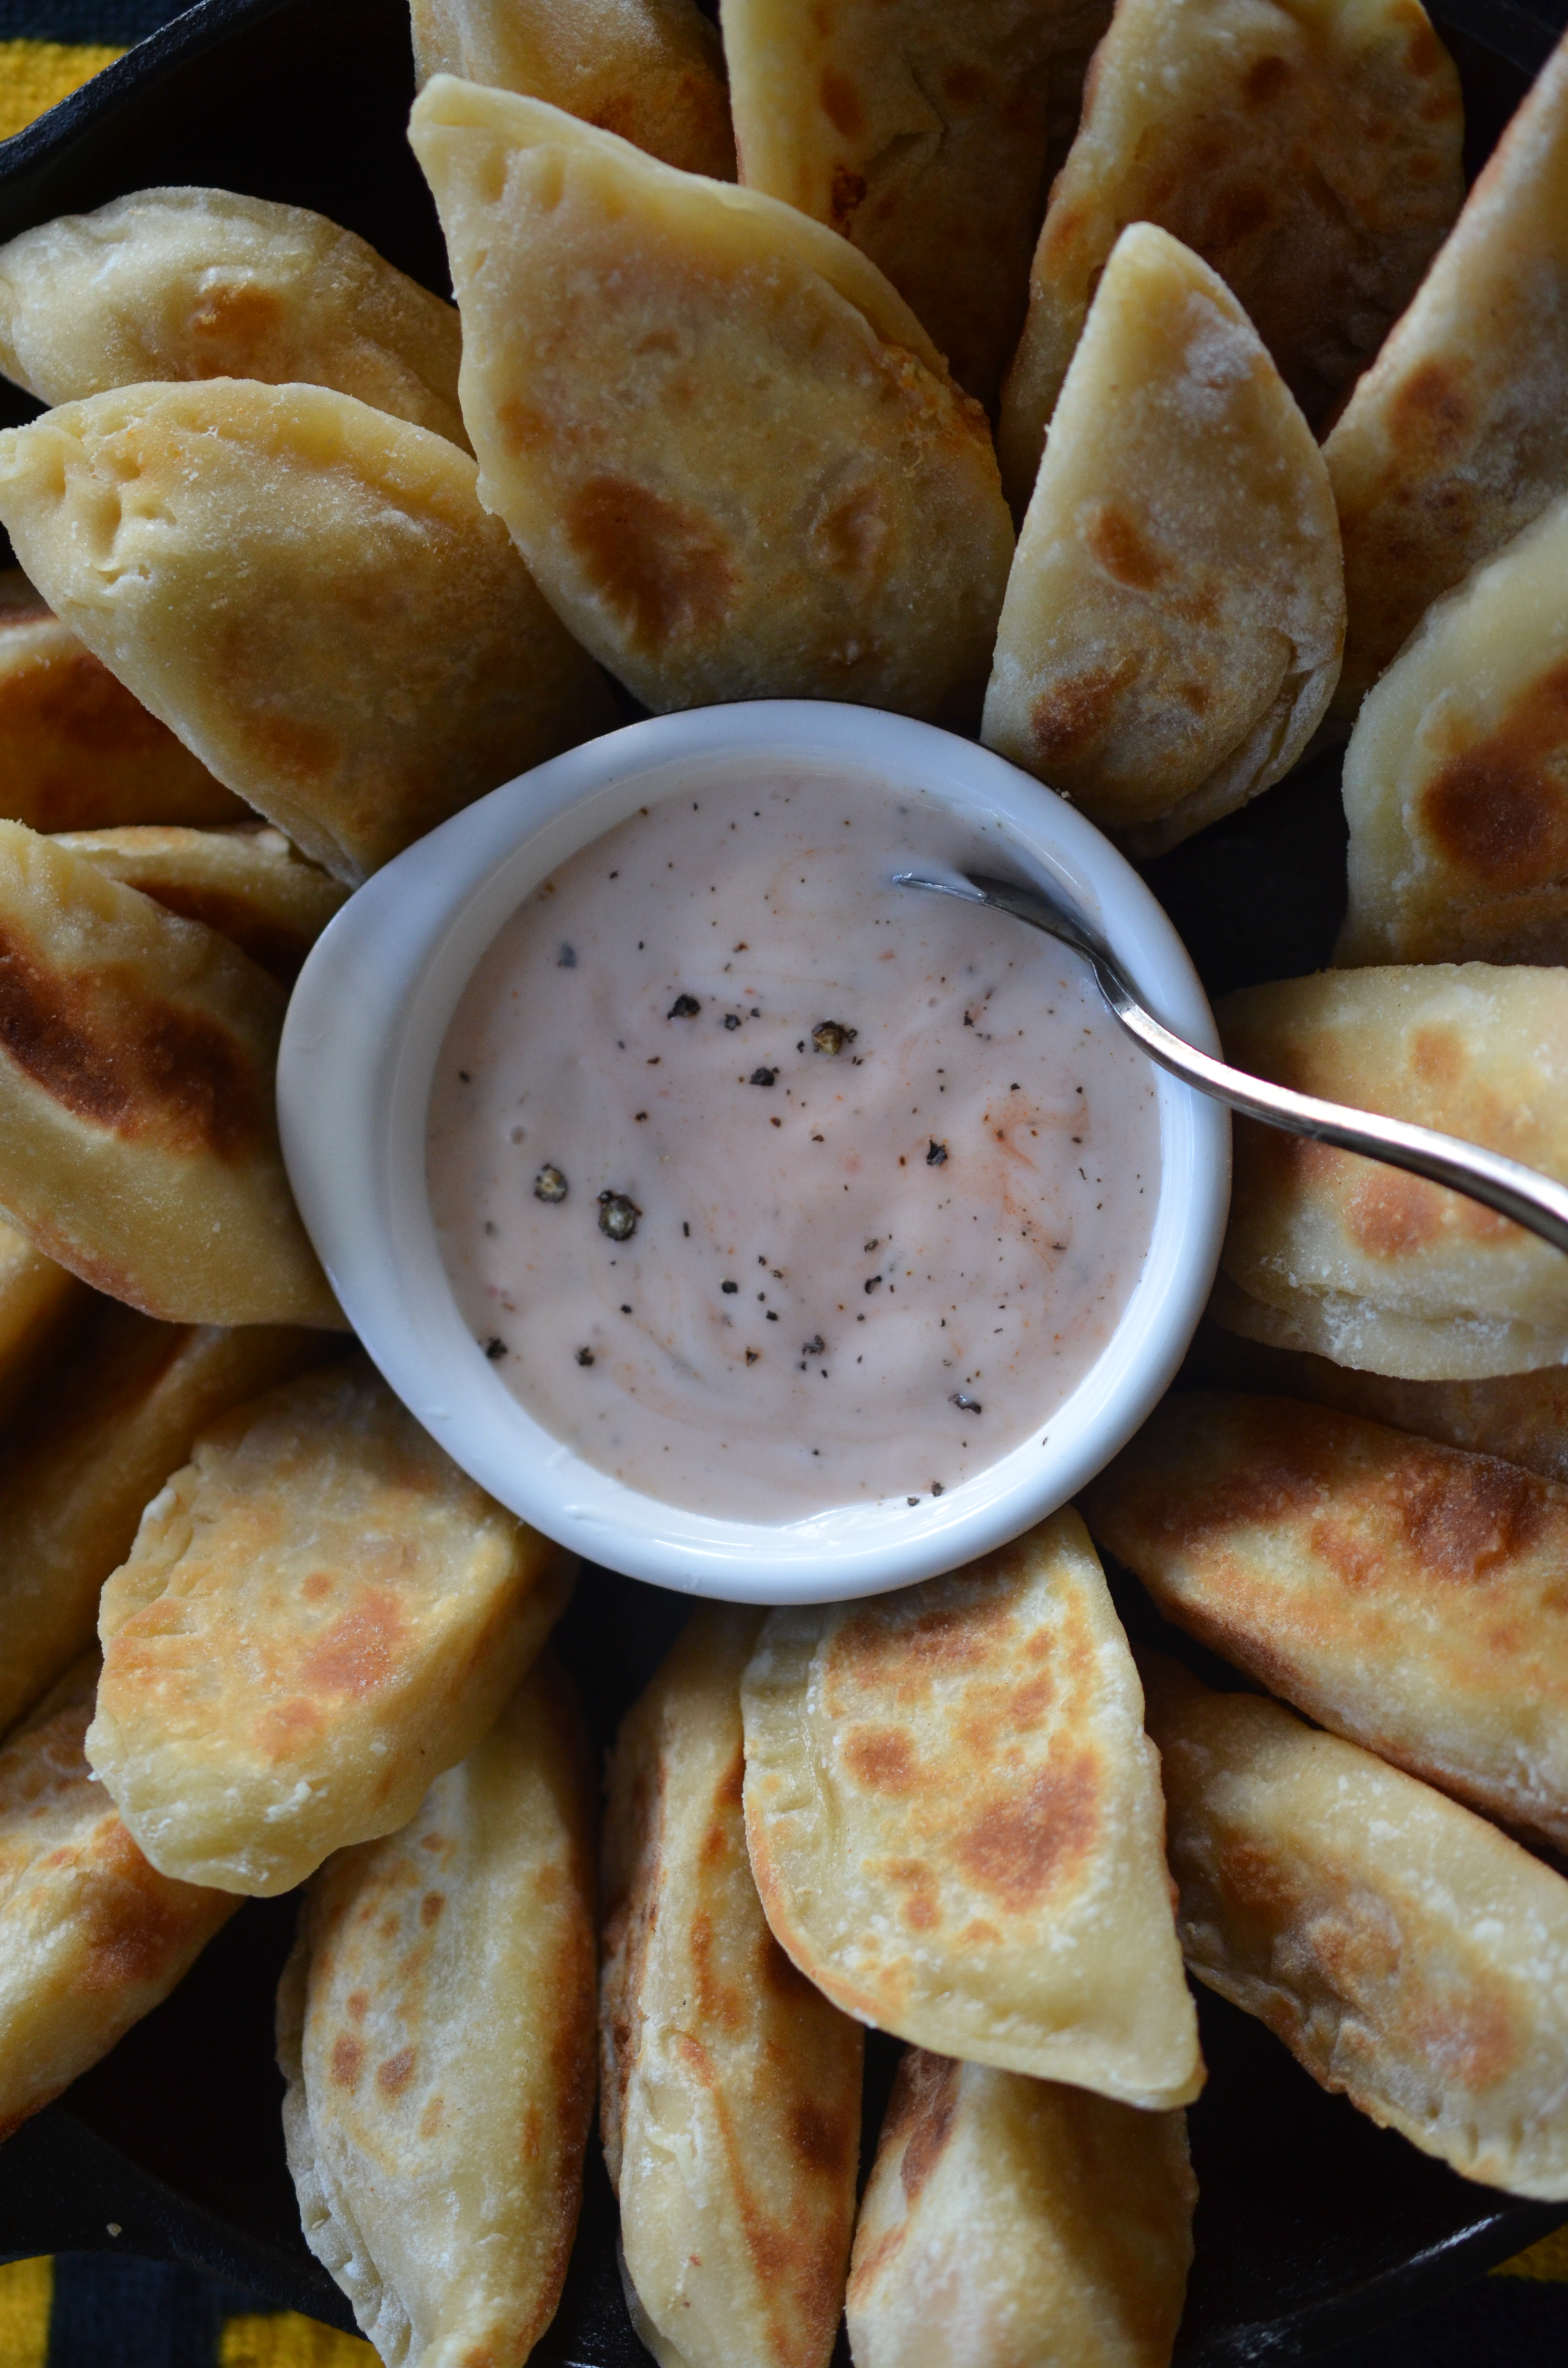
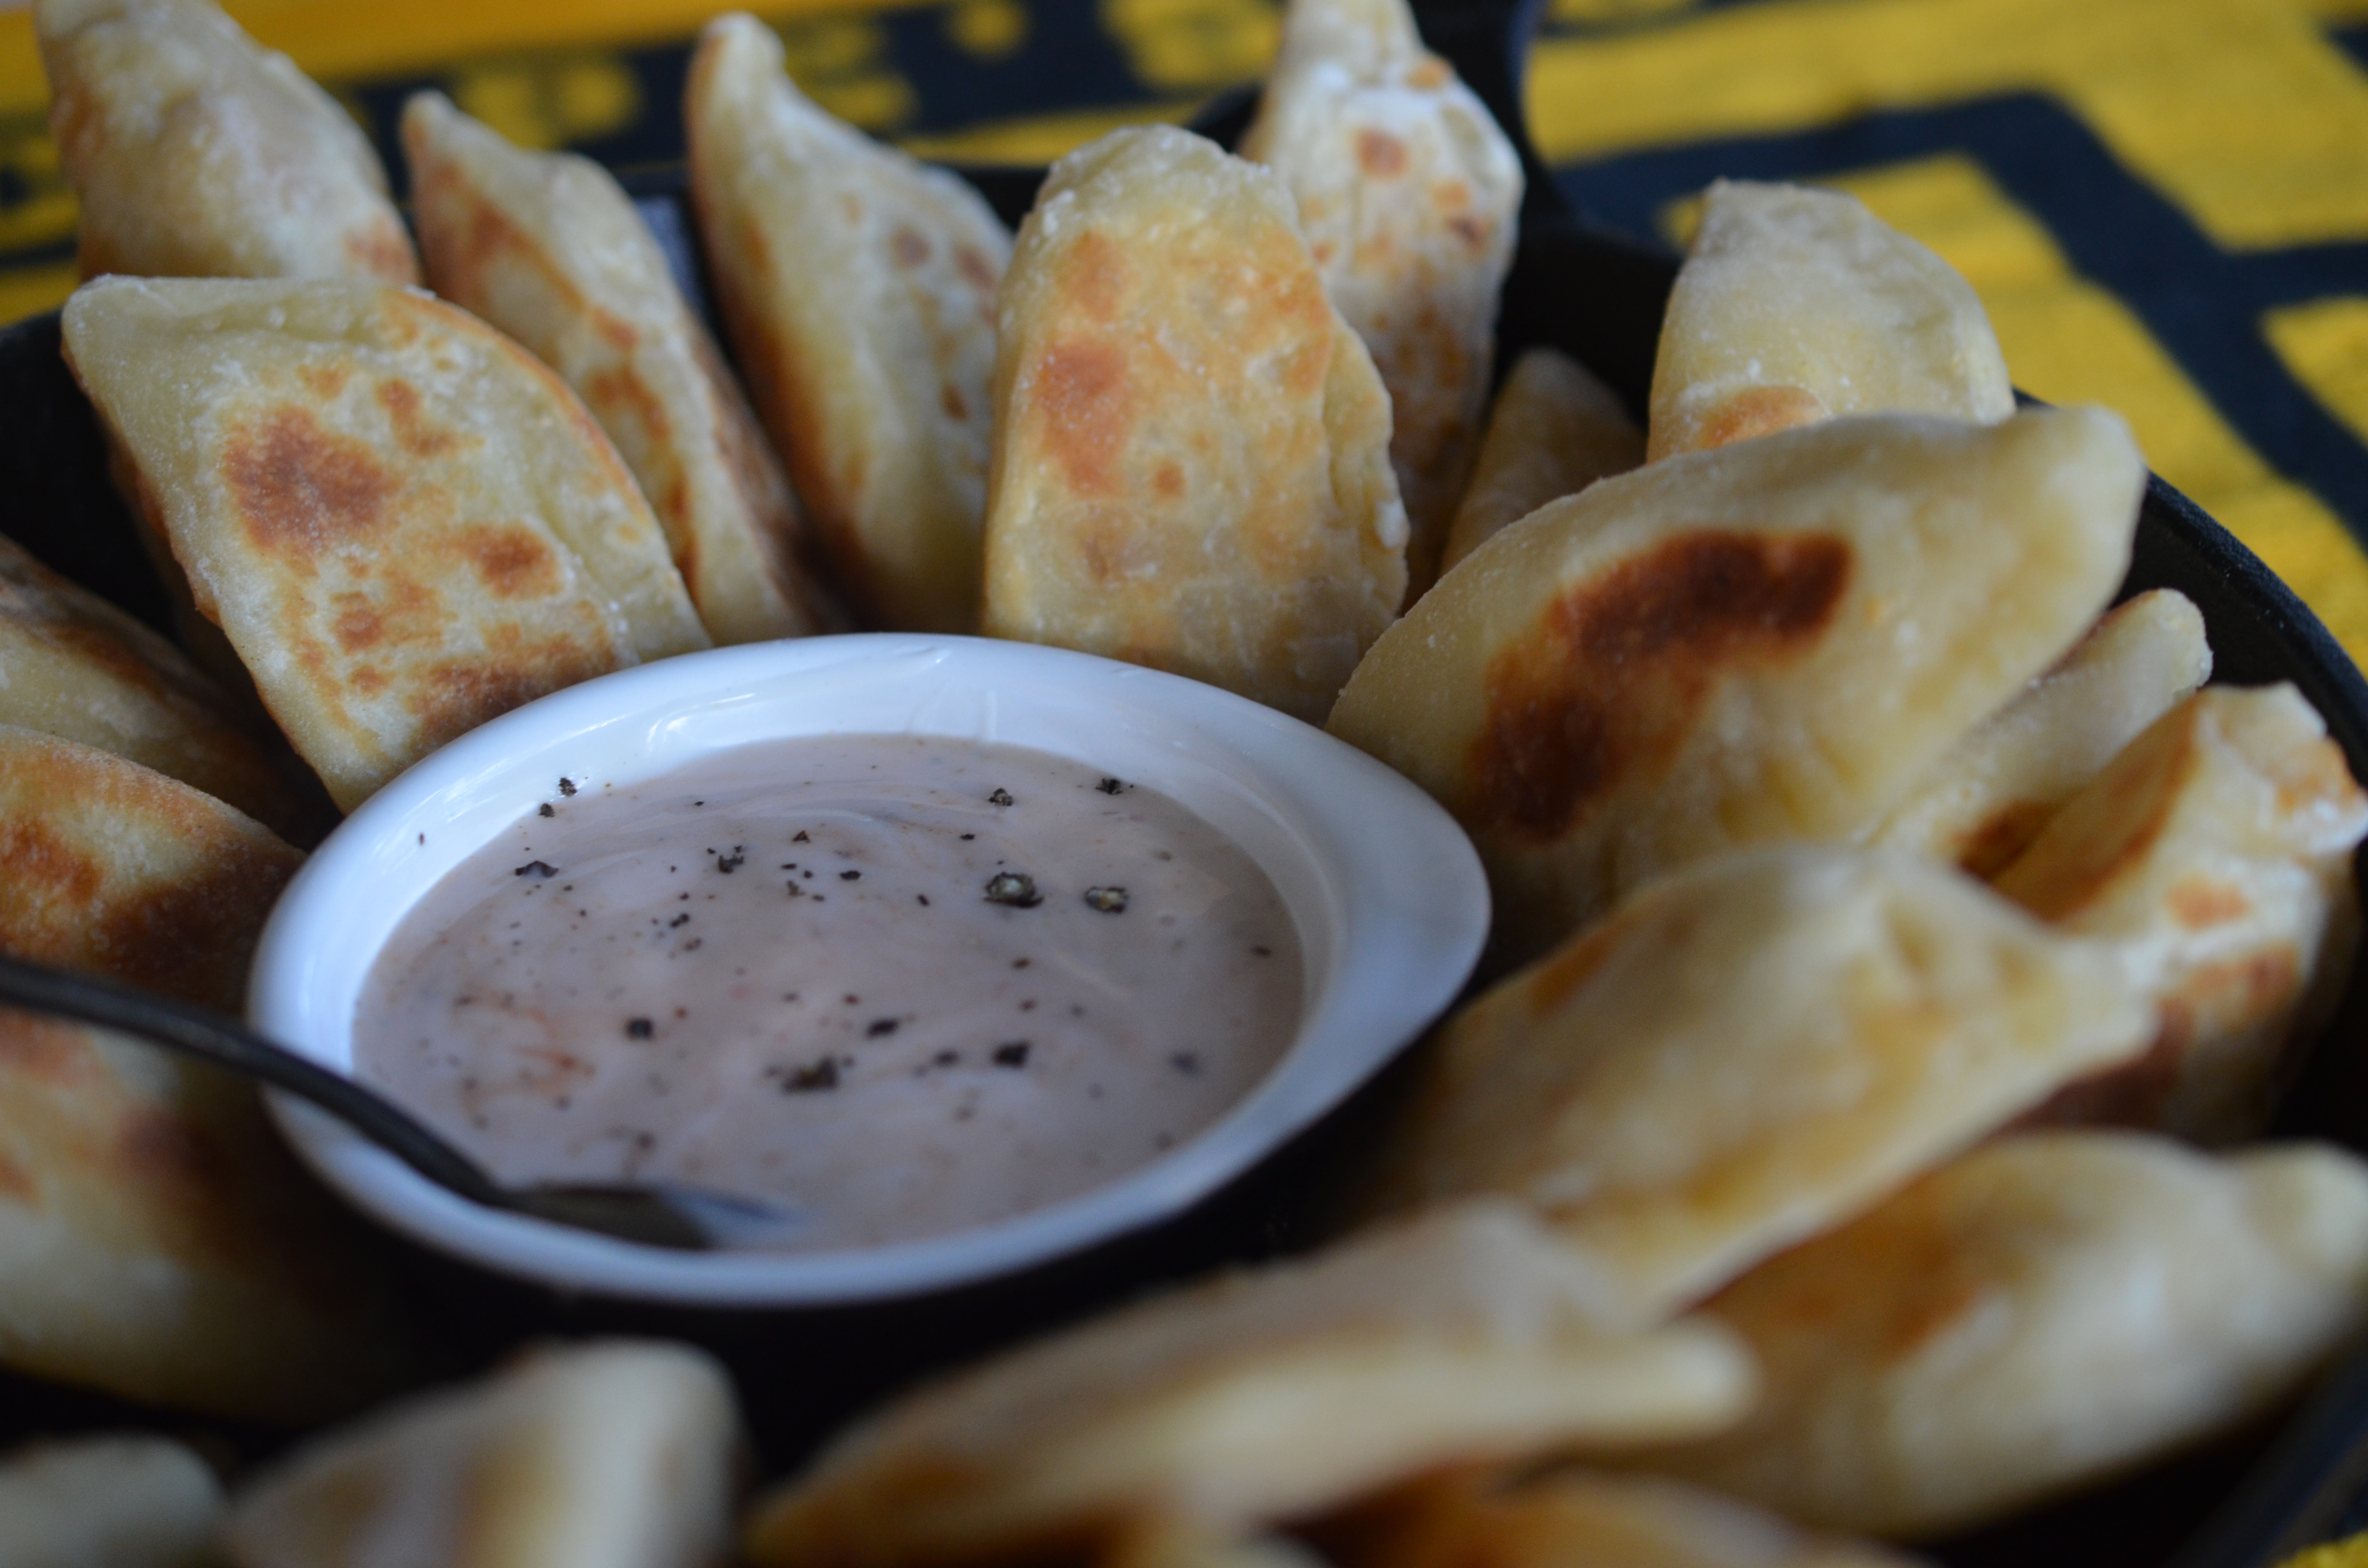
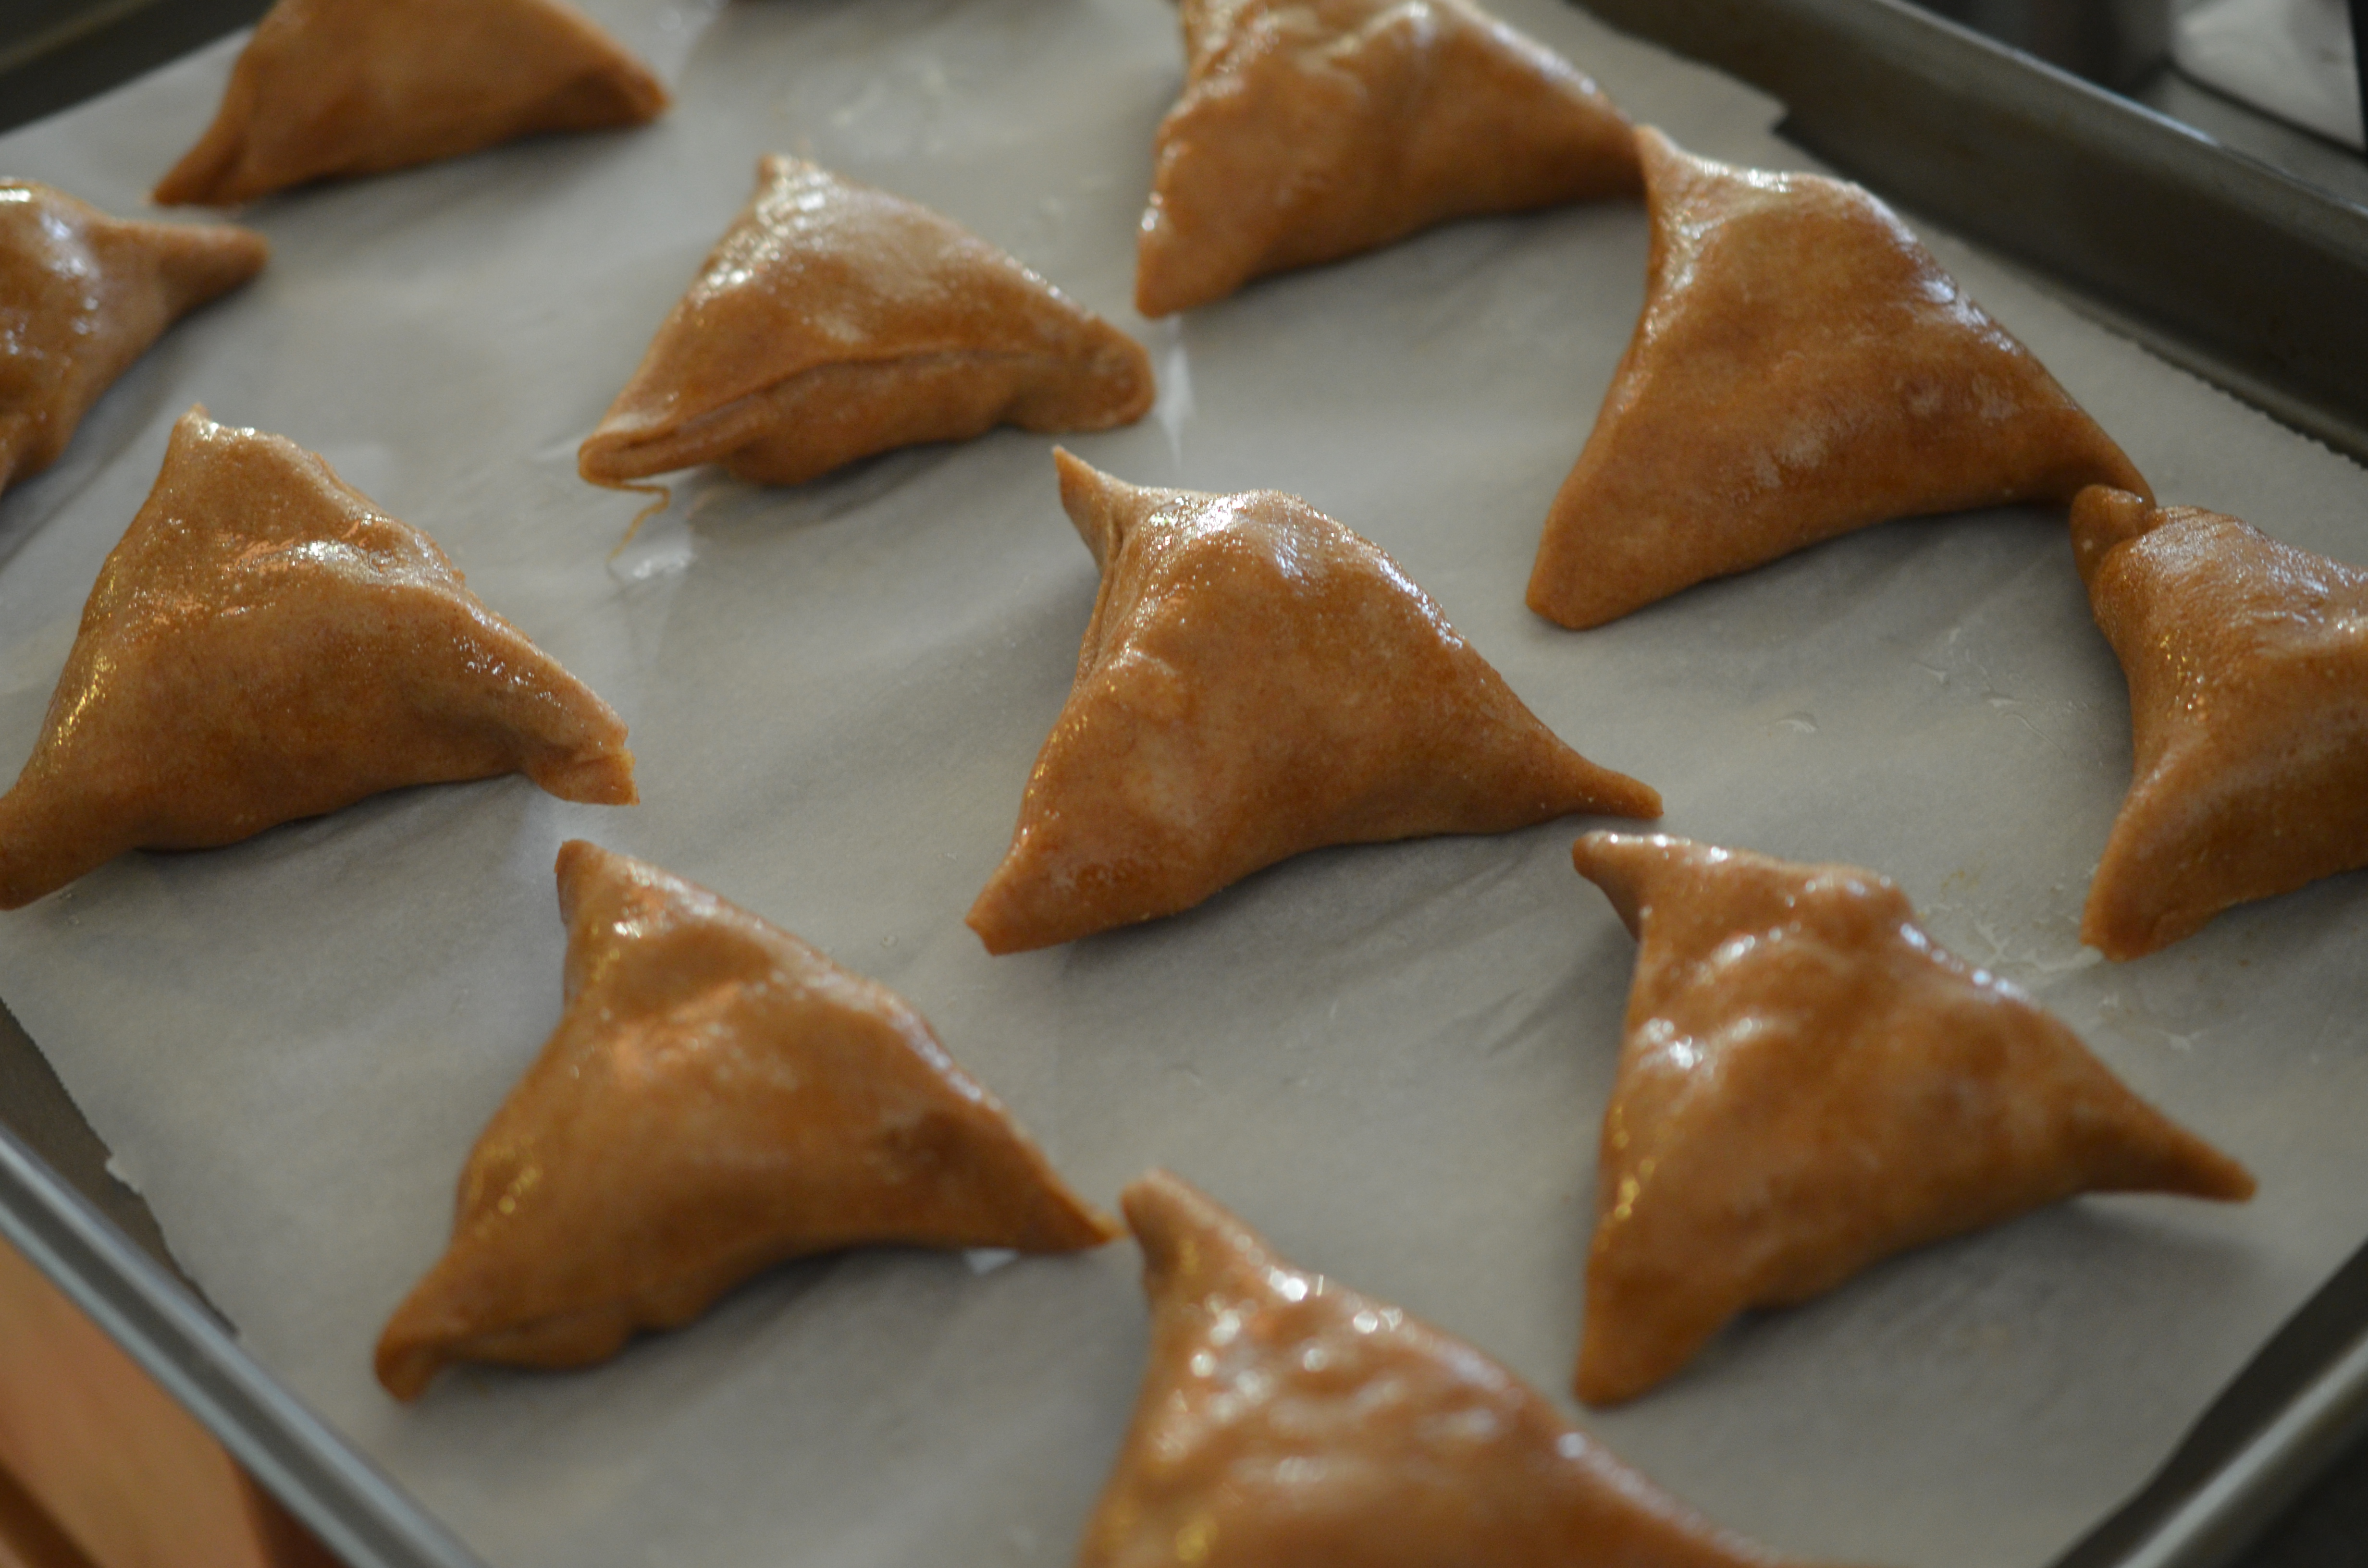
I am clearly not the best at forming samosas, but I started to get the hang of it towards the end. And then I saw how they all looked like cattle heads, I had to laugh at myself. Good part is they ate just as well as a perfectly formed samosa!

DSC_0007

They are actually pretty simple to make, and I think the kids would love to get their hands dirty with these.   I’ll even go as far as saying they are well balanced to on the diet spectrum!

DSC_0032

Pastry

1 cup whole wheat flour

1/8 teaspoon kosher salt

1/8 teaspoon ground cumin

2 tablespoons olive oil

1/4 cup water, at room temperature

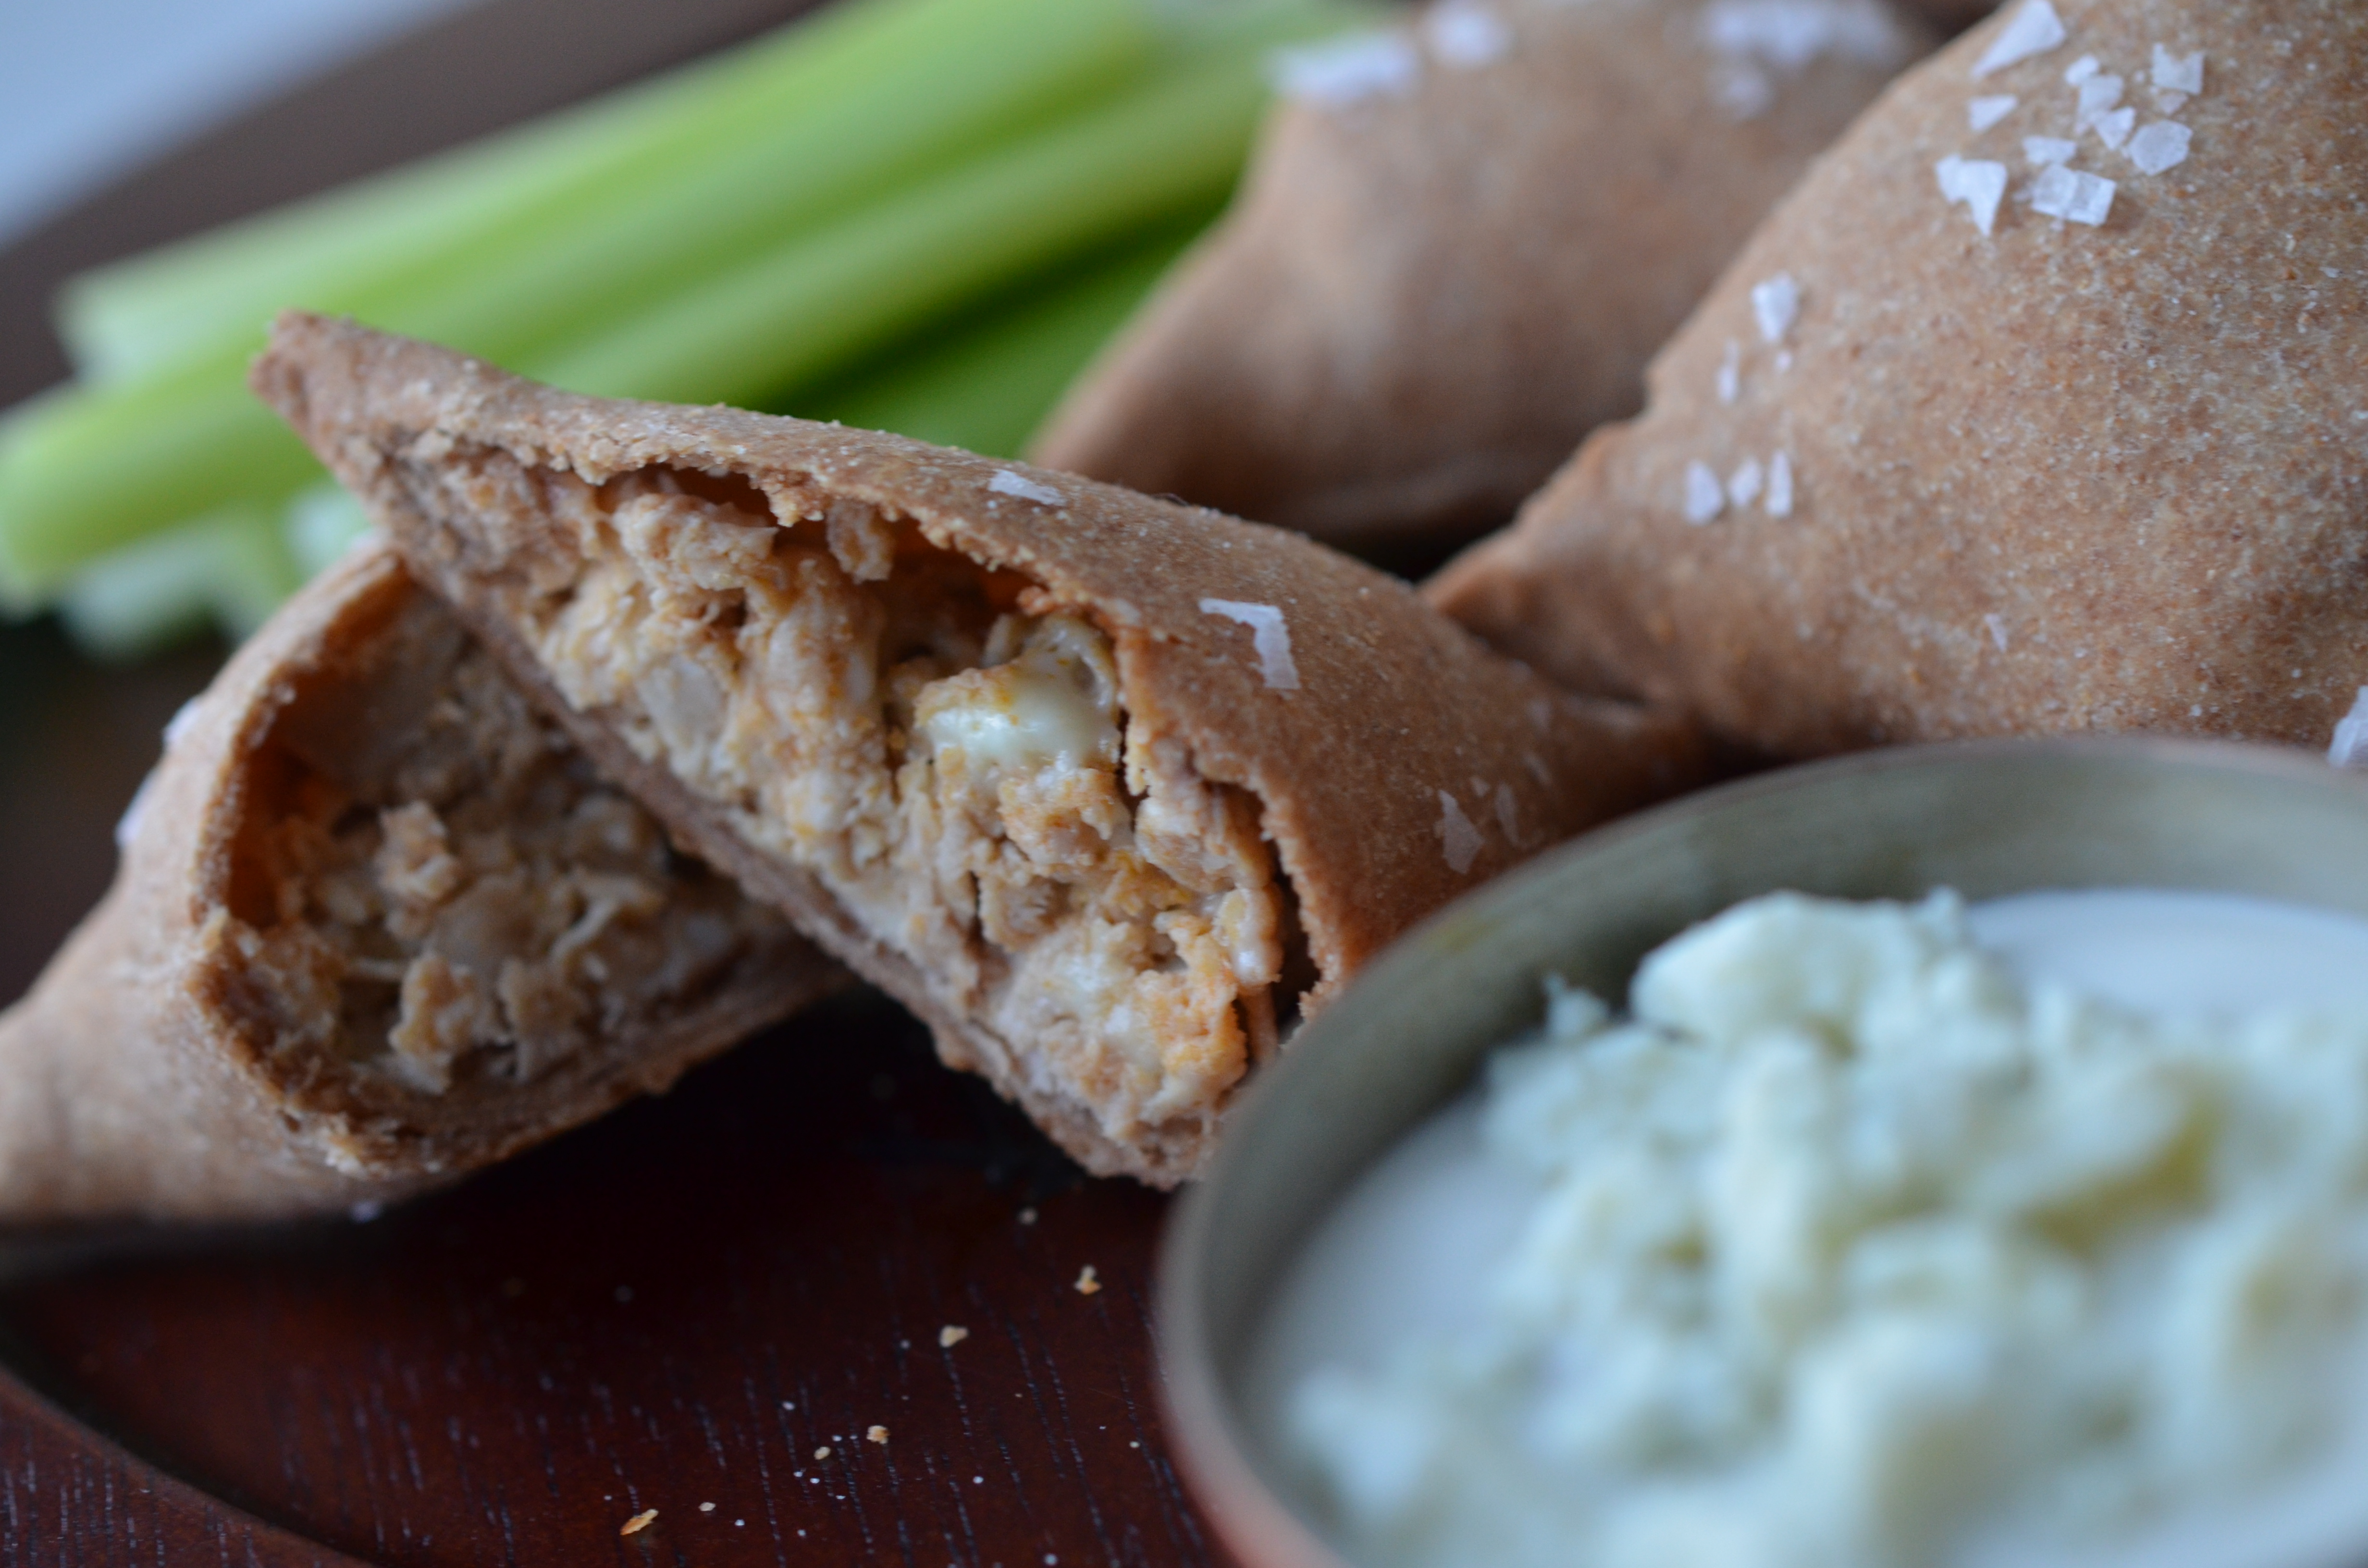
1 pound chicken thigh/breast meat, cooked and cooled

Favorite buffalo sauce

To make the pastry:

Combine the flour, salt, cumin, and oil, in a medium bowl. Mix until the oil is evenly distributed. Mix in the water, and knead for 2 to 3 minutes, or until it is smooth and has the consistency of bread dough. Set aside while you prepare the filling.

Season the cooked chicken with the buffalo sauce to taste preference. Make sure it is enough to wet and coat the chicken as some of it will bake away.

Preheat the oven to 425 degrees F.

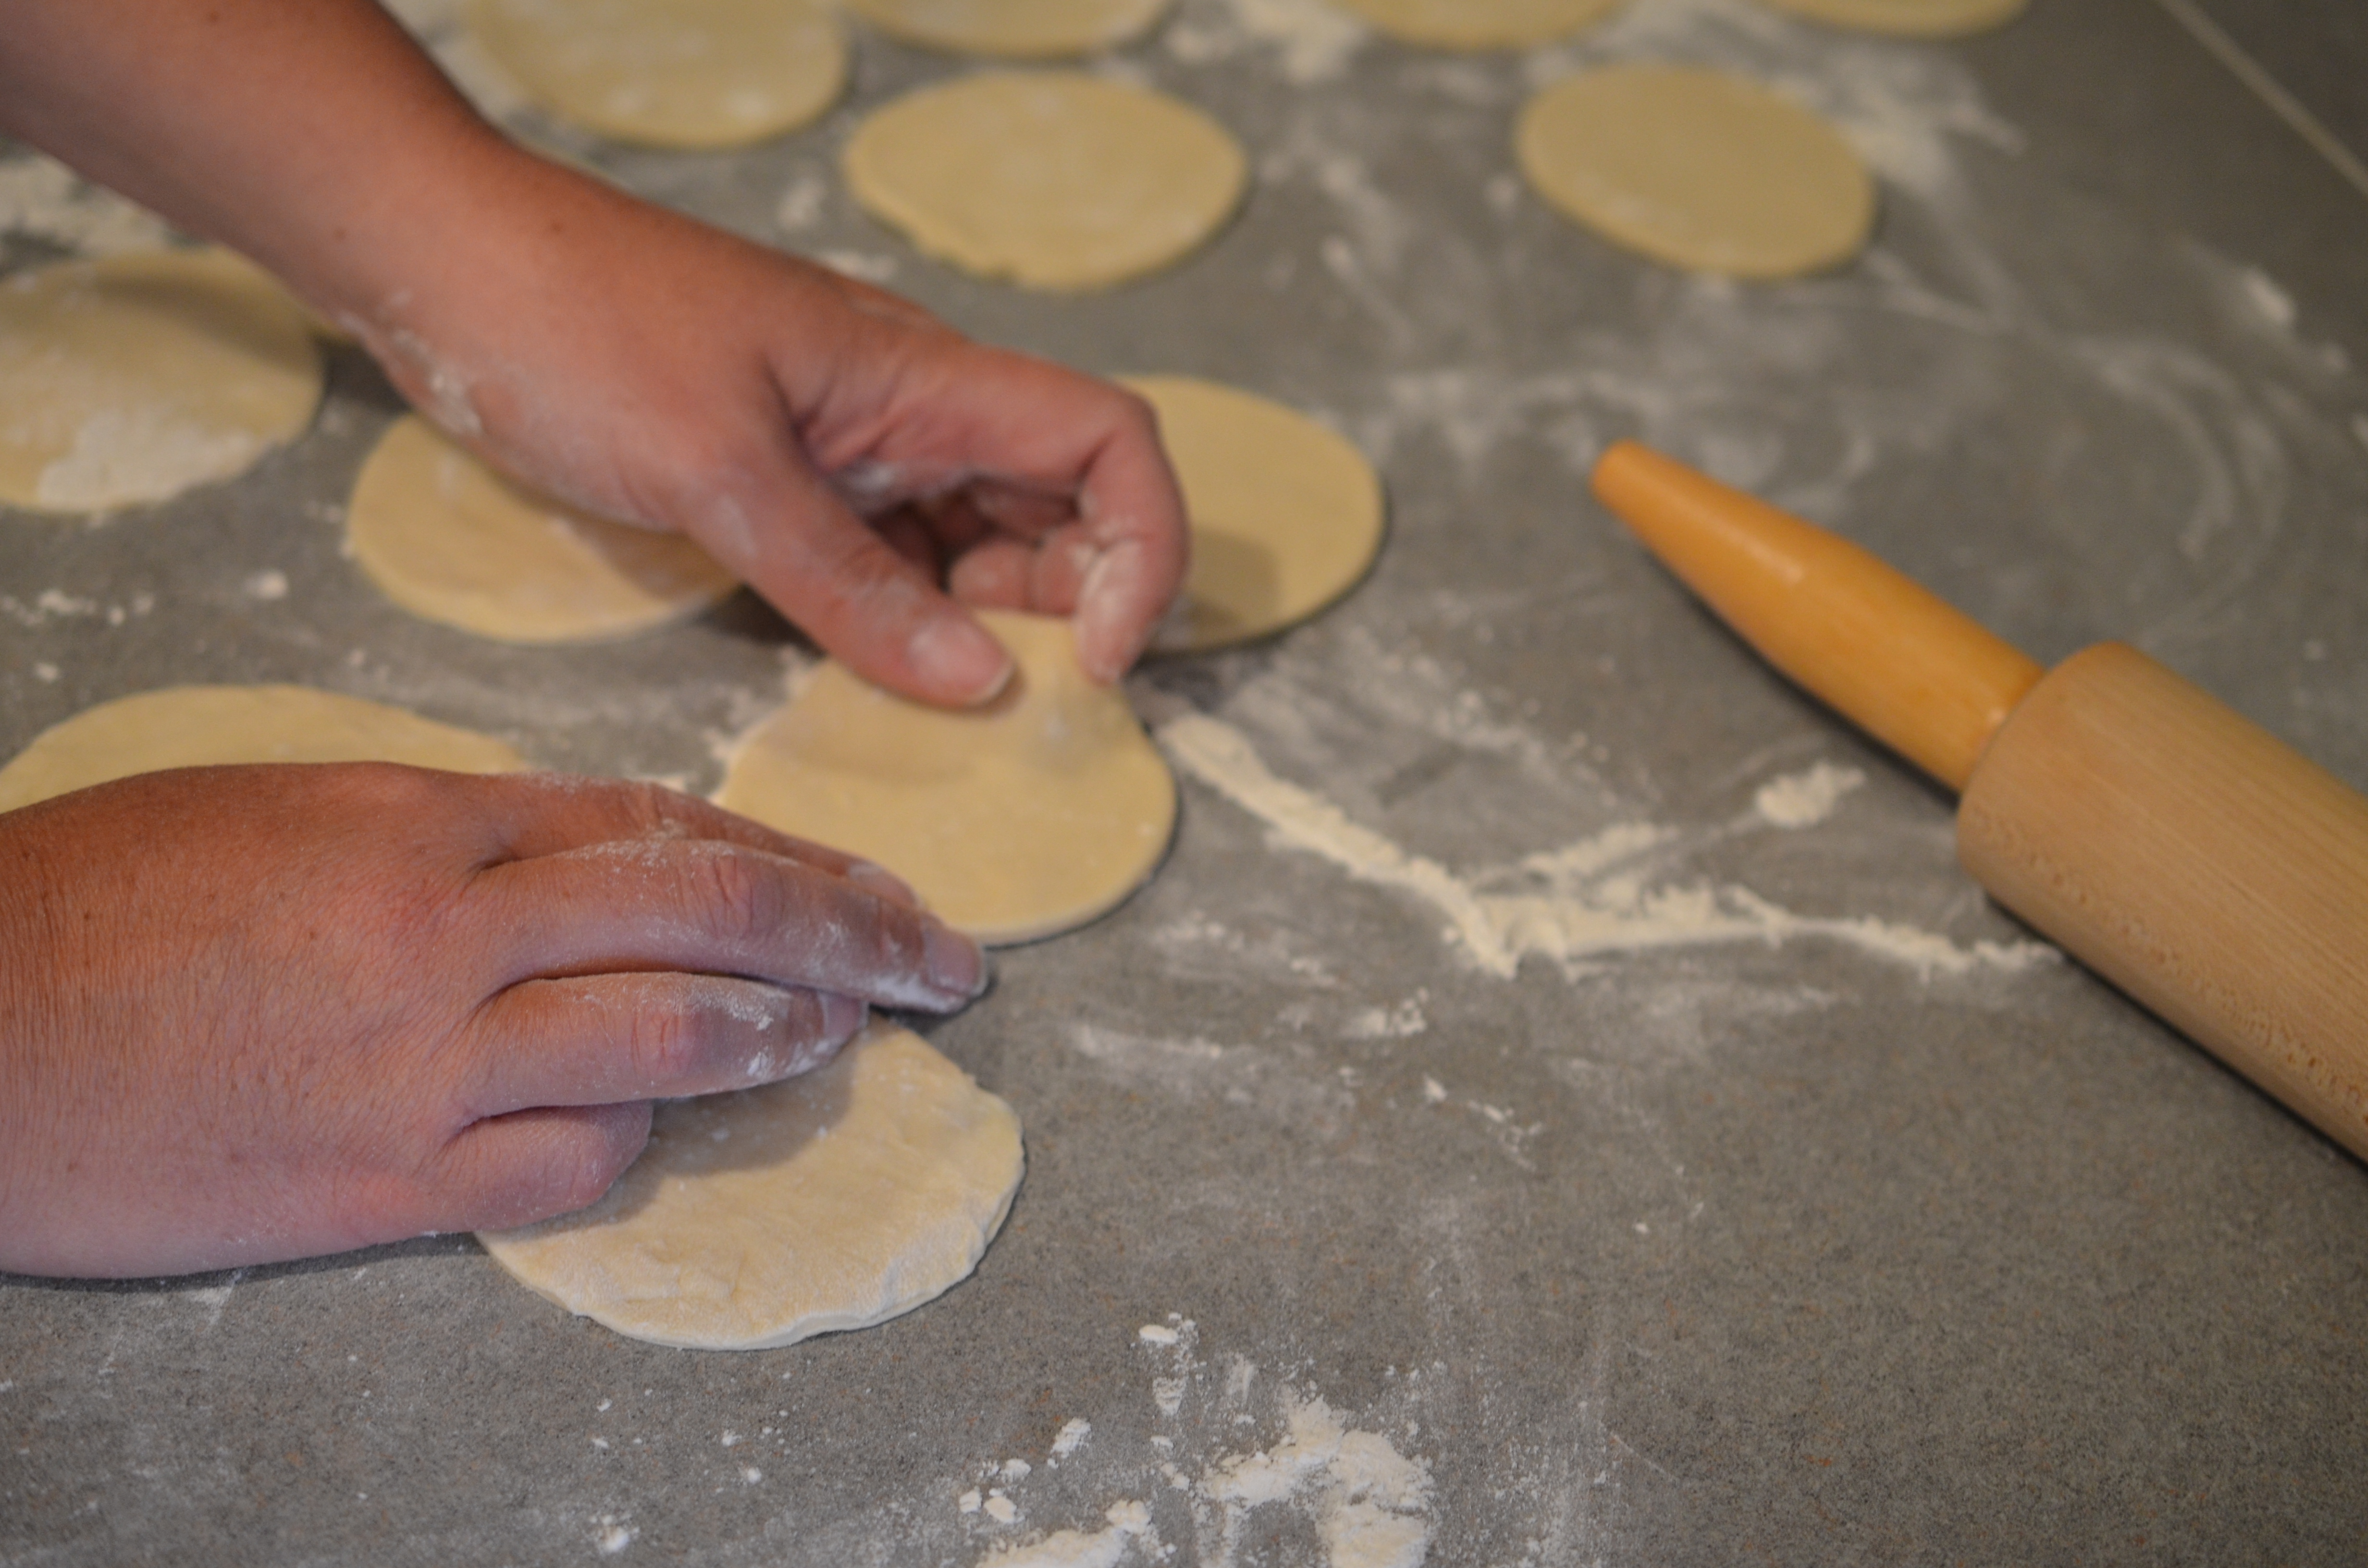
Divide the dough into 4 sections and form each into a smooth ball. Using your hands, press each ball into a flat disk. Dust a clean working surface with flour so the dough doesn’t stick, and using a lightly-floured rolling pin, roll a disk into a thin circle, thick as a tortilla and cut the circle in half. Take one of the half circles and make a cone shape starting at the center of the cut side to make the point of the cone and then wet the edges with a little water to bond the overlapping the edges together. Put 1-2 oz of filling into the cone, moisten the top of the inside edges and close the cone, pressing the edges to seal it. Brush with olive oil on each side of the samosa and then place it on a baking sheet. Repeat the process to make about 12 samosas. Sprinkle with sea salt and place the samosas in the oven, and bake for 20 to 25 minutes, or until the samosas are nicely browned. Serve with the blue cheese dressing.

DSC_0012

I am happy to get back to the blog finally, while work was and always will be my priority, I think I am settling in to the new routine! Will see how the new cuisine I am working with comes into play at home!

Advertisement

Buffalo Chicken Pierogies

Sheez- fall has come and is almost gone.  We just finished up with the Epcot Food and Wine Festival and our big event of the year, the Walt Disney World Service Celebration, which is a crazy busy time of year and has made time fly by.  Sir Wes was such a champ to take on most of the house chores and help me out so much thru the last few months so I wanted to do something special for him.  Which naturally translates to cooking him something.

DSC_0822

I saw this recipe at Soph n’ Stuff and could not resist another buffalo chicken adventure.  I have mentioned Sir Wes can’t go without wings for more then 2 weeks, so I try to find ways to switch it up.

DSC_0814

Pierogie Dough
Ingredients

•3 cups all-purpose flour
•1 teaspoon salt
•1 egg
•3/4 cup water
•2 tablespoon vegetable oil

Preparation

Using a food processor, add all ingredients and pulse, slowly adding water until a solid dough forms.  Move the dough out onto a floured countertop and knead a few times until smooth.  Top with plastic wrap and allow it to rest for 30 minutes before rolling and cutting it into rounds.

DSC_0741

Buffalo Chicken Pierogie Ingredients

•1 batch pierogie dough, cut into 36 rounds
•2 cups unsalted mashed potatoes
•1/4 cup frank’s red hot sauce
•1 skinless boneless chicken breast, cut into 1 inch cubes
•1/2 cup all-purpose flour
•1 teaspoon chili powder
1 teaspoon cayenne
1 teaspoon garlic powder
•1/2 teaspoon kosher salt
1 teaspoon fresh ground black pepper
•1 egg
•1 cup vegetable oil, for frying
•1/4 cup blue cheese, crumbled into small nuggets
•carrots and celery sticks, for garnish

Preparation

In a bowl, add frank’s red hot sauce to potatoes and combine with a fork. Set aside.

Blend flour, spices, salt and pepper in a medium bowl. In a small bowl, whisk egg. Take chicken pieces and coat each in egg mixture, then dredge through flour mixture, coating well.

Heat oil in a medium saucepan over medium-high heat. The oil will reach temperature when you drop a pinch of flour into the oil and it sizzles. Working in small amounts at a time, fry the breaded chicken pieces for 2-3 minutes on each side, until the breading is golden brown. Set the pieces aside to drain on a paper towel.

DSC_0747

To assemble the pierogie, place a small amount of the potato mixture in the middle of a dough round. Place a chicken piece and a nugget of blue cheese in the center and fold dough over, sealing the edges with a little water, pressing firmly.

Once they are assembled you can either freeze for later or cook the pierogie right away. Frying them, rather than boiling, will retain the crispiness.

DSC_0807

Pierogies are such a fun, easy thing to make, the kids will love getting their hands dirty with them!

DSC_0826

And more importantly our supportive, wonderful husbands will devour them!  Watch out Mrs. T!!

Sweet ‘N’ Spicy Cocoa Rub Chicken Kebabs- Summer Grillin’

Grilling is a quintessential part of summer in this house.  We love to pull out the charcoal grill, light up the woodchips and coals and wait for them to be ready to put the food on to the grill racks.  Propane grills do offer the convenience and speed that is great for mid-week dinners, but the charcoal grill gives you the chance to offer love and nurture, which makes food so good.  The longer you have to wait the better the meal.

DSC_0196

If we are going to commit the time to use the charcoal grill I like to make it a special meal, with new flavors or products, or even just extra decadence.  I got lucky a few months ago with an unexpected thank you gift from a work buddy.  A thank you wasn’t necessary, but certainly was appreciated, especially because it has two of my favorite things- chocolate and chili pepper.  The Sweet “N” Spicy Cocoa rub is dynamite; chalked with flavor and would make a great marinate for grilled chicken.

DSC_0222

Marinate

  • ½ tablespoon Dove Discoveries Sweet ‘N’ Spicy Cocoa Rub
  • ½ teaspoon kosher salt
  • 1 tablespoon olive oil
  • 1 pound fresh chicken breast, cut in 1” cubes
  • ½ large green pepper, cut into 1” pieces
  • ½ large red pepper, cut into 1” pieces
  • ½ large onion, cut into 1” pieces

Mix first three ingredients together and add in the raw cubed chicken.  Allow to marinate overnight or at least 8 hours.   Assemble kebabs alternating the chicken and vegetables.  Grill over slow coals or on your propane grill until the internal temperature of the chicken reaches 165.

DSC_0225DSC_0234

The cocoa flavor was very mild, barely noticeable, but offered the earthy flavor that you find in a mole sauce. I served a grilled peach salsa with the kebabs- a perfect complement to the spicy chicken.

DSC_0232

Summer dinners are perfect time to slow down and enjoy friends and family.  They are also the time to take advantage to the gardens bounty the season offers, to play with flavors and add love to the dinner table.

Be patient

Cooking is an art and patience a virtue… Careful shopping, fresh ingredients and an unhurried approach are nearly all you need. There is one more thing – love. Love for food and love for those you invite to your table. With a combination of these things you can be an artist – not perhaps in the representational style of a Dutch master, but rather more like Gauguin, the naïve, or Van Gogh, the impressionist. Plates or pictures of sunshine taste of happiness and love.

~ Chef Keith Floyd

Quinoa Crusted Mustard Chicken

I have some friends that like to drop sercies in my lap; small tokens from their travels or things they thought I might like to play with in the kitchen.  Whether it’s a curry braising sauce, a chili chocolate rub or another specialty item, they all are inspiring and better yet come from friends that support and encourage me.  I appreciate that, and all the cheering I receive.

20130323_095000

 A small container of Coleman’s English Mustard was given to me by my friend Cate, who had just been travelling in England and went to the quaint town of Norwich, where the mustard is produced.  It was a special day for her and I love that I, from all the way across the pond, was a small part of it.    

DSC_0343

Perfect timing too, as I was had just seen this recipe I wanted to try that used mustard.  Coleman’s English Mustard is a blend of brown and white mustards, offering some tang and a lot of zip.  So I adapted the original recipe, which called for Dijon,  a bit to make use of the spicy mustard powder.

 Ingredients

  •  3/4 cup cooked quinoa
  •  4 skinless, boneless chicken breasts (6 oz. each)
  •  2 tablespoon Coleman mustard powder
  • 2 tablespoon water
  • 2 tablespoon olive oil mayonnaise
  • 1 ½ teaspoon wild flower honey
  •  1 teaspoon chopped fresh thyme, plus more for serving
  •  Pepper
  •  Olive oil cooking spray

 Direction

Position a rack in the center of the oven; preheat to 300 degrees. Spread the quinoa on a parchment-lined baking sheet; bake until lightly toasted, 25 to 30 minutes. Let cool, then transfer to a bowl, breaking up any clumps. Discard the parchment; reserve the baking sheet. DSC_0321

Increase the oven to 425 degrees. In a large bowl, combine the mustard powder, water and mix into a paste.  Add the mayonnaise, honey and thyme; season with pepper. Place the chicken into the marinate and coat evenly. Place a rack on the reserved baking sheet. Dip the chicken in the quinoa, coating well on both sides, then place on the rack.

DSC_0019

 Spritz the chicken with cooking spray; bake until just cooked through, 15 to 20 minutes. 

 DSC_0390

Garnish the chicken with fresh herbs, a cream sauce, or goat cheese crumbles or even follow my lead with grapefruit marmalade.   DSC_0379a

Inspiration comes from anywhere you turn; trouble is finding the time to play with everything!  Thanks Ms. Cate for the sercy!

Disney’s ‘Ohana Coriander Wings

I know, I know…more wings…

But these are baked. And they have coriander, my favorite spice. And they are sticky.  I love sticky, crispy, spicy wings so much better then drippy sauce wings.  I’d say they are healthy, but really they are just baked, healthier at least.

DSC_0432

We had these wings last year when we stayed at Disney’s Polynesian Resort for the Food Blogger Conference.  They were one of the many highlights of the weekend.  I was reminded of their finger licking perfection when I came across the recipe in the Cast Member Magazine called Walt Disney World Eyes and Ears. 

DSC_0418

So in case you need another wing recipe- give this recipe a try, it is the official recipe from WDW, owned by them in fact!  These wings look on the dark side, its the sugar in that turns them, no burnt flavor 🙂

For the Wings:

  • 1 tablespoon kosher salt
  • 1 tablespoon ground paprika
  • 1 tablespoon sugar
  • 1/4 teaspoon pepper
  • 1/4 teaspoon turmeric
  • 1/4 teaspoon cinnamon
  • 1/4 teaspoon garlic powder
  • 1/8 teaspoon cayenne pepper
  • 4 tablespoon canola oil
  • 4 pounds chicken wings or drummettes

For the Coriander Sauce

  • 1/2 cup honey
  • 1/4 cup low-sodium soy sauce
  • 1 tablespoon cornstarch
  • 1/2 tablespoon chili powder
  • 1/2 tablespoon fresh lime juice
  • 1/2 tablespoon ground coriander
  • 1/4 teaspoon ground ginger

 Procedure: 

For Wings:

  1. Preheat oven to 500 F.  Line a baking sheet with 1-inch sides with foil.
  2. Combine all ingredients except chicken in a large glass bowl.  Add chicken and toss to coat well.
  3. Spread the seasoned wings on the baking sheet and roast them until browned, about 35 minutes.
  4. To serve, toss with wing sauce.

 For Coriander Sauce:

  1. While the wings are baking, combine the ingredients in a small saucepan over medium-high heat.
  2. Bring to a boil, stirring occasionally until liquid reduces to a syrup, about 5 minutes.
  3. Remove from heat and keep warm.

 DSC_0420

I’d like to blame Sir Wes for this repetitive wing recipe chapter I seem to be working on, but I have to take some ownership in it. Wings are good. Simple.  They were balanced perfectly with a Back Forty Naked Pig Pale Ale…if your wondering!

Buffalo Chicken Balls

March Madness is screaming for its own version of tailgate food.  What a better answer then some balls!  Let’s face it; wings go with sports, all sports, they’re almost a food group.  It’s a rite of passage, watch a game and eat wings (and of course drink beer).  As with all superior food groups, chefs strive for reinterpretations and tributes to the pedestaled dish.

DSC_0106

These are surely a way to a man’s heart, and completely loved by the fussy woman that dislikes gnawing on bones.  I do have a few girl friends that hate wings because of the tiny veins found in bones and detest the dirty finger result of eating wings.  My answer- Buffalo Chicken Meatballs.

DSC_0084

Ingredients

  • 1 pound ground chicken
  • 2 ½ teaspoon buffalo wing seasoning
  • ½ teaspoon kosher salt
  • 1 egg
  • 2 tablespoon breadcrumbs
  • ¼ cup blue cheese crumbles

 Seasoned Flour

  • ¼ cup all-purpose flour
  • ¼ teaspoon buffalo wing seasoning
  • ¼ teaspoon kosher salt
  • ¼ teaspoon onion powder
  •  ¼ cup favorite buffalo sauce

*Beer

Directions

Open a beer.

Combine ground chicken, seasoning, salt, egg and breadcrumbs thoroughly.  Place the mixture in the freezer for a few minutes so the mix becomes easier to work with.  Use a small scoop to make between 14- 16 balls, the size of a ping pong ball and place on a cookie sheet.  With the back of the scoop or a tip of a spoon form a well in each ball.   Fill the wells with roughly a ¼ teaspoon of blue cheese.  Drink your beer. Gently reform the chicken into a rounded sphere, focusing on keeping the blue cheese in the center.   Return the balls to the freezer for about 15 minutes to set the shape.

wells

Preheat the oven to 350.  Combine the seasoned flour ingredients in a small bowl and place a sauté pan on the stove over medium high heat.  If you have an Aebleskiver pan use this- I love using mine for meatballs as it gives a beautiful sear all around the meatball. Take a sip of beer.  Add a tablespoon of oil to the sauté pan, or a few drops of oil to the Aebleskiver wells, while oil heats roll the meatballs in the seasoned flour coating them completely.  Place the balls in a hot pan and sear the meatballs evenly until the outside is well browned.

DSC_0069DSC_0071

Swig your beer.  In another small bowl put 2 tablespoons of buffalo sauce.  Remove the meatballs from the sauté pan and place into the buffalo sauce, rolling them around to coat evenly.  Place the balls on a baking sheet and pop into the oven for 10-12 minutes until the internal temperature reaches 165 degrees.  Remove from oven and serve.   This makes enough for 2-5 friends, depending upon the size of the appetite and the other dishes on the table!

DSC_0097

Serve with blue cheese dressing, ranch, celery, carrots or whatever you love with wings (beer).

DSC_0087

March Madness, Buffalo Chicken Balls, Clean Fingers, Happy Wife and Beer- Husbands delight!!

DSC_0128

Happy St. Patricks Day, and Happy Selection Sunday- GO ACC & SEC!!!!!!

Barbeque Chicken Cornbread Ebelskivers

Ever had an Ebelskiver?  They are basically a stuffed pancake ball, think of a flapjack with your favorite topping turned into a popper.  The Danish are credited for this traditional sweet breakfast treat, originally stuffing them with sweet cinnamon apples.  While the original apple flavor is hard to beat the versatility is seemingly endless. 

In honor of professional football starting this weekend (Go Steelers), I thought I would try a tailgate friendly Ebelskiver.  BBQ chicken and cornbread are two common dishes found at these football celebrations, and both would be perfect for an Ebelskiver.  

BBQ Chicken Cornbread Ebelskiver

Toss the chicken, barbeque sauce and scallions together in small mixing bowl.  Place your Ebelskiver pan on medium low heat.  When it is warm, add a tablespoon of batter into a well.   Add a tablespoon of the chicken mix into the center of the batter filled well.  Allow to cook for a few minutes and carefully rotate with 2 wood skewers.  Allow to cook another 2-3 minutes.   Repeat with remaining batter and filling.  This recipe makes about 16 Ebelskivers.

Does anyone else have to throw out the first pancake they make?  The first Ebelskiver you make, might not be the prettiest, but by the end you fill find your “juju”.    You can make the Ebelskivers the day before and reheat them in the oven the next day, great for a busy Sunday. 

These little guys can be made sweet or savory, how about chocolate peanut butter or maple walnut?  Turn them into savory with ham and gruyere or even turkey and brie.  Use pancake batter for sweet and lesson the sugar for savory. 

These are a great answer to the tired slider.  The poor slider is getting a bad rap for overuse, but we just can’t let it go-

You can buy a pan here– I recommend this one as opposed to others – the nonstick is durable and I have had a lot of luck with mine over the last 3 years-

They are simple enough to get the kiddoes involved as well.   The one thing I would warn everyone is….never put them on menu for 100’s of people.  It is just not a good scene- Ebelskiver for 800 people anyone?  Never again!!! 

Here’s to an injury free and exciting football season!  And Go Steelers!!

Clay Roasted Herb Chicken

With the Fall season fast approaching, evident in all the magazines that have apples or pumpkins on the covers, the football fever that is spreading like wild fire, and the mad race to get the first Pumpkin Latte from Starbucks- who wouldn’t be ready to break out the jeans and the indulge in the comforting fall food! 

One of my favorite dishes to cook thru these months is herb roasted chicken- I just love the way the scents fill the house.   Over the last winter holiday, I picked up a Roasting Clay Kit from William-Sonoma and decided to finally use it to kick off the first College Football Weekend with a roasted chicken.  Unfortunately- William-Sonoma no longer sells the kit, however, one of these will be a little easier and equally tasty, I am sure.  Just perhaps not as fun. 

We have a jungle of basil and rosemary growing in our back yard, which filled the bird quite well.   Add an onion, cracked black pepper, a few tablespoons of butter smeared over the chicken, a healthy dose of kosher salt and the bird is ready. 

Just wrap it with some butcher twine so it cooks evenly and you’re set.

We covered the chicken with parchment paper to protect it from the clay before we rolled the clay out.  The clay was treated like pie dough- stretching it out to cover and secure the chicken.   We clinched the edges tightly to prevent any tiny air pockets.  Now into a 425 oven for an hour and 20 minutes.

We pulled the chicken out and allowed it to rest 15 minutes before taking the mallet to it (clearly, this is the best part). 

Our clay roasted chicken came out very flavorful and tender.  The clay trapped the juices and heat into the bird, giving us the most succulent chicken I have had.  Hands down.

I quickly added a Clay Pot to my wish list, I recommend you follow suit! 

Happy Football Weekend!

Dried Lemon and Curried Chicken with Almond and Raisin Popcorn Rice

Inspiration from Dubai!

A couple of friends dropped a gift bag on my desk a few weeks ago filled with curries, spices and dried lemons from Dubai.   How lucky, and for no reason- just because they’re nice guysJ.  I have never seen dried lemons before, much less cooked with them so I was really excited, absolutely LOVE new ingredients!  Traditionally dried lemons are used in Middle Eastern and Persian cooking.  The lemons are picked when they are ripe, then boiled and salt water and dried in the sun.  They have a strong sour flavor so they should be “cooked with” not eaten as you can other dried fruits.   I took my friends recommendation and decided to try the lemons out with a roast chicken. 

Dried Lemons and Curry, what a great gift!

The flavor was light and delicate, but the aroma of the lemons was strong, a great combination.  The lemons are traditionally used in stews, which will be next!

Dried Lemon and Curry Chicken with Almond and Raisin Popcorn Rice

Chicken Marinate

  • 1 roasting chicken
  • 2 tablespoon olive oil
  • 1 ½ tablespoon medium curry
  • 1 tablespoon kosher salt
  • 1 teaspoon fresh ground black pepper
  • 2 dried lemons, split in half
  • 1 inch ginger root, sliced

To prepare the chicken, start by rinsing the bird with water and patting it dry with paper towels.  Place the chicken in a roasting pan and pour the olive oil over it, spreading it evenly over the chicken.  Sprinkle the curry, salt and pepper all over the chicken, including the inside cavity.  Place the sliced ginger and dried lemon halves into the cavity and truss the chicken.  

Ginger and Lemons to stuff the bird with!

Spool of Twine

Trussing the chicken is a great way to keep the bird cooking evenly.  There are many methods to truss a chicken, but the as long as the legs and wings are kept close to the body and the cavity is closed you will have an evenly roasted chicken!


I like to roast chicken at 475°F for 25 minutes and then turn the oven down to 400°F for another 45 minutes or until the thickest part of the thigh hits 165°F on a meat thermometer.  Great color, Great flavor and plenty of juice!

To go with this chicken I made a flavorful rice, using one of my favorite types of rice- popcorn rice.  Sir Wes and I discovered it on a trip to New Orleans a few years ago and have been hoarding the bags for special meals only.  It has a rich, nutty flavor and is very aromatic.  The flavor is great all by itself but for this meal I added a few twists.

Popcorn Rice is Gourmtastic!

 Almond and Raisin Popcorn Rice

  • ¼ cup diced yellow onion
  • 2 tablespoon olive oil
  • 1 cup of popcorn rice, rinsed in water and pat dry
  • 1 cup chicken stock
  • 1 ¼ cup water
  • 2 tablespoons chopped cilantro
  • 3 tablespoons toasted almond sliver
  • 4 tablespoons raisins
  • Fresh ground black pepper

Heat olive oil in saucepan over medium high; add in onions and sauté for a minute.  Add rice and sauté for a few more minutes.  Toasting the rice like this will refresh it, who knows how long it has sat on the shelf; it will also enhance the natural flavors of the rice.  Add the chicken stock and the water and bring to a boil, turn the heat down to low and cover the saucepan with a lid.  Allow the rice to cook for about 40 minutes.  The water should be absorbed and the rice tender.  Fluff with a fork and add in the cilantro, almonds and raisins.  The raisins will rehydrate naturally as they sit with the hot rice.  Sprinkle with ground black pepper before serving.

Inspiration from Dubai!

Serves 3-5 really good friends depending how hungry they are!