Green Tomato and Fig Cakes- Taking Chances In The Kitchen

I saw these a few weeks ago and they have not left my head, my curiosity was peaked, I had to know.  The flavor combination in a dessert  was too strange to let go, but after thinking about it I realized green tomatoes don’t have a ton of flavor and would likely pick up the flavor you pair with it.  I was right.

DSC_0275

Not a lot of tomato flavor, but still super tasty, they had a comparable flavor to carrot cake, but less sweet, without as much sugar.  The petite cakes are moist even a few days later.  Overall I give them an A (skipping the plus as I really wanted to taste the tomato more) but certainly good enough to eat for breakfast, which is of course the international sign of good desserts.

DSC_0289

Modified from Cooking Light 2013

Ingredients 

  • 8 ounces green tomato, cored and quartered 
  • 7.6 ounces cake flour, sifted (2 cups) 
  • 1 teaspoon baking powder 
  • 1/2 teaspoon baking soda 
  • 1/2 teaspoon ground cinnamon 
  • 1/4 teaspoon salt 
  • 1 cup granulated sugar 
  • 1/2 cup canola oil 
  • 2  large eggs
  • 4 ounces dried figs
  • 6 ounces orange juice 
  • 2/3 cup chopped walnuts 
  • Cooking spray
  • 2 ounces 1/3-less-fat cream cheese
  • 3/4 cups powdered sugar 
  • 1/2 teaspoon vanilla extract 
  •  Dash of salt 
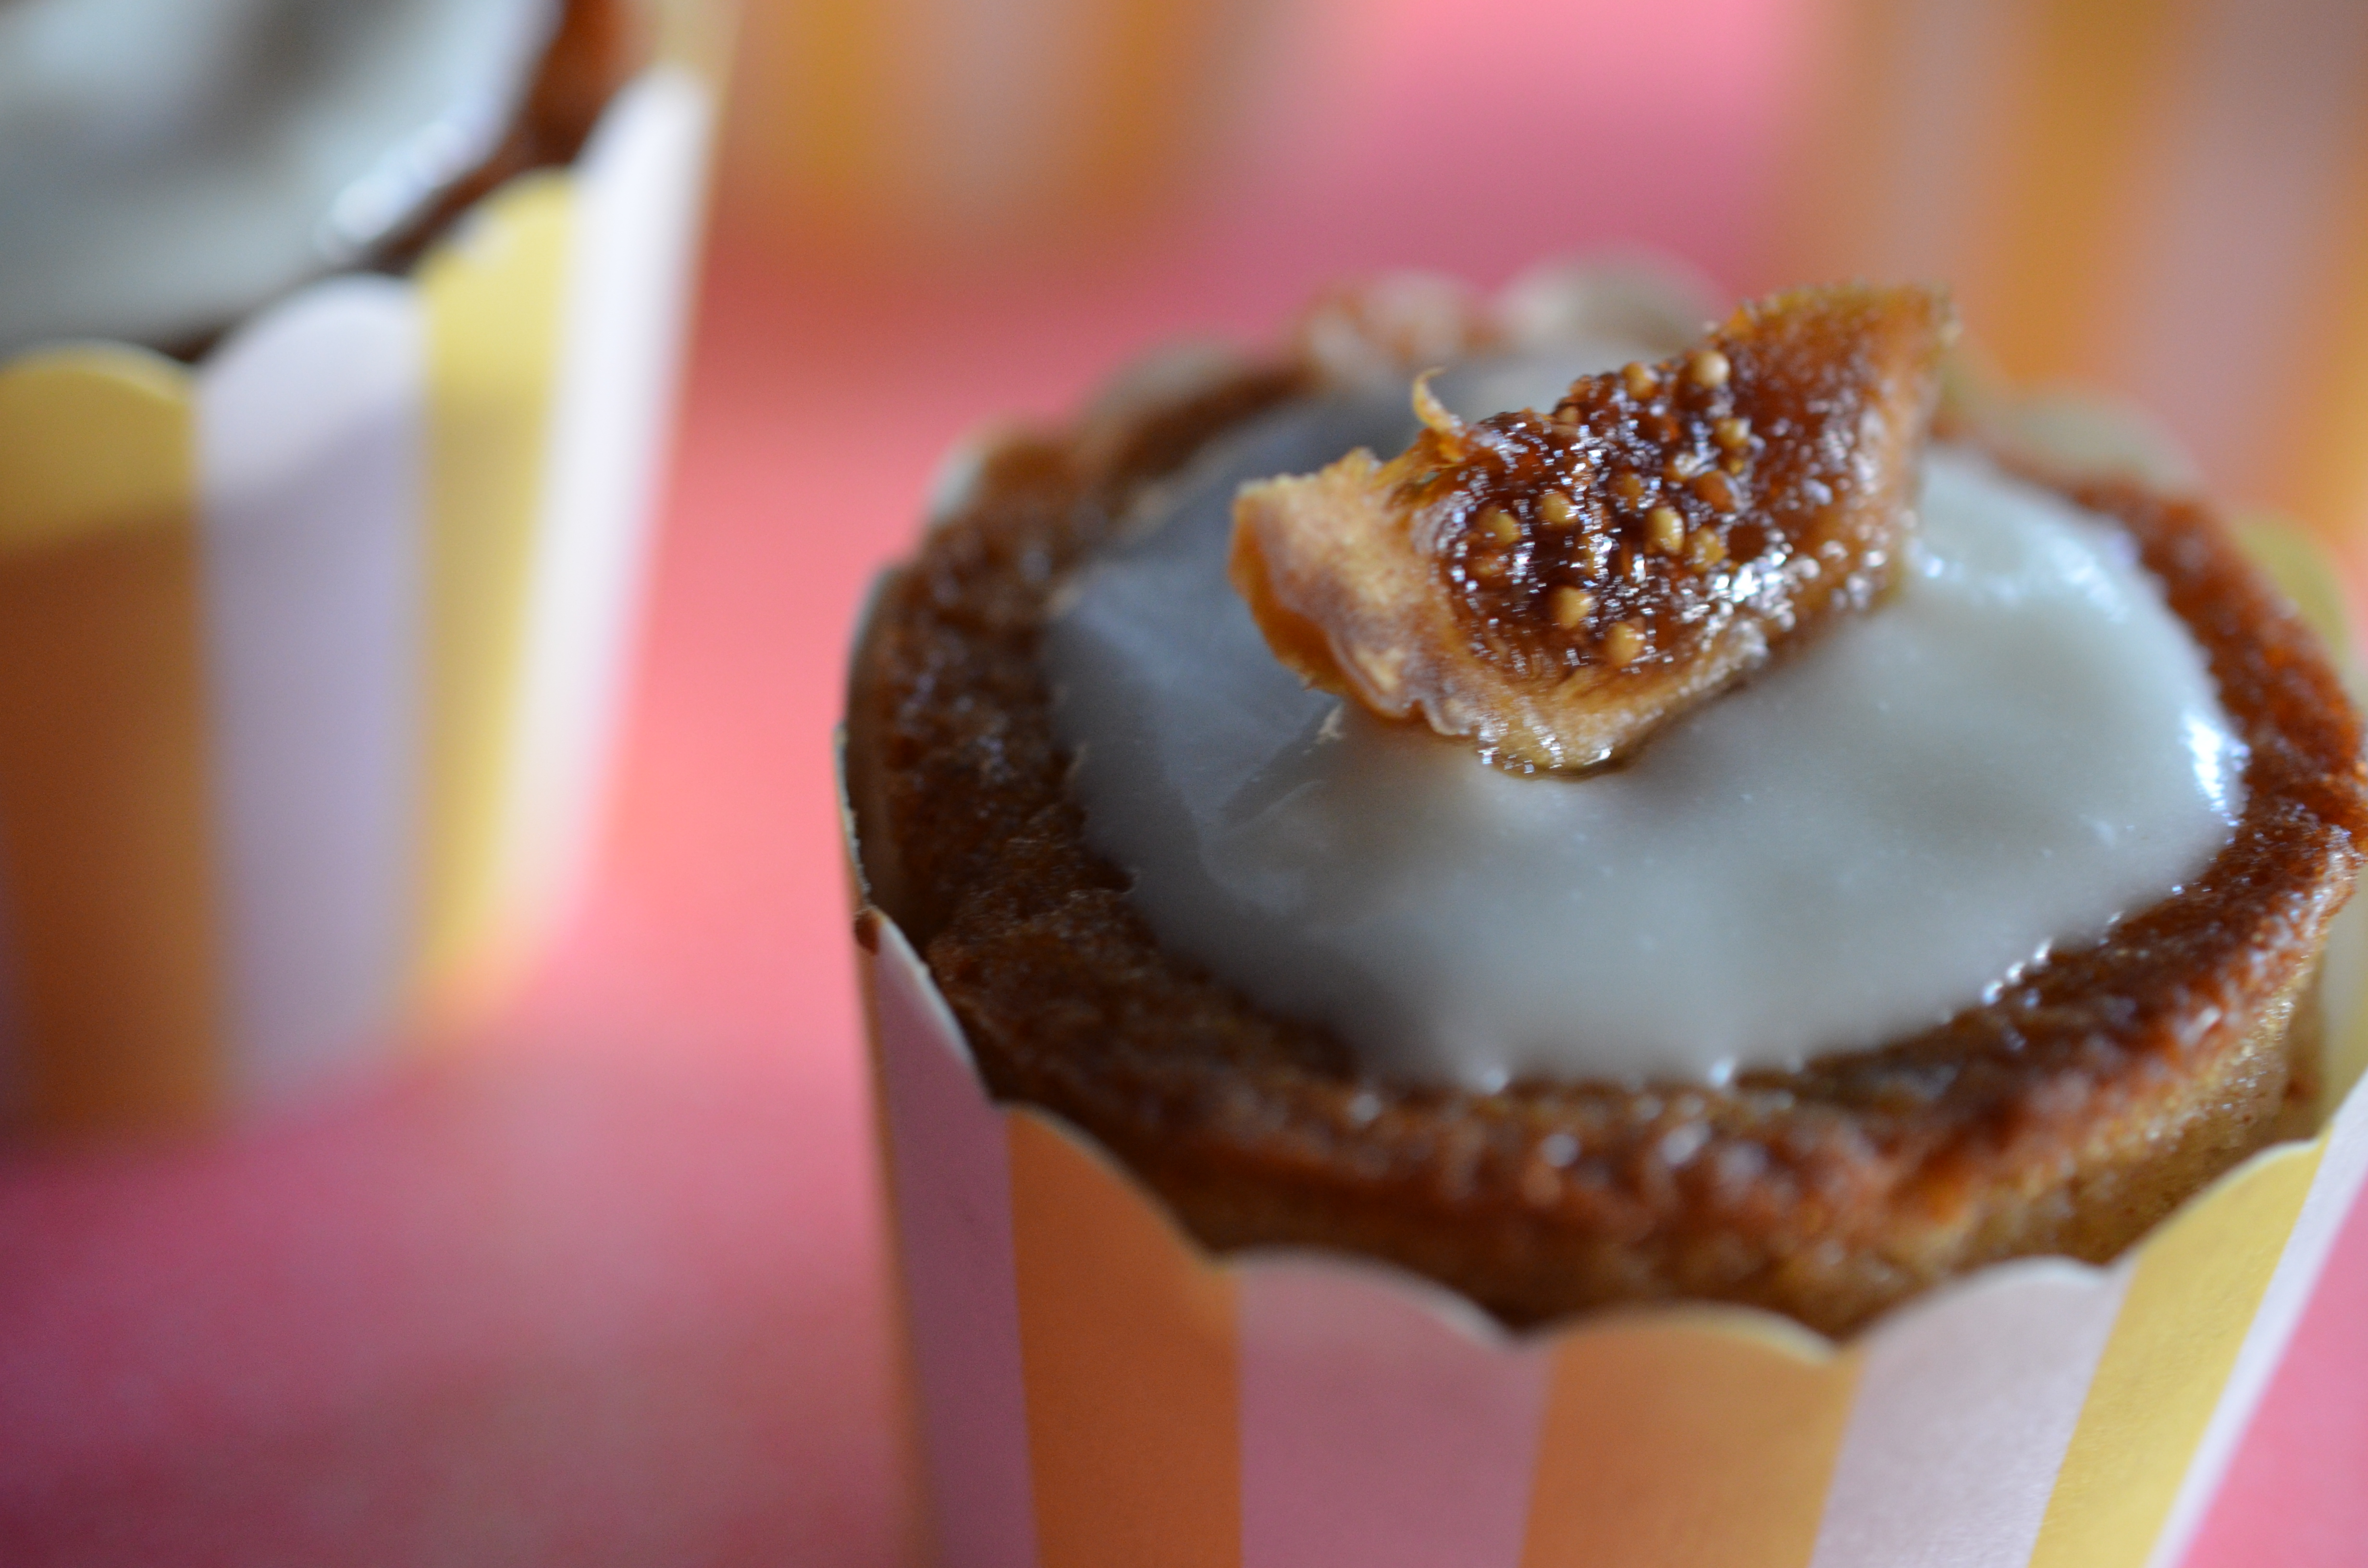
  •  Sliced figs garnishes

DSC_0292

Preparation

Preheat the oven to 350°.

Place tomato in a blender; blend until smooth.

Weigh or lightly spoon flour into dry measuring cups; level with a knife. Combine flour, baking powder, baking soda, cinnamon, and 1/4 teaspoon salt in a bowl. Place sugar, oil, and eggs in a large bowl; beat with a mixer at high speed until blended. Stir in tomato puree and orange rind. Add flour mixture to egg mixture; beat at low speed just until combined.

In a small sauce pan add the orange juice and dried figs.  Bring to a simmer and cover for 5 minutes.  Remove from the stove and take out the figs of the juice.  Allow to cool to room temperature before chopping into small ¼ inch pieces.  Stir in chopped figs and walnuts into the batter.

Place 18 muffin cup liners in muffin cups; coat liners with cooking spray. Spoon the batter into cups. Bake at 350° for 17 minutes or until a wooden pick inserted in center comes out with moist crumbs clinging. Cool in pans 5 minutes. Remove from pans; cool completely on wire racks.

Place cream cheese in a large bowl; beat with a mixer at high speed until smooth. Add powdered sugar, vanilla, and dash of salt; beat until smooth. Spread frosting over the top of each cake. Garnish with sliced figs, if desired.

DSC_0262DSC_0349

I cut the cream cheese icing in half, as I wanted to lighten them up more.  Feel free to double the icing ingredients if your looking for a heavy iced cupcake.

DSC_0334

When you see something that you can’t let go, you just have to go for it!  It might not be exactly as you hoped, but we all know not everything turns out the way you hope.

Green Tomato with dessert? I am a fan!

Advertisement

English Pea and Mint Crostini’s **Summer Simplicity

Summer is always a great time to look for light and healthy food.  And equally important easy, quick food!   The convenience of having some “go to” fast dishes for summer evenings, cook outs and family gatherings is amplified over summer.  I especially love the ones that travel well, I feel so fancy when I pack “apps” in a cooler for the beach- goes perfect with vino at sunset!

DSC_0250

Have to admit- when I see things that my Mom, Queenie, can do without calling me 3 times, and they look tasty, I am immediately attracted to them.  I just don’t like spending all day in the kitchen on the weekends in the summer- so simple, quick and tasty is perfect.

DSC_0304

My grandmother, Madame Margo, told me over 10 years ago about a dish she made with peas and mint, and I think maybe Greek yogurt…I stored the flavor combination away in my brain until a few months ago when I saw the them being played with more often.  We actually had a cooking competition the other day at work, based on the TV show “Chopped”, where the dessert ingredients the participants were given included English peas, ricotta and oranges.  I wanted to scream at them, mint, mint!!  But actually I found myself most impressed with one making something like a pea and ricotta ice cream with and orange sauce, I loved the high creativity!

Pea and Mint Crostini’s

Ingredients

  •  10 ounces frozen green peas, or fresh spring peas    
  • ½ cup part-skim ricotta cheese    
  • ¼ cup mint leaves, without stems    
  • 2 tablespoons fine grated parmesan cheese    
  • 1 tablespoon extra-virgin olive oil
  • 1 teaspoon chopped garlic
  • ½ teaspoon kosher salt    
  • ¼ teaspoon fresh ground black pepper
  • Butter spray/ cooking spray
  • Small baguette bread, cut into 24  1/3 inch thick slices    
  • Fresh tomatoes for garnish

Method

In a 2 quart sauce pan filled halfway with water heat over medium high until water comes to a boil.  Add the peas and return to a boil for one minute. Drain the peas into a colander and rinse with cold water.

In a food processor put the drained peas, and pulse.  Add ricotta, mint, Parmesan, oil, garlic, salt and pepper and blend until mostly smooth.  Transfer into a serving bowl and refrigerate or 30 minutes.

While the spread chills, preheat oven to 325°F. Arrange the bread slices on a parchment paper lined baking sheet  and spray with the butter spray.  Bake until lightly golden and crisp; cool and store in an airtight container until ready to serve.

Assemble just before serving with a tablespoon of spread on each piece of bread.  Garnish with tomato.

DSC_0262

The pea spread can be made a few days before and kept in air tight container- a perfect “get ahead” appetizer.  The bread toasts are best made the day of, but if kept in an airtight container you can do the day before.

DSC_0258

Inspired by my grandmother creativity and knowledge, and my mom’s love of life outside the kitchen!  With those two ladies in mind it is hard to not come out great!

Silver Queen Corn Risotto

My husband, Sir Wes, took a trip to his hometown recently, Fairhope, Alabama, AKA- LA.  He thoughtfully brought me back a sack of fresh Silver Queen corn from one of the local delicatessens of lower Alabama.   The roads of southern Alabama are filled with stands selling the local bounty, and I, along with the rest of Alabama just love it!  We had a few cobs before we had to head out of town so I cut the rest off the cob and stuck it in the freezer for another day.

Silver Queen Corn in all its glory!

While summer usually demands light and easy food, there are times when you crave a rich, comfort dish.  Making a risotto out of summer corn provides a little bit of both!

Alabama Risotto

Silver Queen Corn Risotto

  • 1 tablespoon olive oil
  • ¼ cup diced onion
  • 1 teaspoon chopped garlic
  • 2 ¼ cup Silver Queen Corn kernels, feel free to substitute your favorite local corn
  • ¼ cup white wine
  • 1 ¼ cup chicken stock
  • 1 tablespoon white corn meal, PAN is the brand I use
  • ¼ cup buttermilk
  • ¼ cup milk
  • ½ cup shredded parmesan
  • 2 tablespoon chopped basil
  • Kosher salt
  • Fresh ground black pepper

Mise en Place for a untraditional risotto!

Start by heating the olive oil in a medium pan and add the onions and chopped garlic.  Sauté over medium high heat for a few minutes until the onions become translucent.  Add corn kernels and sauté until slightly toasted, bringing out the natural corn sugars.   Add the wine and deglaze the pan.  Slowly add the chicken stock, ½ cup at a time simmering to release the starches from the corn.  Sprinkle the corn meal into the pan and stir continuously, while the broth starts to thicken.  Pour in both milks, simmering for a few minutes; afterwards adding in the parmesan and basil.   Season the risotto with salt and pepper.  Serve immediately.  Add in grilled shrimp or chicken to make a perfect meal!

Serves 2- 4 people.

Sweet and Cream Corn Riso!

Thanks to Sir Wes for this great gift from the Alabama farmers.  If you haven’t ever tried this variety of corn, you must!

Silver Queen Corn Risotto

Basil adds the perfect touch!

Cheers to long summer days, pool pruned fingers and the gifts from the cornfields!

Honey Ginger Root Vegetables

I was lucky enough to get a thank you package in the mail from a farm, full of greens, roots, and a ton of other veggies from a dear friend! We have been having a smorgishboard of vegetables this last week, and are loving it! 

Surprise!!


Farm on my counter=AWESOME!!!!!!!!!!

 A great “accessory” to vegetables will even turn the biggest vegetable haters into fans!  Adding a nice sauce, butter or flavor profile to your veggies is a great way to change it up and get those nutrients into your diet. 

Beautiful Roots!


 Below is a great method for cooking beets and other roots, no need to peel, which is the most time-consuming, pain in the butt part of beets. 

  • 1/2 pound root vegetables (turnips, beets, rutabegas)
  • 1/2 cup water
  • 1/4 cup olive oil
  • 1 tsp kosher salt
  • 1/4 tsp black pepper

    Out of the oven!

Preheat oven to 425.  Place whole, washed and scrubbed vegetables in oven proof baking dish and add water, oil and seasoning, stir a bit and cover with foil.  Roast in oven for 60 minutes.  Allow to cool to the point you can handle the vegetables, the skin should peel off very easily.  After the skin is removed cut into bite size pieces. 

Easy to peel!

  • 1 tbsp honey
  • 2 tbsp olive oil
  • 1 tbsp fresh chopped ginger
     

Stir honey, oil and ginger together.  Toss the cut roots with the honey ginger sauce and saute over medium high until they start to get nice caramelized color.

Saute until nice and caramelized

 
Honey Ginger Root Vegetables- Dig in!
And ENJOY eating your veggies~