Graduation Champagne Sangria

High school graduation is around the corner for us, and it seemed like a good idea to plan a way to soften the blow for Sir Wes.  His daughter will be walking the stage to receive her diploma and officially into the real world!  An exciting time for all, but also one that will smack Wes in the face with where did the time go!

DSC_0261

Take a sip Wes!

Champagne Sangria

Ingredients

  • 1 cup packed fresh mint leaves plus mint sprigs for garnish
  • ¼ cup sugar
  • ¼ cup water
  • ¼ cup cranberries, strawberries, blueberries or your choice of fruit
  • ¼ cup brandy
  • 1 chilled 750-ml. bottle Champagne or sparking wine

DSC_0280

Preparation

Mint Simple Syrup:

In a small saucepan, combine the sugar, water, and mint over medium heat. Bring to a boil, reduce heat, and simmer for 5 minutes, stirring occasionally, until the sugar has dissolved. Add the berries of your choice (we don’t want to “kill” the berries with heat, but also want to get the flavor in there too) and remove the pan from the heat and allow the syrup to cool for 20 minutes. Pull out the mint leaves before using.

Pour the mint simple syrup into a large pitcher.  Stir in the wine and the brandy and chill the sangria, covered, for 1 hour.  Pour the sangria into tall glasses filled with ice cubes and garnish each drink with mint sprig.

DSC_0257

His little girl is growing up!  As much as we know she will soar, ….his little girl is growing up.  Be proud Sir Wes!!

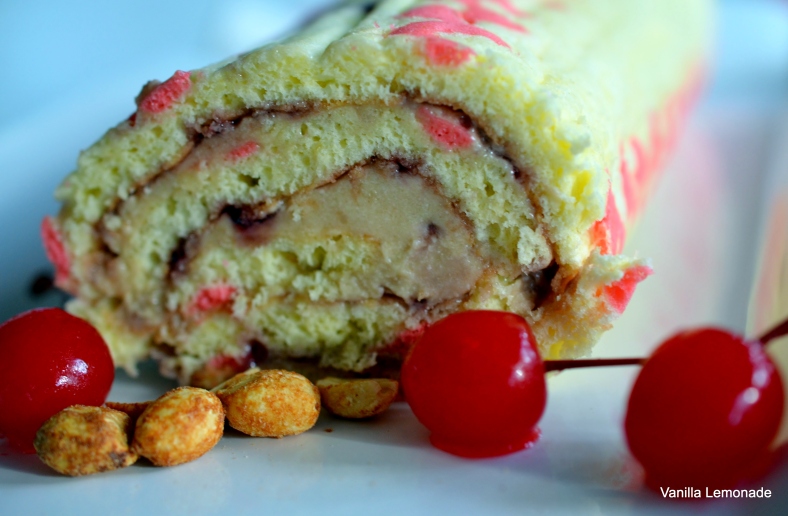
Peanut Butter Jelly Chevron Cake Roll

Love when food trends follow fashion trends.  How adorable is this chevron pattern on a traditional jelly roll.  I credit Pinterest with popularizing food that is so darn cute in the everyday households.  It’s fun to watch all the adorable treats popping up on social media.  And wouldn’t this be great on an Easter brunch table?

DSC_0791

I loved the idea of honoring the 1850s jelly roll then with classic flavors of peanut butter and jelly.

DSC_0765

Ingredients

Cake:

  • ¼ cup powdered sugar
  • Nonstick cooking spray
  • 1 cup all-purpose flour
  • 1 teaspoon baking powder
  • ¼ teaspoon salt
  • 4 large eggs
  • 1 cup granulated sugar
  • 4 tablespoons water
  • 1 teaspoon vanilla extract

Filling:

  • 8 ounce cream cheese, softened
  • 1 cup powdered sugar
  • 1/3 cup peanut butter
  • ½ teaspoon almond extract
  • 10 ounces fruit jelly

Directions

Cake:

In a medium mixing bowl, whip the eggs until frothy. Slowly add sugar, water, vanilla and flour mixture, scraping bowl occasionally.  Take out about 1/4 of the batter and add a few drops of food color to get to the desired color.

Place the colored batter into a piping bag with a small flat tip and make the zig zag pattern onto the wax paper.  You can find patterns on line to print out and trace, or make your own with a sharpie marker on a piece of parchment paper placed under the wax paper.

Bake the patterned batter for 2 minutes; allow cooling for 3 minutes and then spreading the rest of the batter on top.  Bake another 9-11 minutes.

Immediately loosen the cake around the edges and invert cake onto prepared towel. Carefully remove paper. Roll the cake, beginning at the narrow end. Cool on a wire rack for 45 minutes.

Filling:

Add cream cheese, powdered sugar, peanut butter and almond extract to a medium bowl and beat until well mixed. Carefully unroll cake and spread the peanut butter cream evenly to edges. Follow by spreading the fruit jelly over peanut butter.

Gently roll the cake and wrap in plastic wrap; refrigerate at least 3 hours before serving.  Slice and serve with fresh fruit or berries.

DSC_0784

This is such a fun, playful way to present a jelly roll cake.   The peanut butter and jelly filling is going to take you back to the lunchroom table, where everything is cute as a polka dot and sweet as a sprinkle!

DSC_0763

Let your inner child and fashionista meet in the kitchen!

This is what I used https://appliancereviewer.co.uk/best-ovens/

Work Vs. Play- Buffalo Chicken Samosas

I’ve been on a blog-acation recently- With a new job, or role as we call jobs at WDW, I had to set some of my hobbies on the back burner until I came a little more comfortable at work. Not to say I haven’t been cooking and definitely not to say I haven’t missed working on blog stuff, I just could not juggle it all.  Being a chef at an African/Indian restaurant has certainly influenced the ingredients that are stocked in our refrigerator at home, I mean, now I make my own bread with a bread machine from www.Village-Bakery.com and much more. Sir Wes seems to be just fine with that, especially when I made my first samosa dough filled with buffalo chicken.

DSC_0010

I am clearly not the best at forming samosas, but I started to get the hang of it towards the end. And then I saw how they all looked like cattle heads, I had to laugh at myself. Good part is they ate just as well as a perfectly formed samosa!

DSC_0007

They are actually pretty simple to make, and I think the kids would love to get their hands dirty with these.   I’ll even go as far as saying they are well balanced to on the diet spectrum!

DSC_0032

Pastry

1 cup whole wheat flour

1/8 teaspoon kosher salt

1/8 teaspoon ground cumin

2 tablespoons olive oil

1/4 cup water, at room temperature

1 pound chicken thigh/breast meat, cooked and cooled

Favorite buffalo sauce

To make the pastry:

Combine the flour, salt, cumin, and oil, in a medium bowl. Mix until the oil is evenly distributed. Mix in the water, and knead for 2 to 3 minutes, or until it is smooth and has the consistency of bread dough. Set aside while you prepare the filling.

Season the cooked chicken with the buffalo sauce to taste preference. Make sure it is enough to wet and coat the chicken as some of it will bake away.

Preheat the oven to 425 degrees F.

Divide the dough into 4 sections and form each into a smooth ball. Using your hands, press each ball into a flat disk. Dust a clean working surface with flour so the dough doesn’t stick, and using a lightly-floured rolling pin, roll a disk into a thin circle, thick as a tortilla and cut the circle in half. Take one of the half circles and make a cone shape starting at the center of the cut side to make the point of the cone and then wet the edges with a little water to bond the overlapping the edges together. Put 1-2 oz of filling into the cone, moisten the top of the inside edges and close the cone, pressing the edges to seal it. Brush with olive oil on each side of the samosa and then place it on a baking sheet. Repeat the process to make about 12 samosas. Sprinkle with sea salt and place the samosas in the oven, and bake for 20 to 25 minutes, or until the samosas are nicely browned. Serve with the blue cheese dressing.

DSC_0012

I am happy to get back to the blog finally, while work was and always will be my priority, I think I am settling in to the new routine! Will see how the new cuisine I am working with comes into play at home!

Ginger and Fruit Muesli

Swiss physician Maximilian Bircher-Benner introduced Muesli around 1900 for patients in his hospital, which required a diet rich in fresh fruit and vegetables.  He had been served a similar dish when taking a long hike thru the Swiss Alps.   A healthy breakfast that sticks with you- yes please!

DSC_0039

I added ginger to get an extra layer of flavor, not to mention add nutritional values that ginger offers- digestive, sinus and more.  I am especially fond of a little kick start in my breakfast, like it gets the blood flowing and energy zipping!

DSC_0052

Ginger and Fruit Muesli

  • 1 tablespoon brown sugar
  • 1 tablespoon honey
  • 1 tablespoon orange juice
  • 2 tablespoon ginger
  • Pinch of kosher salt
  • 1 ½ cup milk
  • 1 cup greek yogurt
  • 2 cups raw oats- not instant
  • 1 apple, diced into ¼ inch cubes
  • 1 red pear, diced into ¼ inch cubes
  • ¼ cup raisins
  • 2 tablespoons chopped walnuts
  • 2 tablespoons sliced cranberries

Directions

In a small mixing bowl, mix together brown sugar, honey, orange juice, ginger and salt together.  Add in the milk and yogurt and mix well.  In a separate large mixing bowl combine the remaining 6 ingredients, and stir in the yogurt mixture.  Cover and allow to sit 4 hours or overnight.  Stir well before serving.  Garnish with fresh mint or berries.

Serves 6 guests.

DSC_0042

This is a healthy, make ahead, easy dish to throw together for quick, on the go morning meals that are so easy to skip.   I made a batch and we had a few breakfasts with it while the rest went into Tupperware.  Slowly the Tupperware got emptied by me sneaking a spoonful here and there when those hunger pains struck.  Both filling and satisfying!

DSC_0034

Make your own Muesli by changing the fruit, or even adding different juices, it is hard to mess up Muesli as longs as you keep the oats to “liquid” in proportion.   Play with flavors and create your own!

Scratch Made Jumbo Oreos- Love in a Cookie Form!

“If you really want to make a friend, go to someone’s house and eat with him…the people who give you their food give you their heart.” —Cesar Chavez

Food creates memories, transports you to places of past or far way.  How many arguments have you defended your moms meatloaf or your dad’s BBQ as being the best?  What Little Debbie takes you back to the lunch room where life was all about talking your parents into letting you go to your friends house after school?  When you walk down the cookie aisle, what package jumps into your cart because you haven’t had it in years?  Whether food instills memories, remembrance of a mothers love or a cherished tradition, we all have those go to items that take you to another place.

DSC_0114

The many ways to eat the Oreo- often the discussion at the school lunch room table when someone’s mom packed them into a metal lunch box.  Quite the debate, twist and lick, double milk dip, prefer double stuff or straight up, plenty of heated conversation to fill up a lunch period.  I can remember strategically planting myself next to the “boy of the moment” when I had the occasional Oreos packed in my lunch- surely he could not resist me or my Oreos that day and would become my forever boyfriend.

DSC_0115

30 years later I tried again, this time successfully but I went with a homemade version of the iconic cookie- Wes agreed, if cookies kept making there way into his lunchbag, he would assume the role of my forever boyfriend, on top of being my husband.

I used the recipe from Flour Bakery and Café

Ingredients

Cookies

  • 1 cup unsalted butter, melted
  • 3/4 cup sugar
  • 1 teaspoon vanilla extract
  • 1 cup semi-sweet chocolate chips, melted
  • 1 egg
  • 1 1/2 cups flour
  • 3/4 cup unsweetened cocoa powder
  • 1/2 teaspoon baking soda
  • 1 teaspoon salt

Filling

  • 1/2 cup unsalted butter, at room temperature
  • 1 teaspoon vanilla extract
  • 1 2/3 cups confectioners’ sugar, sifted
  • 1 tablespoon milk
  • 1 pinch salt

DSC_0105

Directions

Cookies:

  • In a medium bowl, whisk the butter and the sugar until combined. Whisk in the vanilla and melted chocolate. Add the egg and stir until well blended.
  • In another bowl, combine flour, cocoa powder, baking soda, and salt. Stir to blend them. Using a wooden spoon, stir the flour mixture into the chocolate mixture. The finished dough should feel like Play-Doh. Cover the dough with plastic, and set aside for 1 hour or until firm.
  • Place the dough on a long sheet of parchment paper. Use your hands to shape it into a rough log, about 10 inches long and 2 1/2 inches in diameter. Place the log at the edge of the parchment. Roll the parchment around the log. With your hands on the paper, roll the dough into a tighter log, keeping the diameter the same.
  • Refrigerate the dough for at least 2 hours, or until it is firm enough to slice without crumbling.
  • Set the oven at 325 degrees. Line 2 baking sheets with parchment paper.
  • Remove the dough from the paper. Cut the log into 32 slices, each a quarter-inch. Set them on the baking sheets 1 inch apart.  **I cookie used stamps somewhat unsuccessfully as the cookies rose a bit and lost their pattern.  Going to have to retry the stamp on more of a shortbread cookie.
  • Bake the cookies for 20 to 25 minutes, checking them often after 15 minutes, or until they are firm when touched in the center.
  • Cool completely on the sheets.

DSC_0168

Filling:

  • In the bowl of an electric mixer, beat the butter on low speed for half a minute. Add the vanilla and confectioners sugar and beat until smooth.
  • Beat in the milk and salt. The filling will look and feel like spackle.
  • Place 1 tablespoon of filling on the flat side of 16 cookies. Press the remaining 16 cookies on the filling, flat sides against the cream, to evenly distribute the filling.

Store in an airtight container for up to 3 days.

DSC_0106

Food has power to connect people to loved ones, to memories and even future goals.  The are experiences and artistry within food, dishes and meals that tell stories from both sides of the plate.  As the chef creates moments and emotions that the diners are left to interpret and enjoy.

A small moment in my life with the boy at the lunch room table and an Oreo, captured the heart of my husband all over again.

Bread Fruit Coconut Sesame Tart

Breadfruit, a tropical fruit, known as Ulu in Hawaii, has a versatile flavor profile, which changes as it ripens.  Much like a plantain, sweet potato or a pumpkin, it can be used in both savory and sweet dishes.

DSC_0957

When I bought this I planned to make fritters, but one thing after another got in the way and the green bumpy ball became softer and sweeter.  When I cut into it I had to make a quick change of dinner plans and go straight for dessert.

DSC_1013

A quick look in the pantry and based on some recipes I read I came up with a coconut sesame breadfruit tart.  The tropical flavors were transporting, I drizzled a rum caramel over it and felt like an island girl.

DSC_1042

 Ingredients

  • 2 ½ pound ripe breadfruit, split and flesh removed
  • ¾ cup sweetened shredded coconut, toasted
  • ¼ cup sesame seeds, toasted
  • 1 lime, zest
  • 2 eggs
  • ¾ cup milk
  • ¼ cup sugar
  • ½ teaspoon baking soda
  • ½ teaspoon baking powder
  • ¼ teaspoon kosher salt

DSC_0968

Preheat oven to 350.  Combine all the ingredients into a mixer with the paddle attachment, (or of course use a mixing bowl and your muscles).

Pour into a nonstick, greased tart pan and bake for 60 minutes until center is set.

Serve warm or at room temperature with a quick drizzle of your favorite caramel.

DSC_1032

If you get a chance to cook with fresh bread fruit, sweet or savory I say “go for it”.  They make a great palate for an artist in the kitchen!

The Magic That Happens in Walt Disney World Catering!

As some of you may or may not know, I spent the last 15 years working in catering at Walt Disney World.  It is where I learned to boil water, as people say when you know nothing about cooking!  I’ve been so fortunate to work with countless talented and creative people, and been able to be a part of many amazing events!

DSC_0514

I am now switching gears now to the Food and Beverage line of business at Walt Disney World, more specifically; I am moving on to being a Sous Chef at Sanaa, at Disney’s Animal Kingdom Lodge.  I could not have landed in a more beautiful restaurant and flavorful cuisine!

I went thru my picture files for about an hour and grabbed some of my favorite pictures that capture just a few of my most memorable events.

I have been really lucky, truly, truly blessed! 🙂

Fortunately at WDW you never have to same good bye, just until next time!!!

Pumpkin Sage and Chicken Sausage Gnocchi- Creativity in the Kitchen

Quick fact about me- I have two bachelor degrees, Art History and Studio.  Art has always been a constant thru my life, since I was bored at the dinner tables as a young girl asking what I should draw with the free box of crayons, to the present day sitting in the chef meetings “taking notes”.   When asked though by people how I ended up in the culinary profession, it takes some people a few minutes to connect how being a chef and art degrees correspond.  Yes,food is tasty, but it should also draw out emotion or memories, in other words- is art.

DSC_0740

I have made gnocchi fresh a bunch of times and have found it really simple, you just have to be careful of over mixing the when you add the flour, like all dough’s.  I started off using this recipe from Michael Chiarello and now I am able to eyeball it.  Anytime I have the chance to make dough I am excited, it must be the get your hands dirty method involved!

DSC_0636

You know those look fun make!

DSC_0730

Gnocchi Recipe

Ingredients

  • Kosher salt
  • 1 pound russet potatoes
  • 3 to 4 large egg yolks
  • 1/2 cup freshly grated Parmesan
  • 1/4 teaspoon freshly grated nutmeg
  • 1/2 teaspoon gray salt
  • 1/4 teaspoon freshly ground black pepper
  • 1 cup all-purpose flour, plus more for dusting board and dough

Directions

Preheat the oven to 425 degrees F.

Spread a layer of kosher salt on a baking sheet and arrange the potatoes on top (see Cook’s Note). Bake until a bit overcooked, about 45 minutes. Let sit until cool enough to handle, cut in half, and scoop out the flesh. Reserve the potato skins, if desired, for another use and vacuum seal them, they stay 3-5 times longer fresh than without sealing them, I learned about vacuum sealers from Vacuumsealerre twitter page, everyone check it out. It will improve your food experience.

Pass the potatoes through a potato ricer or grate them on the large holes of a box grater. You should have about 2 cups. Make a mound of potatoes on the counter with a well in the middle, add 3 of the egg yolks, the cheese, nutmeg, salt, and pepper. Mix in the potatoes and mix well with hands. Sprinkle 1/2 cup of the flour over the potatoes and, using your knuckles, press it into the potatoes. Fold the mass over on itself and press down again. Sprinkle on more flour, little by little, folding and pressing the dough until it just holds together, (try not to knead it.) Work any dough clinging to your fingers back into the dough. If the mixture is too dry, add another egg yolk or a little water. The dough should give under slight pressure. It will feel firm but yielding. To test if the dough is the correct consistency, take a piece and roll it with your hands on a well-floured board into a rope 1/2-inch in diameter. If the dough holds together, it is ready. If not, add more flour, fold and press the dough several more times, and test again.

Keeping your work surface and the dough lightly floured, cut the dough into 4 pieces. Roll each piece into a rope about 1/2-inch in diameter. Cut into 1/2-inch-long pieces. Lightly flour the gnocchi as you cut them. You can cook these as is or form them into the classic gnocchi shape with a gnocchi board, ridged butter paddle, or the tines of a large fork turned upside down. Rest the bottom edge of the gnocchi board on the work surface, then tilt it at about a 45 degree angle. Take each piece and squish it lightly with your thumb against the board while simultaneously pushing it away from you. It will roll away and around your thumb, taking on a cupped shape — with ridges on the outer curve from the board and a smooth surface on the inner curve where your thumb was. (Shaping them takes some time and dexterity. You might make a batch just for practice.) The indentation holds the sauce and helps gnocchi cook faster.

DSC_0640

As you shape the gnocchi, dust them lightly with flour and scatter them on baking sheets lined with parchment paper or waxed paper. Set gnocchi filled cookie sheet in front of a fan on low for 1/2 hour (turning gnocchi after 15 minutes). If you will not cook the gnocchi until the next day or later, freeze them. Alternatively, you can poach them now, drain and toss with a little olive oil, let cool, then refrigerate several hours or overnight. To reheat, dip in hot water for 10 to 15 seconds, then toss with browned butter until hot.

DSC_0623

When ready to cook, bring a large pot of water to a boil and add salt. Drop in the gnocchi and cook for about 90 seconds from the time they rise to the surface. Remove the cooked gnocchi with a skimmer, shake off the excess water, and serve as desired.

Cook’s Note: Baking potatoes on a layer of salt allows heat to circulate 360 degrees. Scrape the salt into a jar and reuse it again and again. If you do not have time to shape the gnocchi, you can freeze the dough, defrost it in the refrigerator, and then shape it. To freeze shaped gnocchi, line baking sheets with waxed paper and dust with flour. Spread the gnocchi on the prepared sheets and freeze until hard. Remove to individual-portion-size freezer bags. Store in the freezer for up to 1 month. To cook, drop the frozen gnocchi into boiling salted water. Cook for about 2 minutes after they rise to the surface.

To finish the meal off I looked in the fridge to see what I had to make a sauce- a half a can of pumpkin, some chicken sausage and a green pepper; perfect for a Pumpkin Sage and Chicken Sausage Gnocchi Dish.

DSC_0741

Pumpkin Sage Sauce

  • 1 1/2 tablespoon olive oil
  • 2 tablespoon diced yellow onion
  • 3 garlic cloves, sliced thin
  • 1/4 cup white wine
  • 1 cup heavy cream
  • 1/4 cup pumpkin puree
  • 3/4 teaspoon ground sage
  • 1/4 teaspoon ground black pepper
  • 1/2 teaspoon sea salt
  • 1/8 teaspoon ground nutmeg

To make the quick sauce:

In a heavy bottom medium saucepan, add the olive oil and allow to heat.  Add in the onions, followed a minute later by the garlic and sauté until fragrant and transparent.  Pour in the white wine and stir to deglaze the pan.  Allow the wine to come to a simmer and cook for a minute.  Stir in the heavy cream and the pumpkin and mix well.  Spinkle in the sage, black pepper, sea salt and nutmeg.  Allow the sauce to come to a slow simmer and reduce naturally.  You can always add a roux or cornstarch slurry if you prefer.

To bring it all together:

  • 12 ounces chicken sausage, sliced on bias
  • 1 medium green bell pepper, large diced
  • 3 tablespoon sliced green onions
  • Gnocchi
  • Pumpkin Sage Sauce

Heat a large nonstick sauté pan over medium high heat.* Add in the chicken sausage and sauté.   Follow with the diced peppers and boiled gnocchi, if needed add a splash of olive oil, depending on the fat content of the sausage.  When the sausage is cooked and nice color on the gnocchi is achieved ladle in the pumpkin sauce and give a quick stir.  Serve in pasta bowls and garnish with green onions.

*You may need to work in batches if your sauté pan is not large enough.

Serves 4-6 guests

DSC_0736

Gnocchi is a great way to show your kids how fun cooking can be, and also how rewarding making food from scratch can be.  I think any chance to get the kiddos into the kitchen do something more than lick the spoon is important.  More importantly it will give them a memory of a moment when they created something wonderful.

Go ahead- get your hands dirty!!!

Chinese Boiled Peanuts- The Gateway to Becoming a True Southener

I was born just outside of Philadelphia, in Phoenixville, Pennsylvania. I spent a wonderful 12 years playing in the creek in the backyard, going to the pool every summer day and growing into a young girl fond of the King of Prussia Mall before moving south to Virginia Beach. More fun filled years followed in the southern beach town thru high school before I moved and got swept away and truly “southernized” by the charm of Charleston, South Carolina. I fell in love with the South, the tradition and grace, from the willowing giant oaks filled with Spanish moss to the hospitality of strangers on the uneven cobblestone streets. There were only a few southern ways that I could not adapt- one being those giant mushy goober peas, a southern delicacy – Boiled Peanuts.

DSC_0944

I just could not get passed the soft, gross texture, or that a perfectly good peanut was wasted- how can you possibly beat the innate peanut flavor? However, my husband, who came from even deeper south, Fairhope, Alabama, loves the little boogers and convinced me to make some. I bought a one pound bag and made two different flavors- Cajun and Chinese. The raw green peanuts are harvested late summer but you can still get raw dried peanuts thru the year in most groceries. I immediately had a change of heart when I tasted one of the Chinese boiled boogers.

DSC_0865

Ingredients
1/2 pound raw unshelled peanuts
1/4 cup dark soy sauce
2 tablespoons sugar
1 ½ teaspoons salt
1 stick cinnamon, about 3 inches in length
1 star anise
1 clove
1 dried chili, optional

Directions
Place the peanuts into a large pot and fill with water, stirring to remove the excess dirt. Drain into a colander, rinse and repeat 3 times. In a heavy bottom pot add the peanuts and pour just enough water to cover. Stir in the soy sauce, sugar, salt, cinnamon, star anise, clove, and dried chili.

Bring the mixture to a boil over high heat and then lower temperature to a slow moving boil. Cook for 4-5 hours, checking occasionally that liquid is still covering the peanuts. Add water as needed and cook until desired tenderness. Another method is to use a slow cooker on low for 12 hours.

Serve the peanuts warm; reserving the liquid to store the peanuts in, if you have any leftover. Reheat on a stove with the braising liquid to serve later.

DSC_0873

Like any good southerner, I can accept fault with grace- I was wrong about the celebrated boiled peanut. I fell in love with these suckers. The Chinese flavor profile enhanced the traditional peanut flavor that I could not part with, absolutely addictive.

DSC_0934

With a pile in front of us, Sir Wes and I did not stop eating them until they were gone; barely even a face wipe or a sip of beer. I knew at this point of indulgence that although I have a birth certificate from Pennsylvania, I was truly a Southern girl.

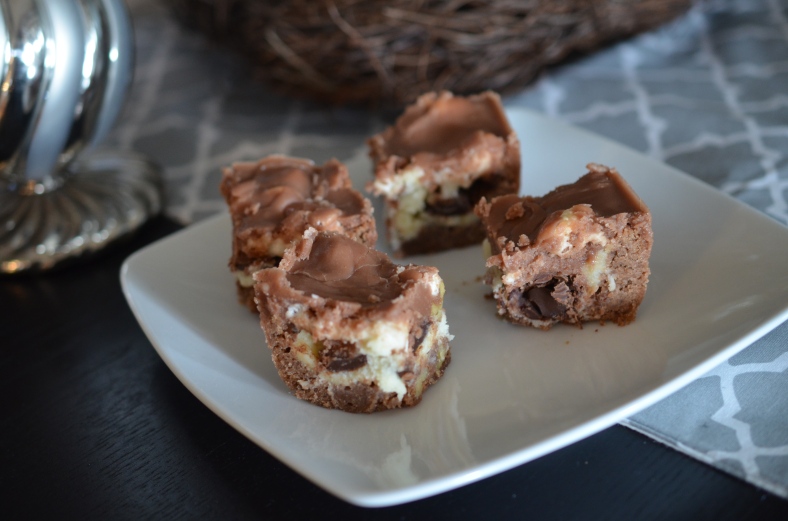
Broadway Brownie Bars AKA Praline Cream Brownies

Broadways Bars- the star of every dessert buffet; that’s what one baker called them, but after baking them I would rename them as Praline Cream Brownies. The frosting you pour over top of the baked layer brownies is reminiscent of the drippings I used to peel off the parchment paper when I scooped pralines at the Charleston Popcorn Shop.

DSC_1333

These are extra sweet- cut them in one inch squares so you don’t overdo it. Taste of Home supplied the recipe.

DSC_1326

Ingredients
FILLING:
6 ounces cream cheese, softened
1/2 cup sugar
1/4 cup butter, softened
2 tablespoons all-purpose flour
1 egg, lightly beaten
1/2 teaspoon vanilla extract

BROWNIE:
1/2 cup butter, cubed
1 ounce unsweetened chocolate
2 eggs, lightly beaten
1 teaspoon vanilla extract
1 cup sugar
1 cup all-purpose flour
1 teaspoon baking powder
1 cup chopped walnuts

TOPPING:
1 cup (6 ounces) semisweet chocolate chips
1/4 cup chopped walnuts
2 cups miniature marshmallows

FROSTING:
1/4 cup butter
1/4 cup milk
2 ounces cream cheese
1 ounce unsweetened chocolate
3 cups confectioners’ sugar
1 teaspoon vanilla extract

Directions
In small bowl, combine the first six ingredients until smooth; set aside.

In a large saucepan over medium heat, melt butter and chocolate. Remove from the heat and cool. Stir in the eggs, and vanilla. Add the sugar, flour, baking powder and nuts, stirring until blended.

Spread batter in a 13-in. x 9-in. baking pan coated with cooking spray. Spread filling over batter. For topping, in small bowl, combine chocolate chips and nuts; sprinkle over filling. Bake at 350° for 28 minutes or until almost set. Sprinkle with marshmallows; bake for 2 minutes longer.

For frosting, in a large saucepan, heat butter, milk, cream cheese and chocolate until melted; stirring until smooth. Remove from heat; stir in confectioners’ sugar and vanilla. Immediately drizzle over marshmallows. Chill well; cut into 1 inch bars.

DSC_1313

Happy Baking!!!