Dill Pickle Crisps and Deviled Egg Brunch Dip

I know a lot of people that would swear up and down that a good party cannot be had without deviled eggs. Honestly, I have yet to meet one I haven’t liked. Hate to add it to a menu of mine as they are just so expected, and then the classic, down home southern girl inside of me tells me “what in God’s name am I talking about”, and they are saved from being 86’d from the buffet table. But nothing wrong with mixing it up, after all dip is equally important at all parties, brunch included!

DSC_0130

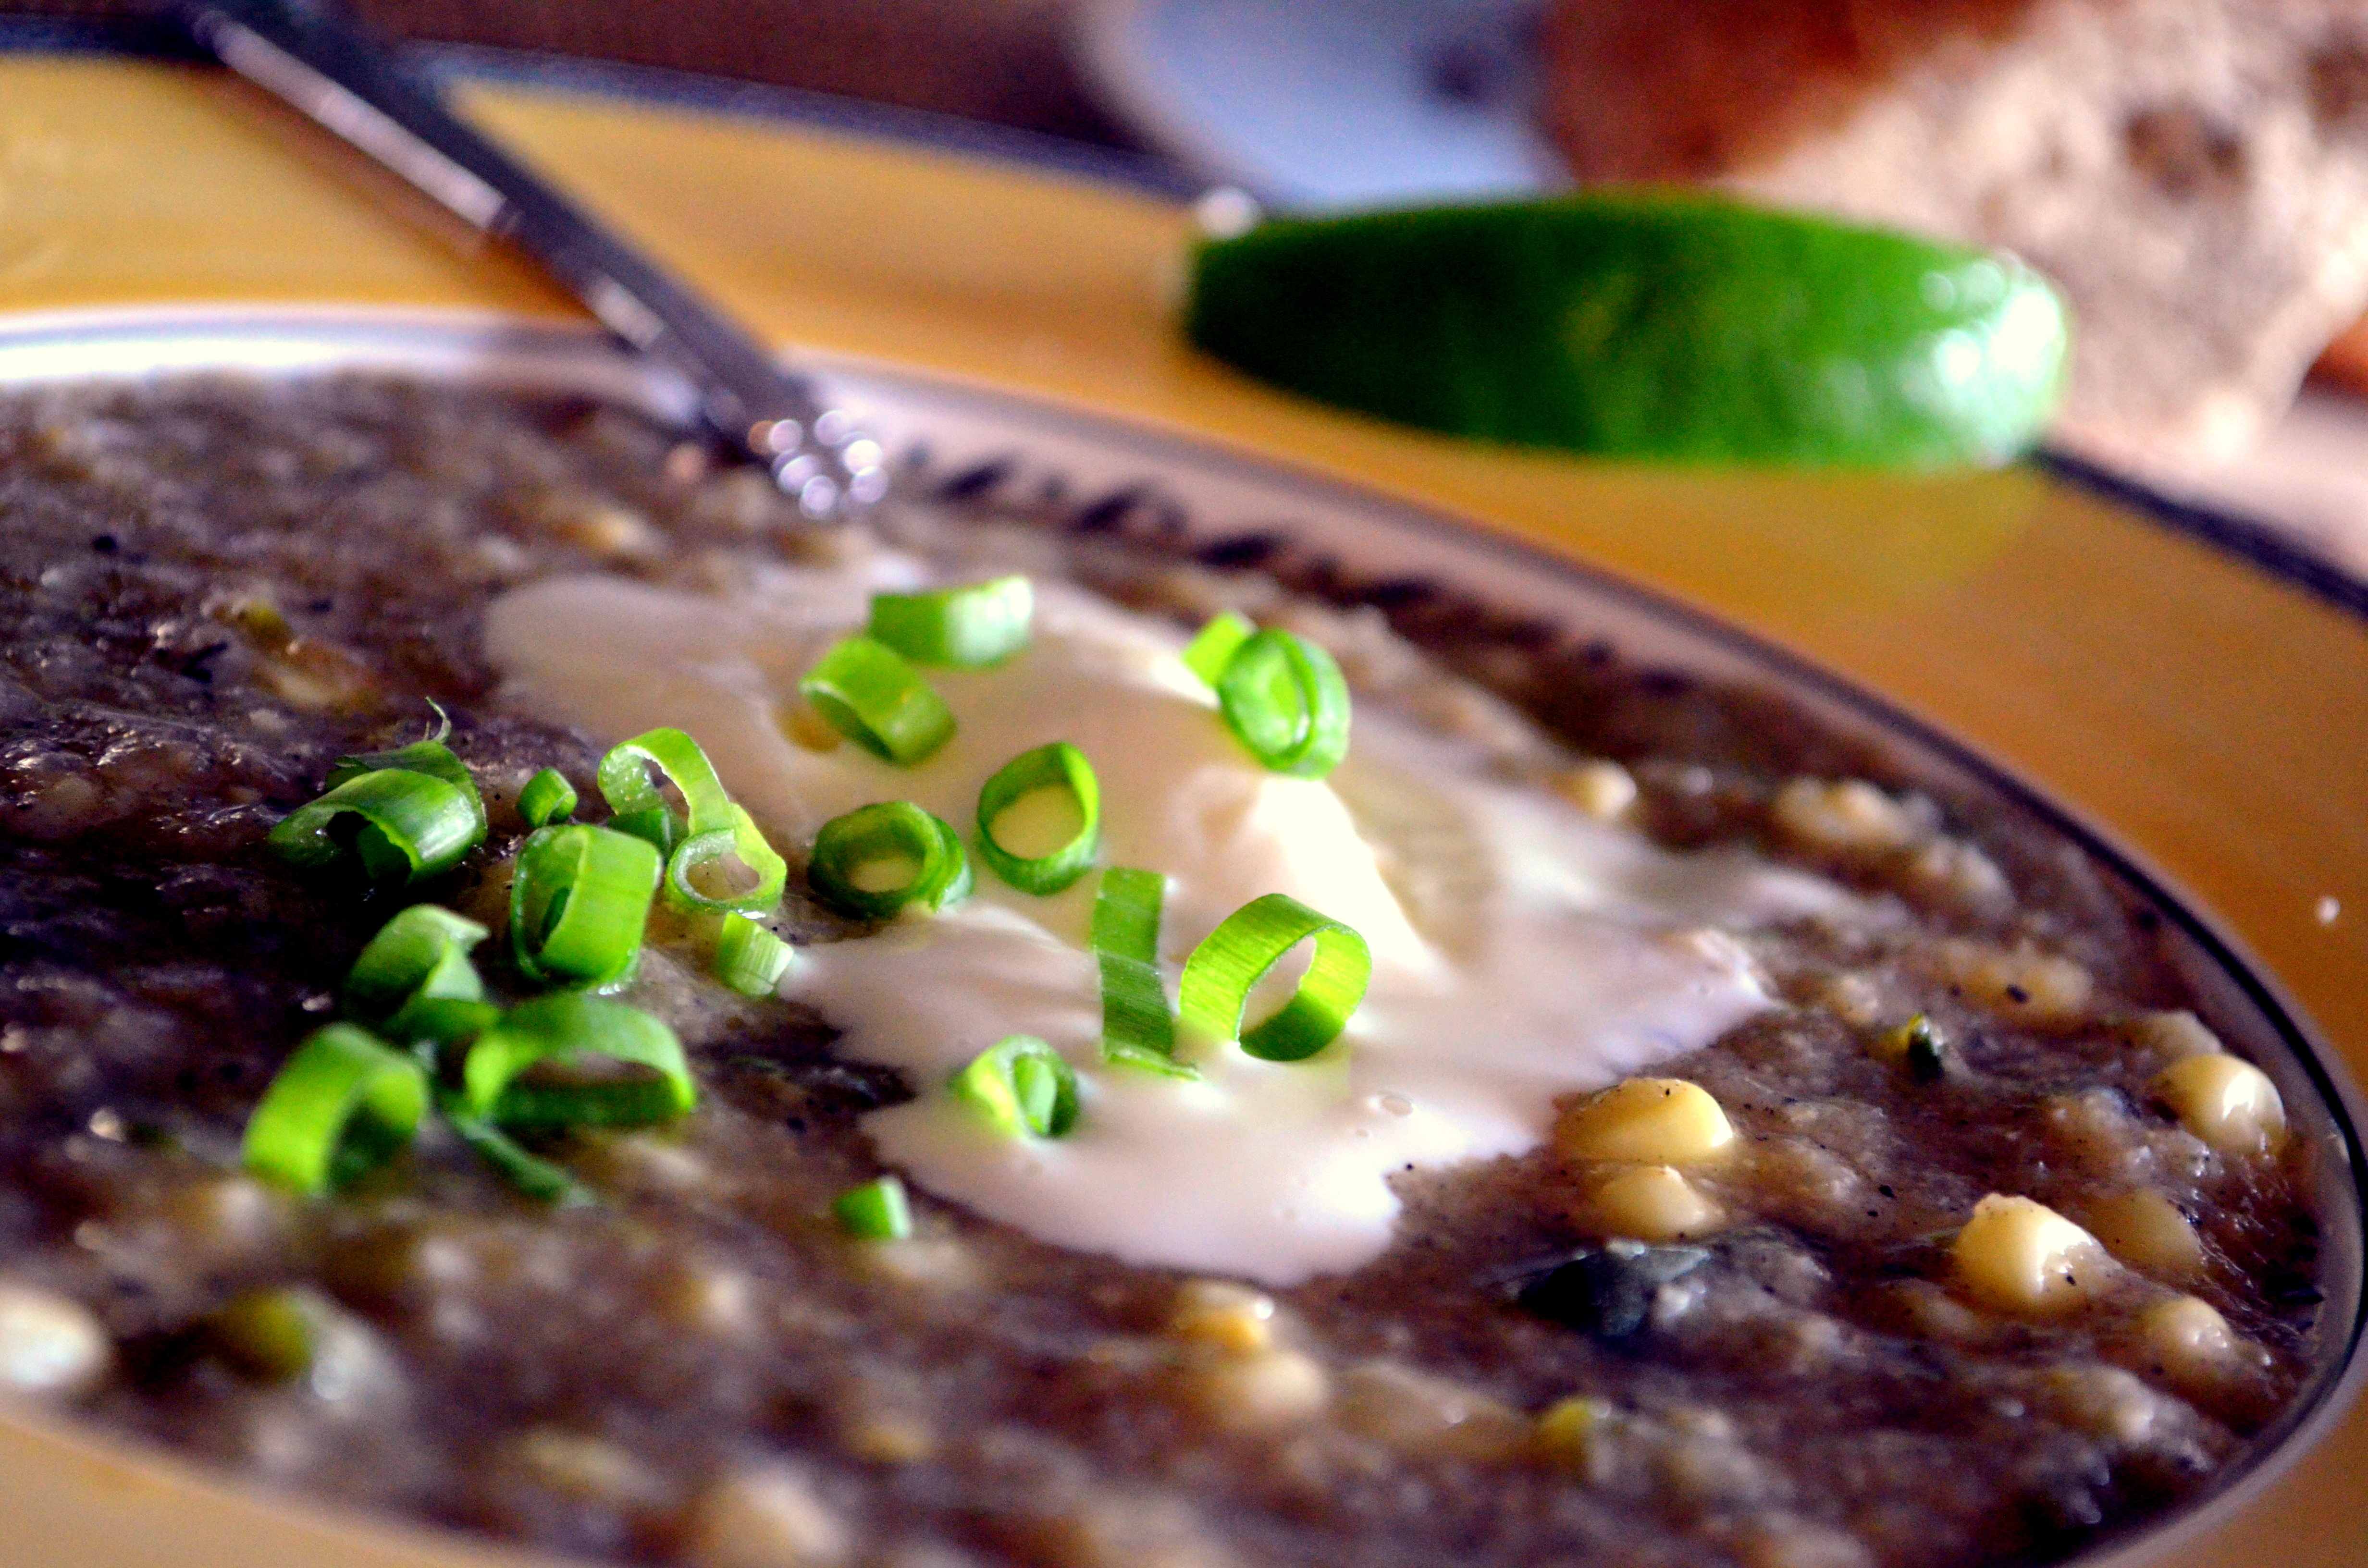
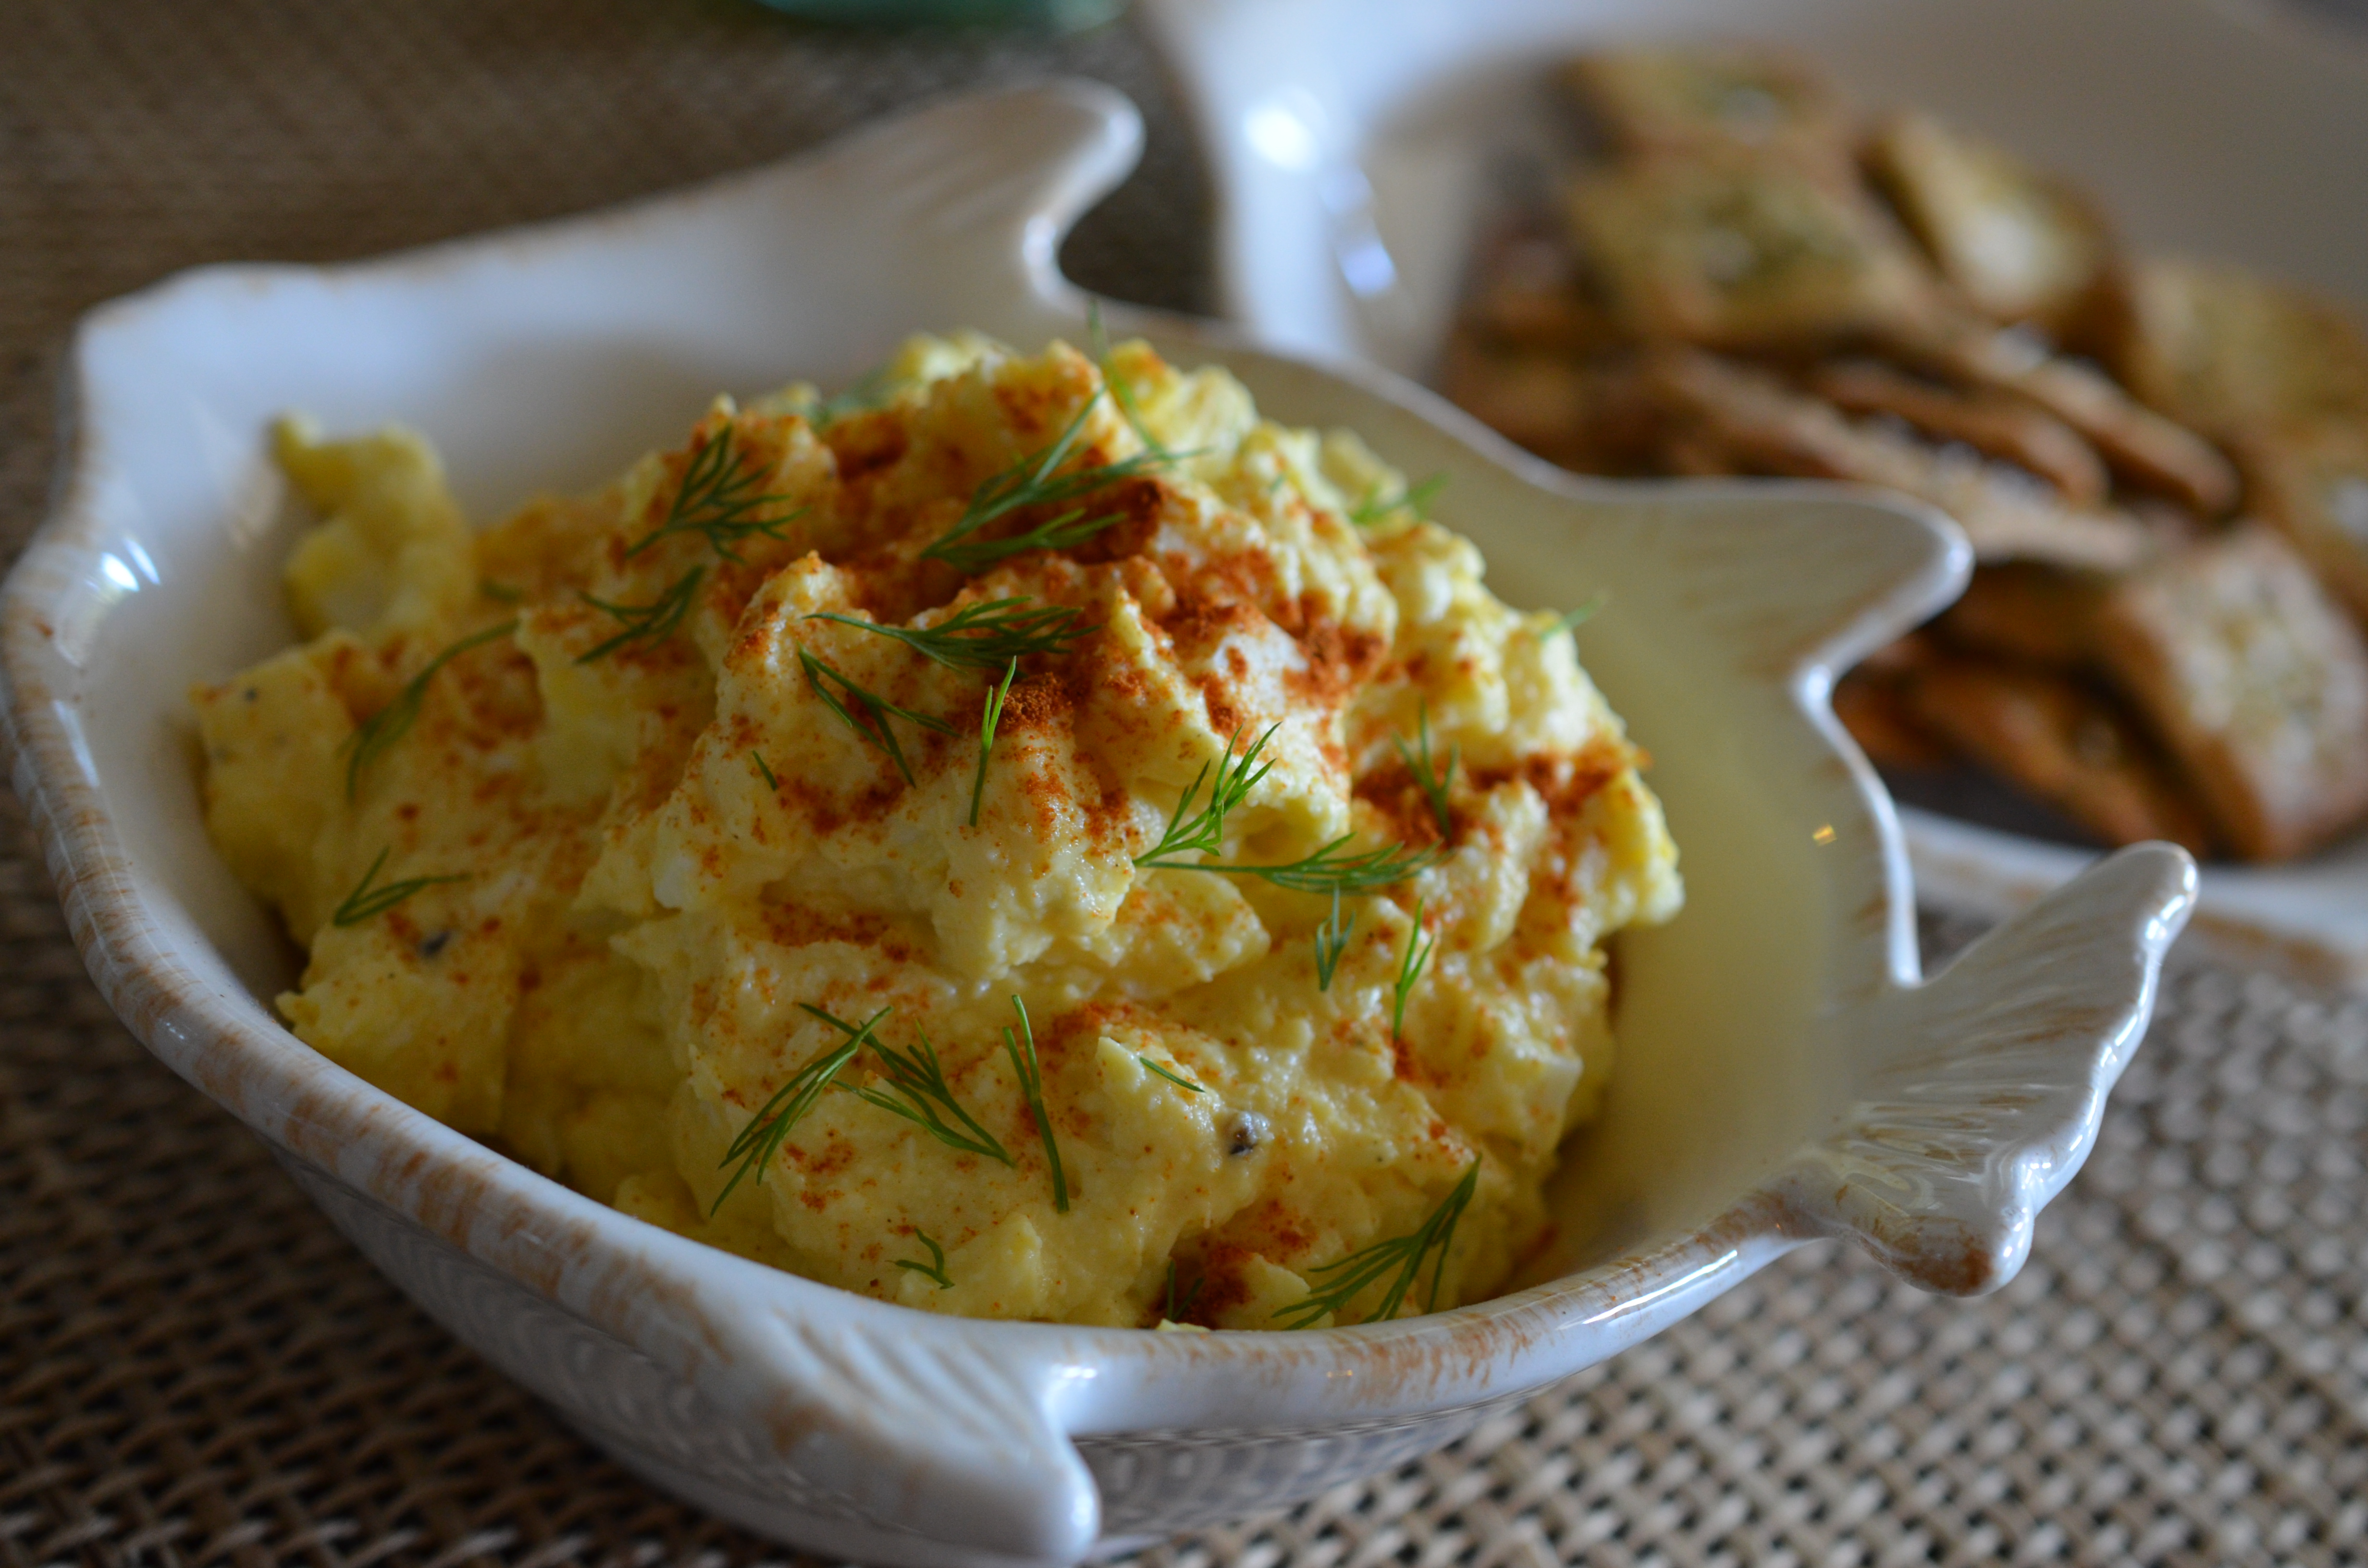
Some may say this is just egg salad, but it is served with crackers- so that obligates it to be a dip. Hands down, no question asked. The end. Dip.

DSC_0189

This recipe comes from way back on September of 2009 from Food and Wine Magazine

Deviled Egg Spread

1 dozen large eggs
2 tablespoons white vinegar
1 cup mayonnaise
1 tablespoon yellow mustard
Salt & pepper
Paprika for dusting

  • Place the eggs in a large saucepan and cover with cold water; make sure the water is a good inch above the eggs. Add in the vinegar and heat to a rapid boil. Place the lid on the saucepan and remove it from the heat. After allowing to stand for 15 minutes, drain the water from eggs and run cool water over them to cool. Add a few ice cubes to chill them faster.
  • Peel the egg shells and slice them in half lengthwise. Rough chop half of the egg whites and place them into a large bowl. Put the remaining whites and all of the yolks to a food processor along with the mayo and mustard. Process until smooth. Scrape the mixture into a bowl and blend with the chopped egg whites. Season with salt and pepper. Can be made ahead and refrigerated overnight.

Makes about 3 cups of DIP

DSC_0142

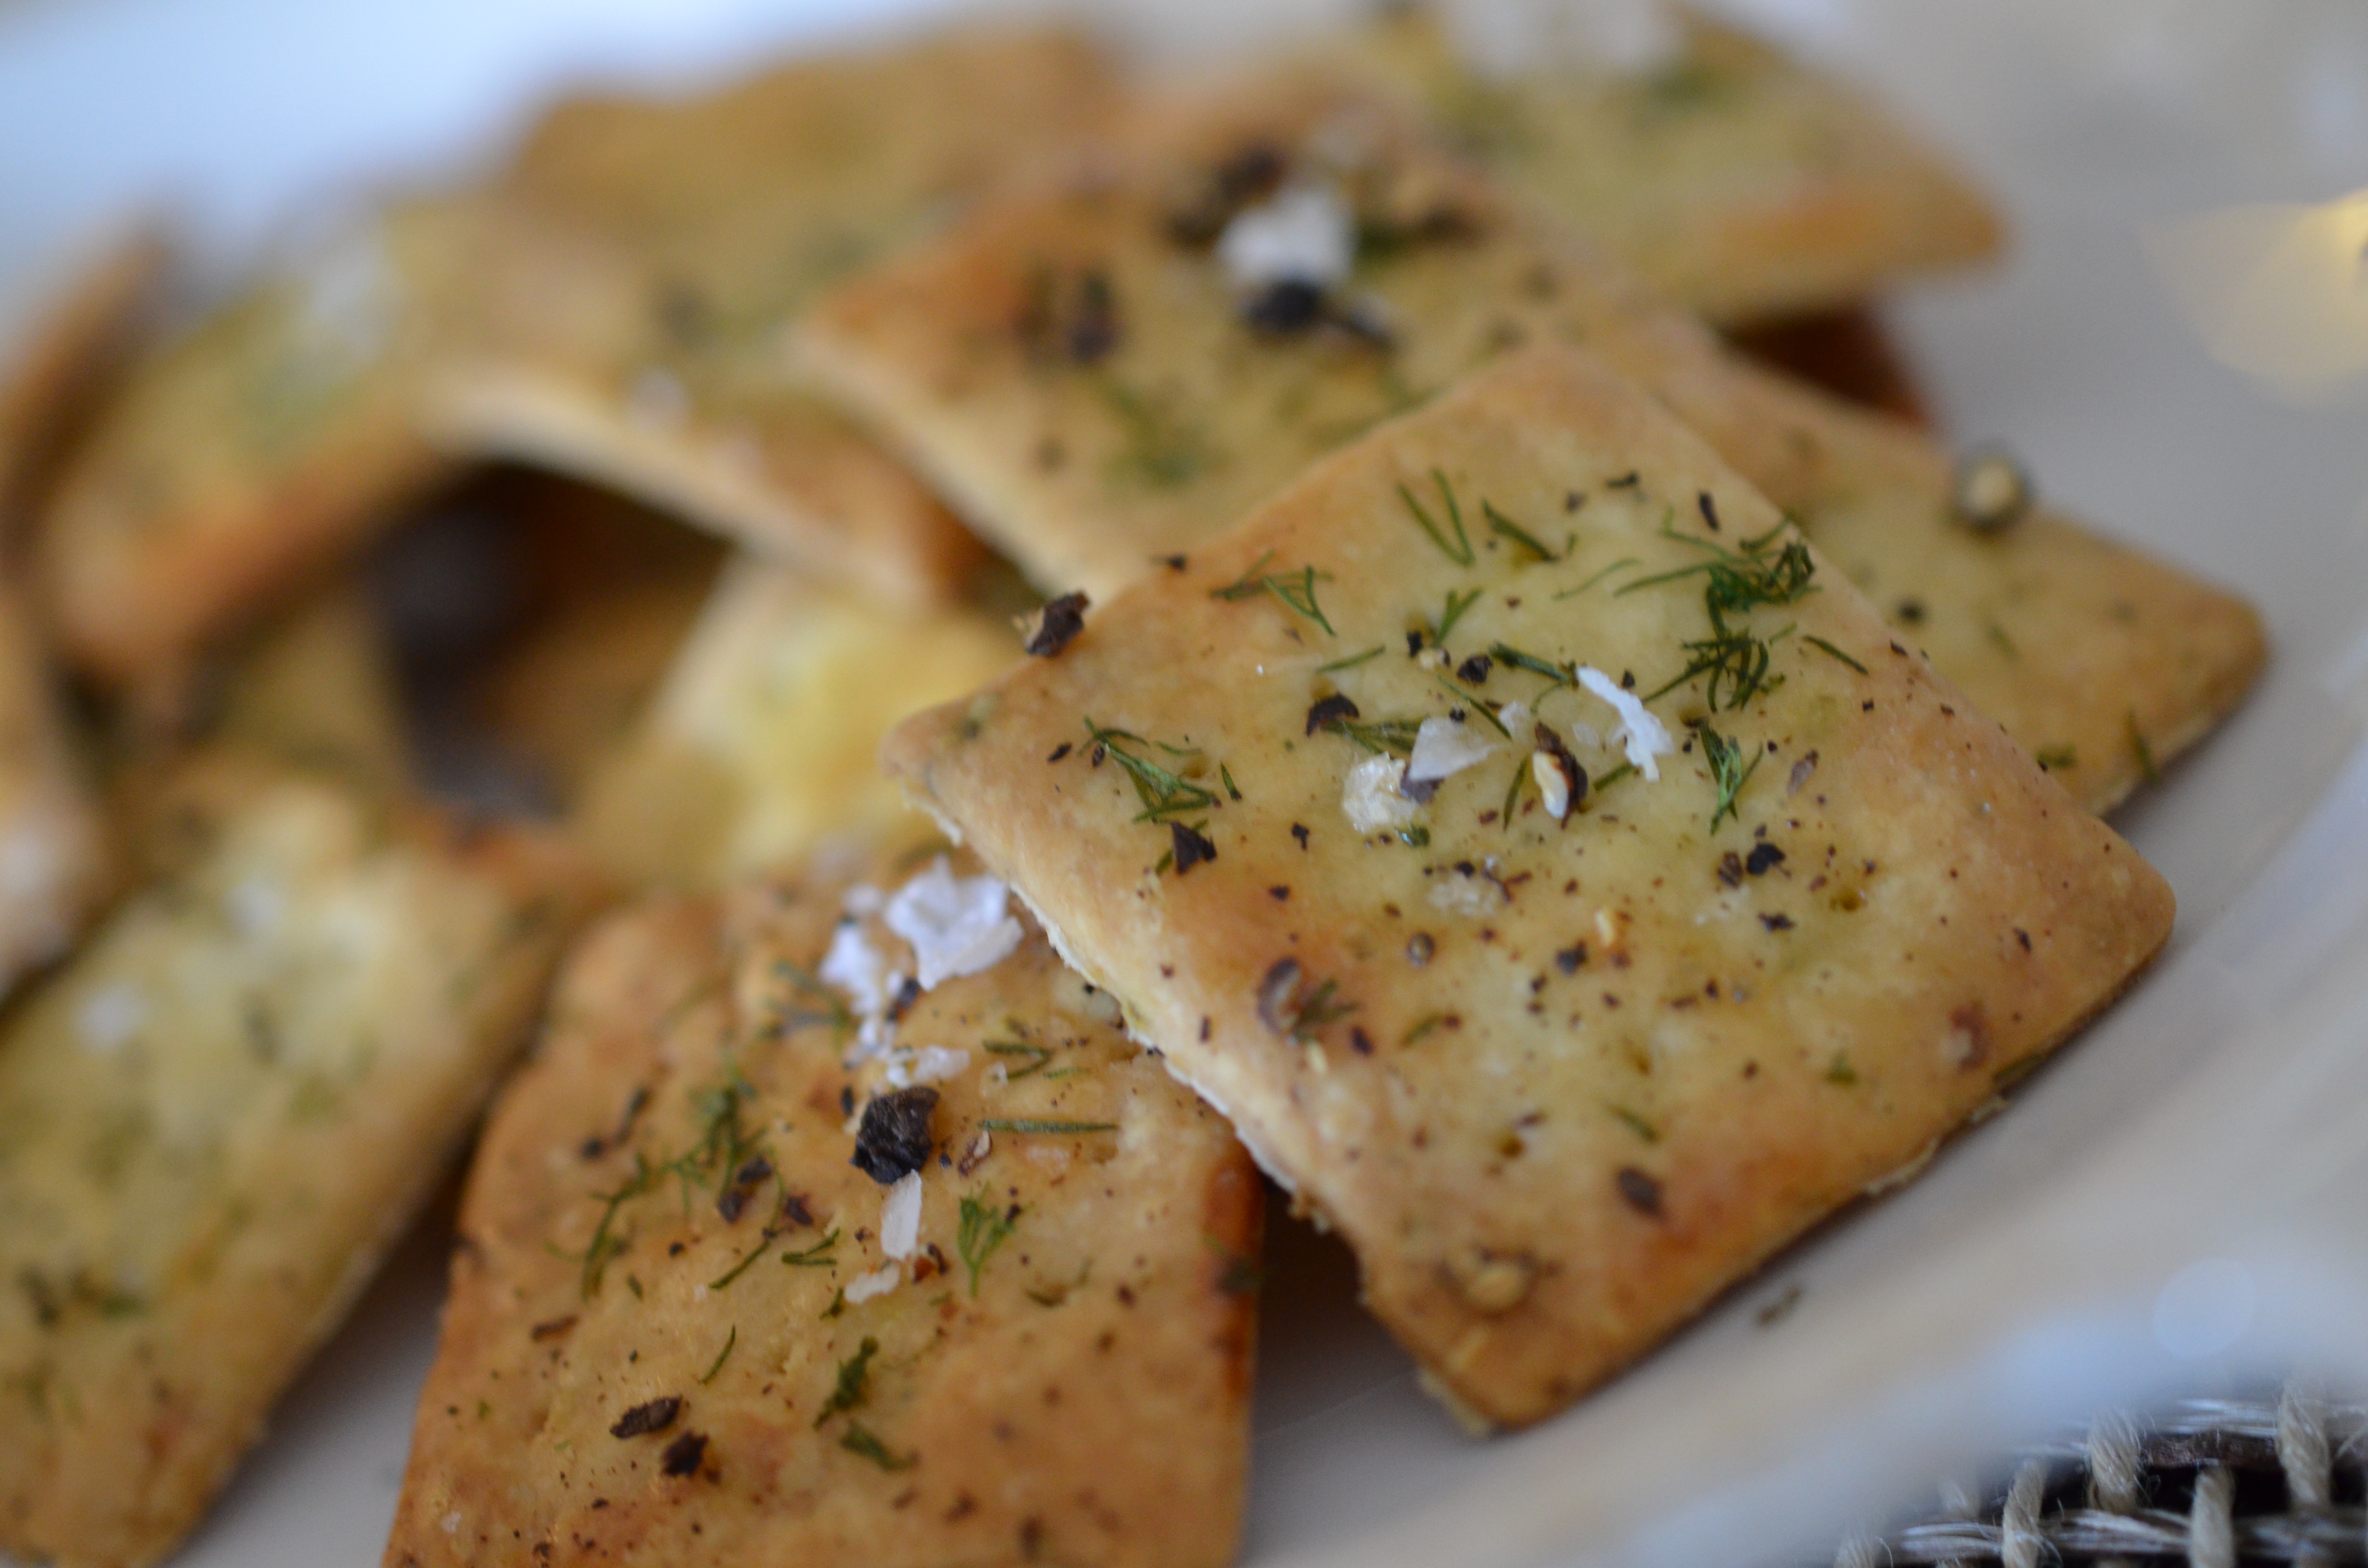
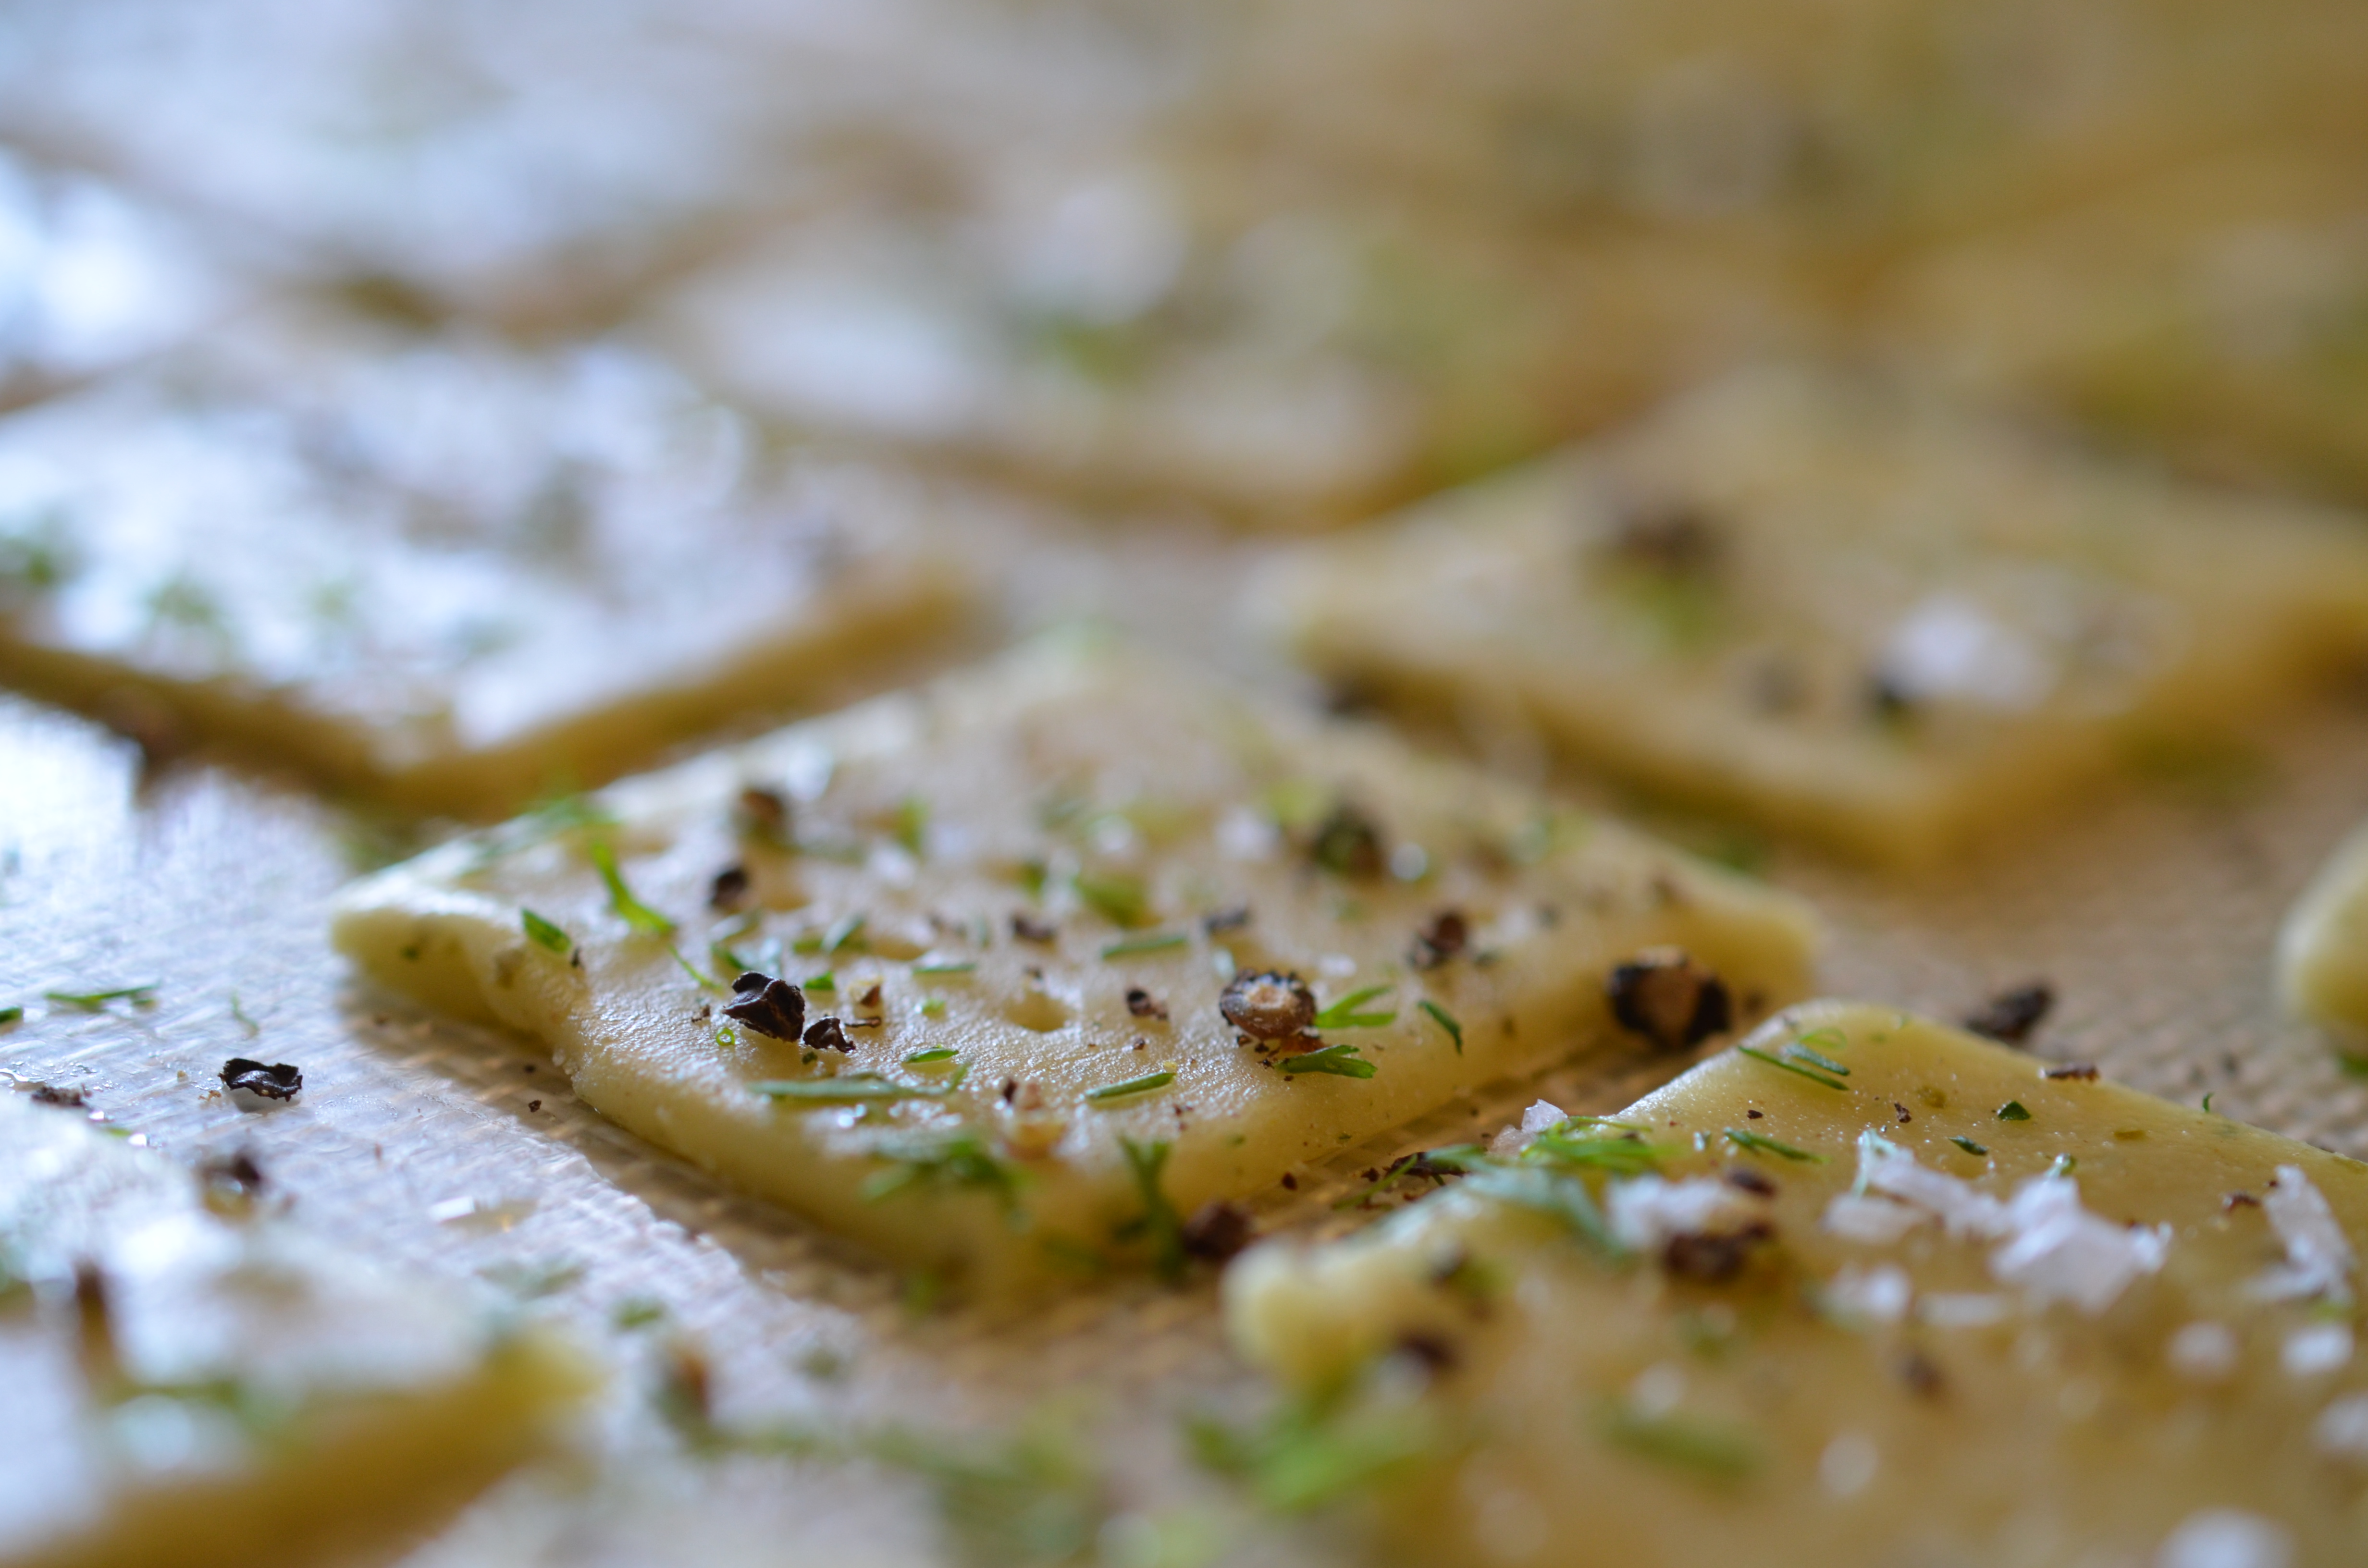
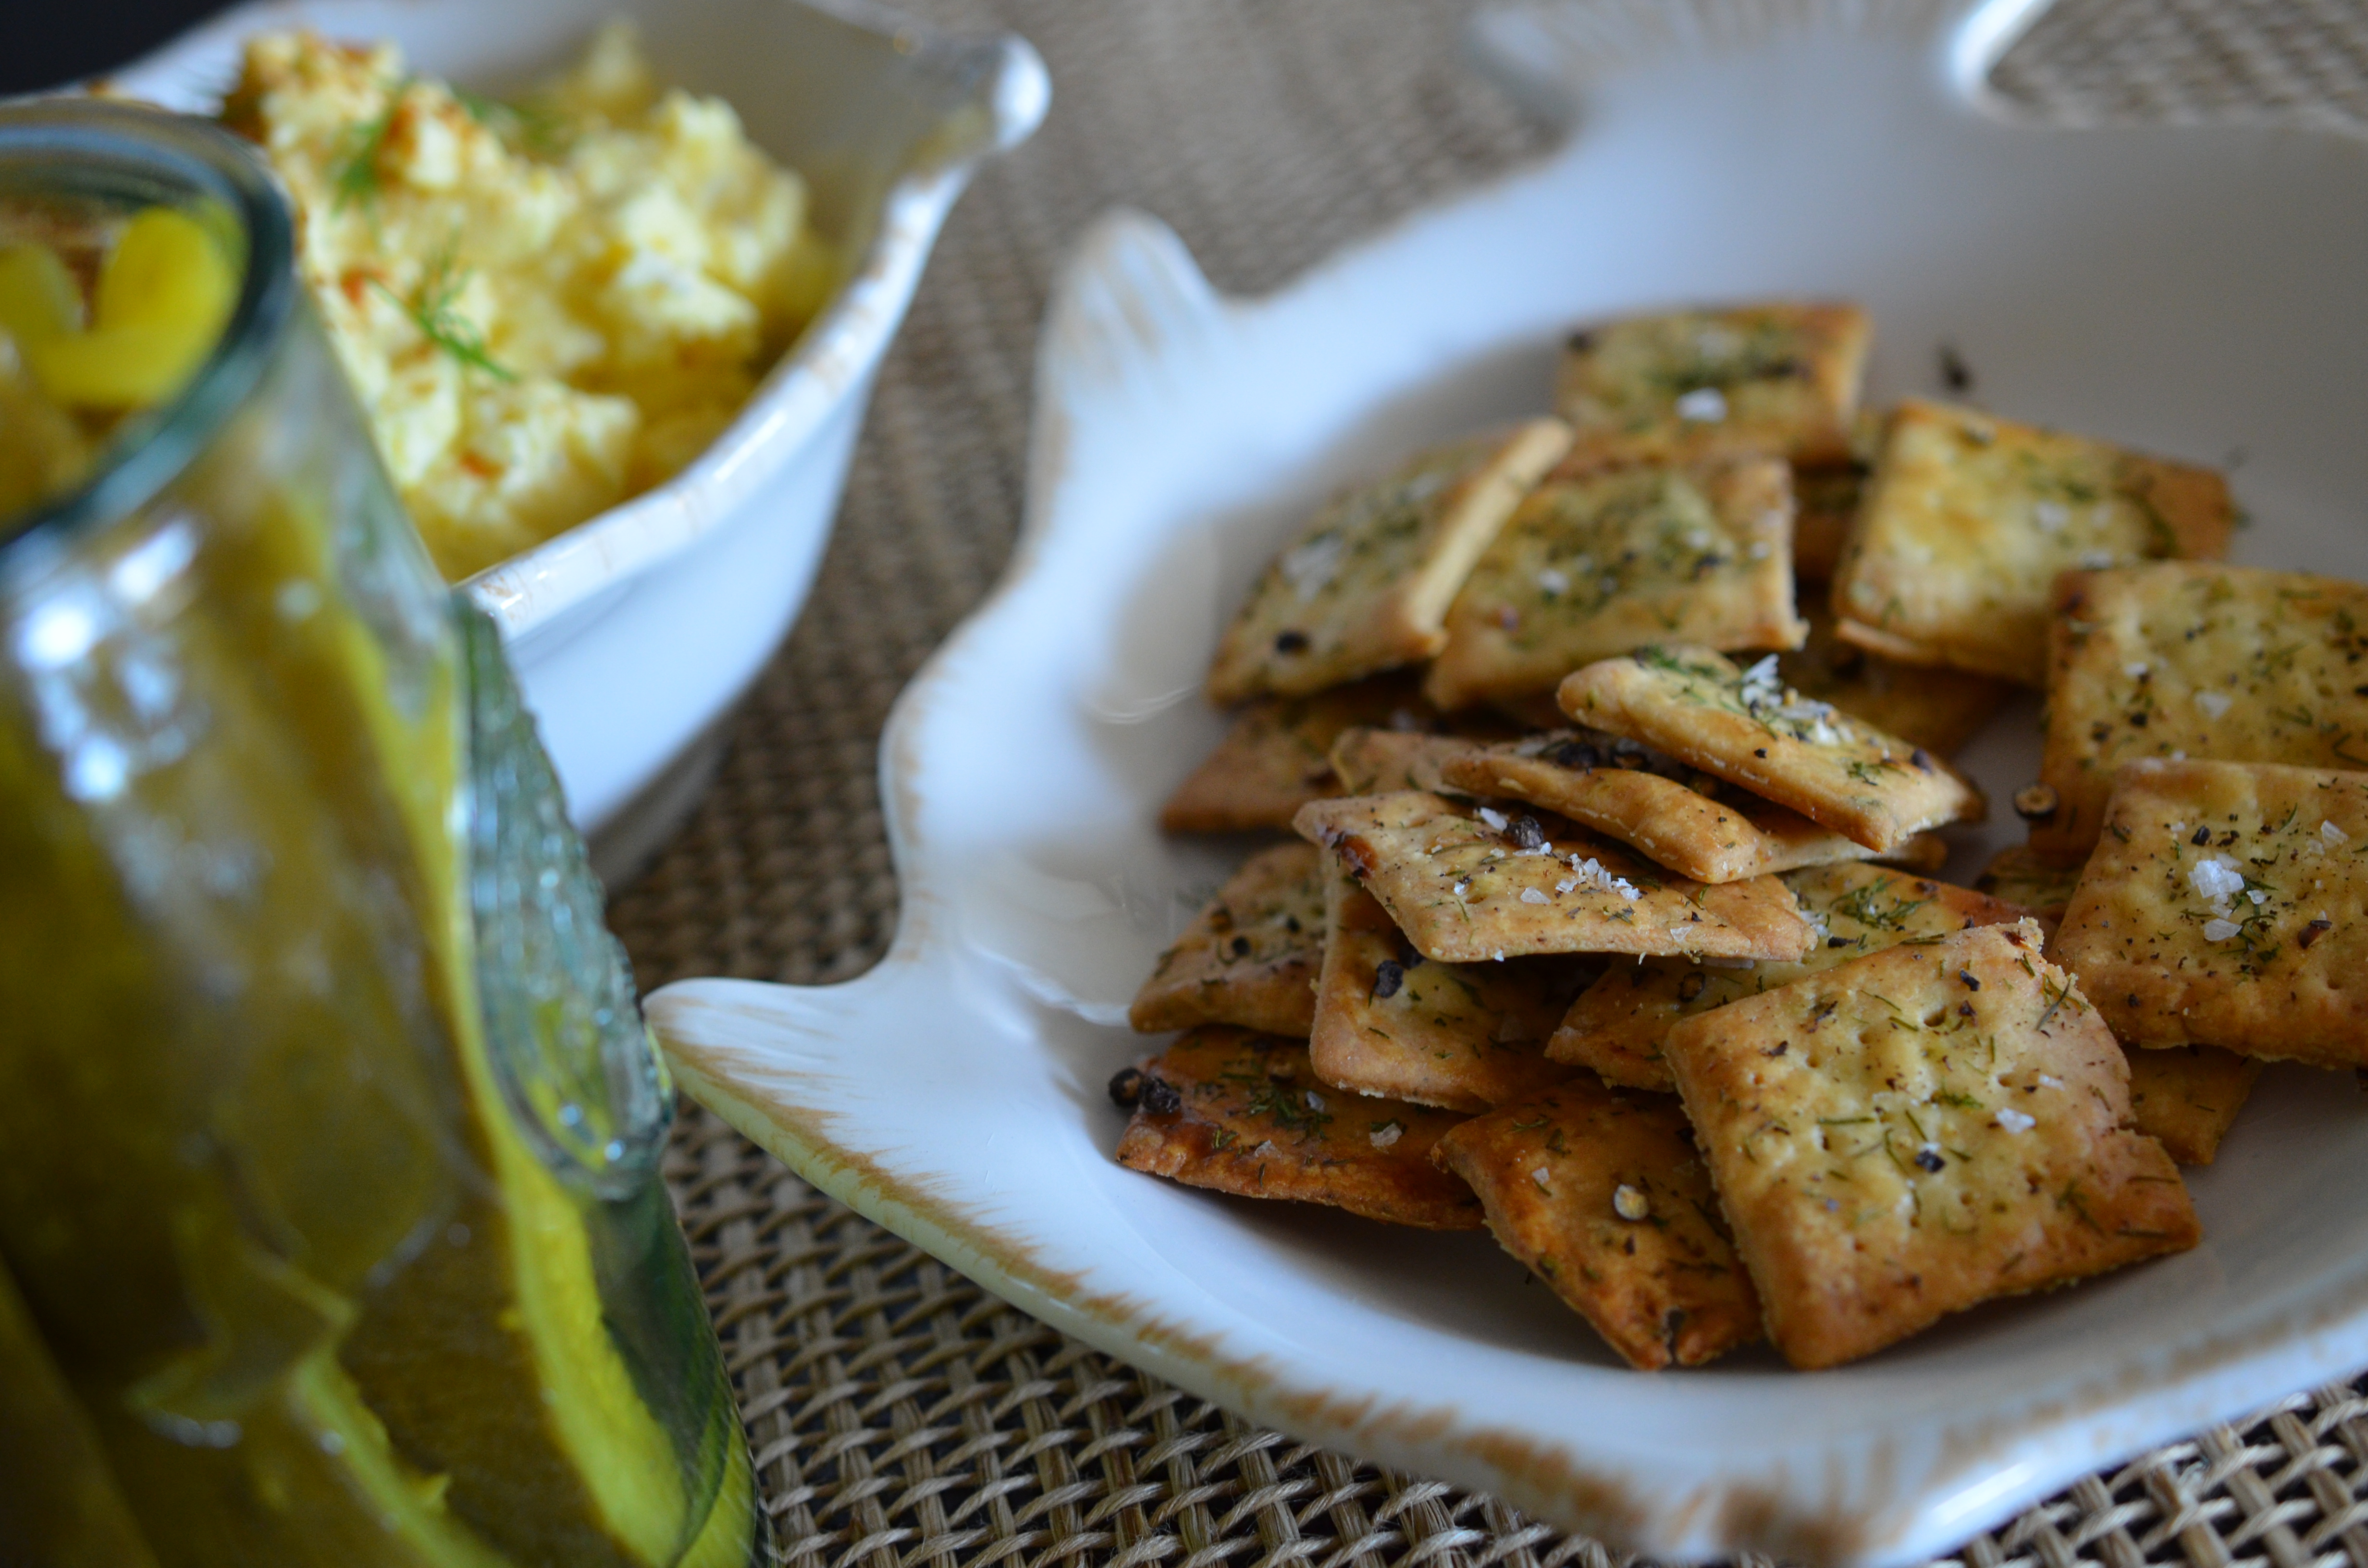
To add a special touch to the Deviled Egg alternative I took out the standard pickle in the dip and added it to the cracker- which came out great! I love the zip and sourness in the crackers- definitely a unique twist on a standard butter crack. Watch your back Keebler!

This Zestuous recipe has been slightly modified

Dill Pickle Crisps

  • 1 cup whole wheat flour
  • 3 tablespoon unsalted butter
  • 1 tablespoon extra-virgin olive oil
  • 1 teaspoon powdered ranch dressing mix
  • ¼ cup chopped dill pickle (2 spears)
  • 1 egg, cracked and blended for egg wash
  • 1 teaspoon flaked sea salt
  • 1 teaspoon chopped dill
  • ½ teaspoon fresh course ground black pepper

DSC_0112

  • Using a food processor, add the flour and softened butter and pulse until combined. Add the oil and ranch seasoning and blend again. Add in the chopped dill pickle and mix until the dough forms into a ball. Remove the dough from the processor and shape into a disk, cover with plastic wrap and refrigerate for 30 minutes.
  • Using a clean surface, a piece of parchment paper or a silpat sprinkled with flour, roll the dough to about 1/8 thickness.
  • Using a cookie cutter, cut out the crackers and peel away the excess dough. Place the cut crackers onto a parchment/silpat lined baking sheet and lightly brush the egg wash over the tops. Sprinkle with the salt, dill and pepper. Prior to baking tap each cracker with a fork to allow are to escape and your crackers to remain flat.
  • Bake in a 400-degree oven for 12 minutes or until golden brown. Allow to cool and enjoy!

Makes about 50 crackers, depending on the size of your cutter.

DSC_0155

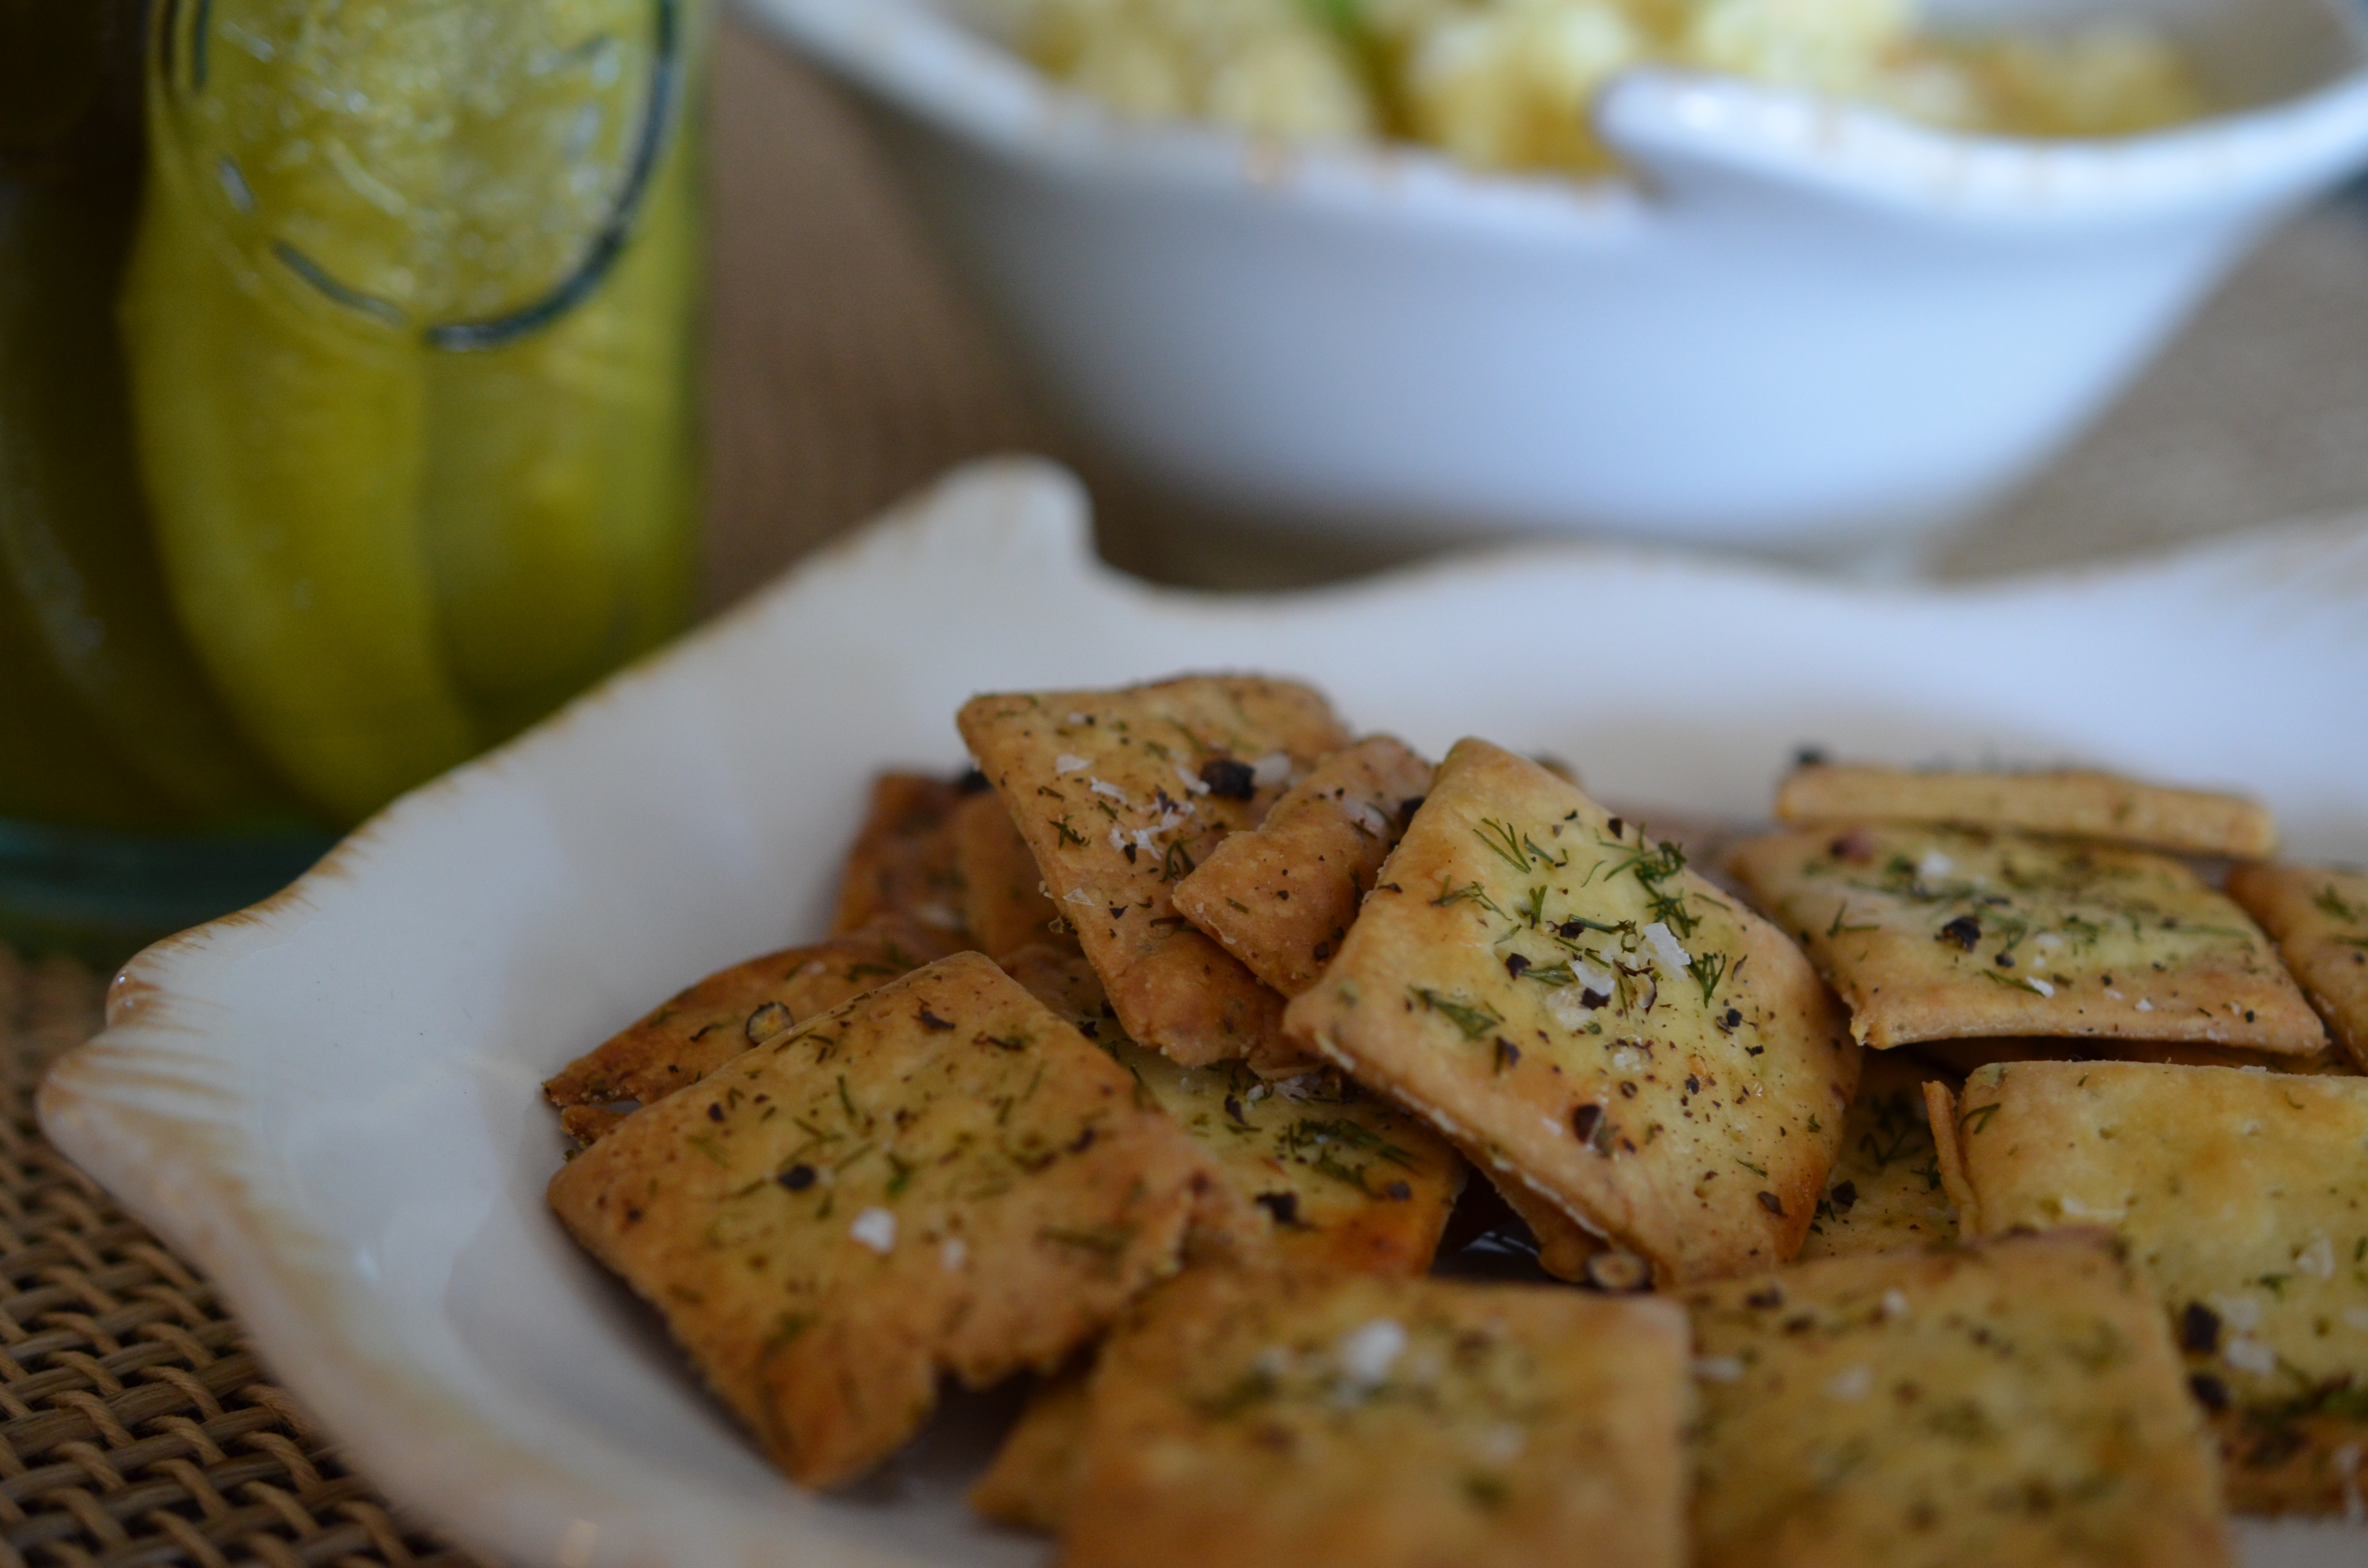
These Dill Pickled Crisps make a great vehicle for the deviled egg dip. Can’t get much more southern then this!  Cheers to all parties, especially brunch!

DSC_0173

#BrunchWeek is rocking social media this week- The #BrunchWeek Hashtag was even trending on Sunday!  So awesome! Of course, we couldn’t do it without the generous sponsors!  I can’t wait to see who wins the prizes!   Big Kudos to –  California WalnutsLodge Cast Iron, Vidalia Onions-The Flavors of Summer, Black Gold Farms, the Food and Wine Conference and Sunday Supper, Bob’s Red Mill, Whole Foods Market -Orlando, and Stonyfield Organic

For a chance to win one of the amaze-ball prizes just play in the a Rafflecopter giveaway!

Just look at this great list- all offer a chance to win! and plenty to get hungry over!

I can’t wait to see whats going on at Girl in the Little Red Kitchen!

Brunch Recipes with Eggs

Asparagus and Leek Frittata by Rachel Cooks
Baked Ham and Egg Cups by Culinary Adventures with Camilla

Veggie Quiche Cups by Take A Bite Out of Boca
Asparagus and Eggs in Mornay Sauce by Noshing With The Nolands

Brunch Recipes with Potatoes

Traditional Home Fries by Sarcastic Cooking

Meat, Poultry and Fish Brunch Recipes

Chicken Pockets by Jane’s Adventures in Dinner
Turkey Dill Crepes by Kokocooks

Breads, Grains, Cereals and Pancake-type Yums

Cherry Coconut Granola by Katie’s Cucina
Brioche by poet in the pantry by poet in the pantry
Gold Goddess Steel Cut Oats by The Vintage Cook
Quick and Easy Early Morning Parfaits by Cravings of a Lunatic
Caramelized Onion & Bacon Croque Monsieur by The Kitchen Prep

Fruit and Vegetable Brunch Recipes

Warm Salad Three Ways by Cook the Story

Spreads for Brunch

Black & Blue Thyme Jam by Cooking In Stilettos

Brunch Dessert Recipes

Crumb-Top Blueberry Muffins by Love and Confections
Banana Walnut Scone (Gluten Free/Dairy Free) by Around My Family Table
Croissant & Chocolate Bread Pudding by White Lights on Wednesday
Honey Poached Pear “Sundae” by Amanda’s Apron
Strawberries and Cream Muffins by The Domestic Mama & The Village Cook

Marcona Almond and Duck Fat Brittle

I’ve been wanting to make this brittle for quite a long time, but for one reason or another it only made it as far as the back burner.  We all have those ideas/projects right?  But I thought about it being a perfect special touch to add to a salad for a special meal- maybe even a brunch! 🙂

I adore Marcona almonds, known as the “Queen of Almonds,” which are imported from Spain. They are shorter, rounder, softer, and sweeter than the domestic variety. When I was in Barcelona they became a staple while walking the streets of the city. I picked up the best I’ve had at the market, Las Ramblas- and have been searching for their match ever since. I may just have to return to the scene of the crime to get them again- CC: Sir Wes.

DSC_0019

Last fall a tub landed in our offices at work, and slowly shrank into crumbs. These Queens inspired a conversation regarding unique cookies with myself and the pastry chef, whom thought using duck fat in lieu of butter would make an interesting brittle. I couldn’t agree more as I thought of the Spain/Catalan influence with the duck and Spanish almonds.

DSC_0022

Ingredients 

  • 3 tablespoons + ½ teaspoon duck fat
  • 1 1/4 cups whole Marcona almonds
  • 1 cup granulated sugar
  • 1/4 cup water
  • 1/2 teaspoon baking soda

Method

  • Prepare a baking sheet by lining it with aluminum foil, spread the ½ teaspoon of duck fat evenly over the foil and set aside
  • In a small sauté pan melt the duck fat over medium heat. Add the almonds and stir constantly, toasting them for 2 minutes, Remove pan from heat.

DSC_0384

  • In a heavy saucepan, over medium high heat, combine the sugar and water. Stir constantly until it comes to a boil. Use a damp pastry brush or a moist paper towel to remove any sugar particles from the sides of the saucepan. Without stirring allow to boil until the temperature reaches the hard crack stage, 310°, about 10 minutes
  • Remove saucepan from heat, and stir in almond mixture and baking soda.
  • Immediately pour the mixture onto prepared baking sheet, spreading the brittle quickly into a ¼ inch layer with a metal spatula. Let set for 30 minutes or until hardened. Break into pieces.

Makes about a pound of brittle.

The brittle came out super light from the baking soda which makes it very easy to eat. Not at all the kind of brittle that breaks teeth.  The flavor with the richness of the duck fat and sweet nuttiness of the Marcona almonds is balanced and perfectly decadent.

DSC_0029

This has been on my mind ever since our inspired collaboration and thought they would be make a great addition to a salad on a brunch. I added tuna, plums and goat cheese crumbles but would also be lovely with simple greens and raspberries. You can also serve the brittle alone in a nut or candy dish.

DSC_0060

While this brittle  isn’t the same as the treasured bag of almonds from the Barcelona Market, it is quite inspired by them and the search for the Barcelonan Almonds led me to that cookie discussion with the pastry chef.   Anyone ever been “biten” by the search for that perfect bite again?

#BrunchWeek has been filled with so many great ideas and tasty looking items- Special thanks to Terri at Love and Confections and Christine at Cook the Story, who have spent so much time putting the event together!  And thanks to our sponsors who made #BrunchWeek so much better!  California WalnutsLodge Cast Iron, Vidalia Onions-The Flavors of Summer, Black Gold Farms, the Food and Wine Conference and Sunday Supper, Bob’s Red Mill, Whole Foods Market -Orlando, and Stonyfield Organic

There are still a lot of incredible prizes to win- click on this link and sign up- very simple and safe too! . a Rafflecopter giveaway

This list looks amazing- I can’t wait to see everyone’s posts!!

Brunch Beverage Recipes

Irish Cream Coffee by Sweet Remedy
{Grown-Up} Lemonade by {i love} my disorganized live

Brunch Egg Recipes

An Easy Italian Egg Recipe by Cook the Story
Asparagus Tomato Frittata by Big Bear’s Wife
Sausage and Egg Muffins by Small Wallet Big Appetite
Mennonite Gold Hash & Eggs by The Vintage Cook
Eggs Over Wilted Spinach by The Vintage Cook
Brie and Herb Omelette by Noshing With The Nolands
Hangover Breakfast Burrito by Cooking In Stilettos

Brunch Recipes for Breads, Grains, Cereals and Pancake-Type Yums

Almond Croissants by Love and Confections
Granola Pancakes by Jane’s Adventures in Dinner
Blueberry Scones with Lemon Glaze by Katie’s Cucina
Strawberry Scones by Real Housemoms
Blueberry Vanilla Muffins by Take a Bit Out of Boca

Brunch Dessert Recipes

Marcona Almond and Duck Fat Brittle by Vanilla Lemonade
Kiwi and Rose Cream Trifle by Culinary Adventures with Camilla
Banana “Ice Cream” by Amanda’s Apron
Chocolate Coated Mini Donuts by Kokocooks

Watermelon Rosemary Champagne Brunch Cocktail

#BrunchWeek is under way- Bloggers from across the country kicked it off yesterday morning and followed with a #Tweetchat in the afternoon.  There was enough buzz on twitter that we saw #BrunchWeek trending right below #CincoDeMayo, pretty cool!  There were some huge prizes given away yesterday as well- luckily there are even more left!  Click on the link at the bottom of the page, the Rafflecopter, for a chance to win.  The #BrunchWeek sponsors have outdone themselves! 8655385121_01eb457200 The signs of summer are coming, and I couldn’t resist garden inspired cocktail.  I am not a gin fan, but because of my husbands devotion to it, we always seem to have it on the shelf.  The good part is that the refreshing watermelon really balances the emphasis of the juniper berries in the gin.  DSC_0248 Although gin is not my spirit of choice, I always get excited when I see fresh herbs in sweets and cocktails, I love the earthyness that seeps in.  This recipe comes from Everyday Magazine  Ingredients 

  • 1/2 cup water
  • 1/2 cup sugar
  • 1 sprig rosemary
  • 4 1 inch pieces watermelon
  • Ice
  • 2 ounces gin
  • 1 ounce fresh lemon juice
  • Wine
  • Watermelon wedges

 Directions 

  1. To make the rosemary simple syrup place the water, sugar and rosemary in a small saucepan and simmer until the sugar is dissolved, about 5 minutes and cool.  This can be made ahead, and nice to have on hand for those “moments of need”. 
  2. When ready to serve, drop the watermelon into a cocktail shaker, and crush with a muddler or wooden spoon.  Add enough ice to fill the shaker, and then add gin, rosemary syrup and lemon juice; and shake. Strain into 2 champagne flutes. Top with champagne and garnish each with a watermelon wedge.

DSC_0257 This is a perfect Brunch-tail for a Mother’s Day, light, refreshing and not going to put you under the rest of the day. After all whether its breakfast in bed or ladies brunching, there should always be be some saucing… DSC_0269Mother’s Day is getting closer- buy your cards and keep following along with #BrunchWeek for ideas! Thanks to all the fabulous sponsors! They got it going on for sure!! California WalnutsLodge Cast Iron, Vidalia Onions-The Flavors of Summer, Black Gold Farms, the Food and Wine Conference and Sunday Supper, Bob’s Red Mill, Whole Foods Market -Orlando, and Stonyfield Organic For a chance to win one of the great prizes- click on this link and sign up- super easy and legit. a Rafflecopter giveaway


Today there are a ton of brunchalicious posts from across the country- Check them out!

Beverages Pear Hibiscus Brunch Cocktail by Rachel Cooks Strawberry Rose Sangria by The Girl In The Little Red Kitchen Mocha Frappuccino by Around My Family Table Pineapple-Basil Tea by The Kitchen Prep

Eggs

Tomato and Mozzarella Quiche by Love and Confection Cherry Tomato and Chorizo Omelette by Katie’s Cucina Asparagus and Bacon Quiche by Confessions of an Overworked Mom

Meat, Poultry and Fish

Bacon Canapés with Oranges and Maple Yogurt by Cook the Story Chicken Bacon Ranch Panini by Sweet Remedy Pancetta Wrapped Chicken by Jane’s Adventures in Dinner

Breads, Grains, Cereals and Pancake-type Yums

Spinach and Goat Cheese Muffins by Culinary Flavors Overnight Blintz Bake by White Lights on Wednesday Bananas Foster French Toast by by Cravings of a Lunatic

Desserts

Cinnamon Raisin Bread by Katie’s Cucina Mrs. Lund’s Fresh Plum Cake by The Vintage Cook Chocolate Chip Banana Bundt Cake by Take A Bite Out Of Boca Strawberry Scones by Kokocooks Strawberry Mascarpone Tart by Kelly Bakes

Fruits and Veggies

Honey-Watermelon Soup by Culinary Adventures with Camilla

Tomato Basil Macarons #BrunchWeek

Today is the start of #BrunchWeek, which leads straight up to Mother’s Day.  There are bloggers across the country participating, so there is bound to be some great ideas for the coming Sunday’s feast.  Check out the end of the post for a list of recipes and posts to be inspired by as well as list of incredible sponsors.  Click on the Rafflecopter link to get a chance to win amazing prizes from the sponsors!!! Super easy!

8655385121_01eb457200

I have to admit- I’ve been gotten.  A little monster snuck into my head, and flipped a switch to make me believe that all the hype about macarons being “difficult” would not be true for me.   I was convinced that I, an amateur, yet successful baker would not have any issues with this simple cookie.  So when I was thinking about creative brunch ideas, savory macarons popped into my head and I signed on the dotted line- #BrunchWeek Day 1, Savory Macarons.

DSC_0160

Of course there was plenty of time to get started, just needed to get past that busy work week, and then Sir Wes’ birthday celebration #WEStival, my brother’s family visit, a catching up at work week, a weekend to relax, and then a crazy town week at work.  Soon I was left with just two weeks to tackle these “simple” cookies.  It turns out that the hype was real- macarons are as temperamental as they get, they are not simple at all, more like a monster in fact.  Touch them wrong and its over for you.

DSC_0157

It was helpful having to try and retry baking macarons nightly due to deadline, as I am certain I have actually learned about the anatomy of the French monsters.

With the help of Les Petits Macarons written by Kathryn Gordon and Anne E. McBride, I spotted my troubles and made plans for the next batch.  I strayed a few times over to good old Martha, but became sold on Kathryn and Anne’s methods and advice.

DSC_0119

My problems laid mostly with the feet, they had all types of problems- flat feet, no feet, wide-load feet, and most commonly,  “why don’t I have model feet”.  The monsters also had some intestinal problems, not much of a fan of this topic, but I’ll just say that there were runs and explosions.

With enough nights to work on them and the help of some friends at work, along with this monster bible, I managed to be satisfied with the macarons.  All had not been lost, I won the war against the savory macaron monster- as I would say at work- “Kiss it B*^@ches….”

This recipe and method came from Les Petits Macarons with some very slight modifications to adding the savory-

  • 1 ¼ cup almond flour (Bob’s Red Mill is in my pantry)
  • ¾ cup confectioner sugar
  • 2 tablespoons tomato powder
  • ¼ teaspoon kosher salt
  • 1 tablespoon powdered egg whites
  • ¾ cup granulated sugar
  • ½ teaspoon cream of tartar
  • ½ cup aged egg whites (from 4 eggs, aged covered in the fridge for 1-2 days) – Room Temperature
  • 2 drops red gel food color (optional)
  • 2 tablespoon crystalized basil
  • 10 tablespoons garlic herb cream, goat, brie or preferred cheese spread

DSC_0165

Makes about 40 macaron sandwiches

1. Preheat the oven to 200ºF. Pulse almond flour, confectioners’ sugar salt and tomato powder in the bowl of a food processor 4 times for 4 seconds each time. Sift dry ingredients over a piece of parchment paper.

2. Hand whip the powdered egg whites and the granulated sugar in an electric mixer bowl, add in the egg whites and cream of tartar until the mixture is homogenous.  Whisk on medium-high speed, when the egg whites reach soft peaks add the food coloring if you choose to use.  Continue whipping until glossy stiff peaks form (about 8-11 minutes).  The meringue should look like marshmallow fluff when ready or when you are able to hold the bowl upside-down without it falling out.

3. Sift the dry ingredients into the meringue and J-fold until you reach the, almost impossible to know, macaronner stage. It is important to fold the different components just enough,(sadly I think this only comes after you’ve learned what doesn’t work), but not too much or the macarons will crack. To make sure that you have reached the right point, once the ingredients appear combined, lift some of the mixture about 1 inch above the bowl with the spatula. If it retains a three dimensional shape, fold it again. When folded just enough, the mixture should fall right back into the bowl, with no stiffness, in one continuous drip.   Fill your piping bag halfway, allowing the maximum piping control.

4. Pipe the macarons 1 ½ inches apart on silicon baking sheet lined sheetpan. (again, more of the practice makes perfect saying).  Slam the baking sheet down to remove excess air (slam 6 times, from 6 inches above the table). Sprinkle the crystalized basil on top of each macaron.  Bake for 15 minutes and then turn the oven to 350 and cook for another 6-9 minutes depending on size.

5.  Fill with your preferred garlic herb spread, creamed brie, goat cheese, ect.  Refrigerate until an hour prior to serving.

DSC_0141

***With any failures there are learning’s.  Pay attention to what didn’t work so you know what to try or avoid in the future.

I have to admit, there is no way I am done with these monsters.  I feel like they might have won this round, but now that I’ve cut my teeth, I am ready for round 2.

DSC_0207

I secretly love getting stumped in the kitchen, as it makes successes so much sweeter.

Take a look below to see this great list of #BrunchWeek  Posts!!

Today’s Brunch Recipes From Participating BrunchWeekers Beverages

Blood Orange Mimosas by Love and Confections

Strawberry Mimosa by Jane’s Adventures in Dinner

Margarita for Mama by poet in the pantry

Candied Bacon Bloody Mary by Sarcastic Cooking

Eggs

Breakfast Won Ton Cups by Small Wallet Big Appetite

Meat Lover’s Quiche by Savory Sweet Eats

Chorizo and Garlic Frittata by {i love} my disorganized life

Cherry Tomato and Chorizo Omelet by Katie’s Cucina

Meat, Poultry and Fish

Candied Bacon by Cravings of a Lunatic

Shrimp-Grapefruit Orchid Stirfry by Culinary Adventures with Camilla

Savory Treats

Hollandaise Sauce by Kokocooks

Breads, Grains, Cereals and Pancake-type Yums

Apple Cinnamon Crepes by Sweet Remedy

Grain-free Apple Walnut Pancakes by Seasonal and Savory

Desserts

Biscoff Coffee Cake Muffins by White Lights on Wednesday

Bob’s Scottish Oat n’ Walnut Sticky Scones by The Vintage Cook

A big thanks to all the sponsors, California WalnutsLodge Cast Iron, Vidalia Onions-The Flavors of Summer, Black Gold Farms, the Food and Wine Conference and Sunday Supper, Bob’s Red Mill, Whole Foods Market -Orlando, and Stonyfield Organic,

Click below on the link and see all the generous and incredible prizes the #BrunchWeek sponsors have donated!

a Rafflecopter giveaway

Quinoa Crusted Mustard Chicken

I have some friends that like to drop sercies in my lap; small tokens from their travels or things they thought I might like to play with in the kitchen.  Whether it’s a curry braising sauce, a chili chocolate rub or another specialty item, they all are inspiring and better yet come from friends that support and encourage me.  I appreciate that, and all the cheering I receive.

20130323_095000

 A small container of Coleman’s English Mustard was given to me by my friend Cate, who had just been travelling in England and went to the quaint town of Norwich, where the mustard is produced.  It was a special day for her and I love that I, from all the way across the pond, was a small part of it.    

DSC_0343

Perfect timing too, as I was had just seen this recipe I wanted to try that used mustard.  Coleman’s English Mustard is a blend of brown and white mustards, offering some tang and a lot of zip.  So I adapted the original recipe, which called for Dijon,  a bit to make use of the spicy mustard powder.

 Ingredients

  •  3/4 cup cooked quinoa
  •  4 skinless, boneless chicken breasts (6 oz. each)
  •  2 tablespoon Coleman mustard powder
  • 2 tablespoon water
  • 2 tablespoon olive oil mayonnaise
  • 1 ½ teaspoon wild flower honey
  •  1 teaspoon chopped fresh thyme, plus more for serving
  •  Pepper
  •  Olive oil cooking spray

 Direction

Position a rack in the center of the oven; preheat to 300 degrees. Spread the quinoa on a parchment-lined baking sheet; bake until lightly toasted, 25 to 30 minutes. Let cool, then transfer to a bowl, breaking up any clumps. Discard the parchment; reserve the baking sheet. DSC_0321

Increase the oven to 425 degrees. In a large bowl, combine the mustard powder, water and mix into a paste.  Add the mayonnaise, honey and thyme; season with pepper. Place the chicken into the marinate and coat evenly. Place a rack on the reserved baking sheet. Dip the chicken in the quinoa, coating well on both sides, then place on the rack.

DSC_0019

 Spritz the chicken with cooking spray; bake until just cooked through, 15 to 20 minutes. 

 DSC_0390

Garnish the chicken with fresh herbs, a cream sauce, or goat cheese crumbles or even follow my lead with grapefruit marmalade.   DSC_0379a

Inspiration comes from anywhere you turn; trouble is finding the time to play with everything!  Thanks Ms. Cate for the sercy!

Disney’s ‘Ohana Coriander Wings

I know, I know…more wings…

But these are baked. And they have coriander, my favorite spice. And they are sticky.  I love sticky, crispy, spicy wings so much better then drippy sauce wings.  I’d say they are healthy, but really they are just baked, healthier at least.

DSC_0432

We had these wings last year when we stayed at Disney’s Polynesian Resort for the Food Blogger Conference.  They were one of the many highlights of the weekend.  I was reminded of their finger licking perfection when I came across the recipe in the Cast Member Magazine called Walt Disney World Eyes and Ears. 

DSC_0418

So in case you need another wing recipe- give this recipe a try, it is the official recipe from WDW, owned by them in fact!  These wings look on the dark side, its the sugar in that turns them, no burnt flavor 🙂

For the Wings:

  • 1 tablespoon kosher salt
  • 1 tablespoon ground paprika
  • 1 tablespoon sugar
  • 1/4 teaspoon pepper
  • 1/4 teaspoon turmeric
  • 1/4 teaspoon cinnamon
  • 1/4 teaspoon garlic powder
  • 1/8 teaspoon cayenne pepper
  • 4 tablespoon canola oil
  • 4 pounds chicken wings or drummettes

For the Coriander Sauce

  • 1/2 cup honey
  • 1/4 cup low-sodium soy sauce
  • 1 tablespoon cornstarch
  • 1/2 tablespoon chili powder
  • 1/2 tablespoon fresh lime juice
  • 1/2 tablespoon ground coriander
  • 1/4 teaspoon ground ginger

 Procedure: 

For Wings:

  1. Preheat oven to 500 F.  Line a baking sheet with 1-inch sides with foil.
  2. Combine all ingredients except chicken in a large glass bowl.  Add chicken and toss to coat well.
  3. Spread the seasoned wings on the baking sheet and roast them until browned, about 35 minutes.
  4. To serve, toss with wing sauce.

 For Coriander Sauce:

  1. While the wings are baking, combine the ingredients in a small saucepan over medium-high heat.
  2. Bring to a boil, stirring occasionally until liquid reduces to a syrup, about 5 minutes.
  3. Remove from heat and keep warm.

 DSC_0420

I’d like to blame Sir Wes for this repetitive wing recipe chapter I seem to be working on, but I have to take some ownership in it. Wings are good. Simple.  They were balanced perfectly with a Back Forty Naked Pig Pale Ale…if your wondering!

WESitval and the Coca-Cola Float Cupcakes

Last week was my husband Sir Wes’ birthday or Birfday as he calls it.  It also happened to be my niece and nephews spring break, who were more than happy to come all the way from South Carolina to celebrate WEStival with us.   What kid wouldn’t want to go to a birthday party at Walt Disney World.  Forget the bowling alley/Putt Putt/Chucky Cheese parties, WEStival was where it was at. 

WEStival


Sir Wes had only made two requests for his birthday, first was to spend time with the family and the other was that he wanted Coca-Cola Cake for his birthday dessert; a child hood favorite of his.  Both of these requests were easy and fun to fulfill. 

DSC_0472

 We spent the few days hopping between the parks and the pools, kids and adults having a blast.  A little of this-

DSC_0054

 And a little of that-

521873_10200239215036251_2098764545_n[1]

 Coca-Cola Float Cupcakes- recipe adapted from Nigella Lawson’s How To Be A Domestic Goddess

Coca-Cola Cupcakes:

  • 1 1/2 cups all-purpose flour
  • 1 cup + 2 Tbsp. granulated sugar
  • 1/2 tsp. baking soda
  • 1/4 tsp. salt
  • 1 large egg
  • 1/2 cup buttermilk
  • 1 tsp. vanilla
  • 1/2 cup (1 stick) unsalted butter
  • 2 Tbsp. cocoa
  • 1 cup mini marshmallows
  • 1 cup Coca-Cola

 Coca-Cola Glaze:

  • 1 1/2 cups confectioner sugar
  • 2 Tbsp. unsalted butter
  • 1 Tbsp. cocoa
  • 3 Tbsp. Coca-Cola
  • 1/2 tsp. vanilla

 Marshmallow Buttercream:

  • 7 Tbsp. unsalted butter
  • ¾ cup confectioner sugar, sifted
  • 1 Tbsp. milk
  • ½ tsp. vanilla extract
  • 2/3 cup mini marshmallows

DSC_0485

For the cake:

Preheat oven to 350.

In a large bowl, mix together the flour, sugar, baking soda and salt. In another bowl, beat the egg, buttermilk and vanilla. In a heavy-based saucepan, melt the butter, cocoa, marshmallows and Coca-Cola, heating it gently. Pour the warm butter mixture into the dry ingredients, stirring well, and then add the liquid ingredients mixing until the batter is well blended.

Pour into a muffin tin that has been greased or lined with papers filling each well ¾ quarters and bake for 20-25 minutes until a tester comes out clean.

For the glaze:

Sift the confectioner sugar into a bowl and set aside. In a heavy-based saucepan, combine the butter, Coca-Cola and cocoa and stir over a low heat until the butter has melted. Remove from the heat, add the vanilla, and spoon in the sieved icing sugar, whisking well, until you’ve got a smooth, spreadable, but still runny, icing.

Either dip the cupcake tops into the pot of glaze, or carefully pour a tablespoon of glaze over the cupcakes while they are still warm, and leave to cool

For the marshmallow buttercream:

Mix together the softened butter, confectioner sugar, vanilla and milk until the buttercream frosting is a smooth consistency.

Gently melt the marshmallows in a glass bowl in the microwave for 45 seconds on 50% power until they have slightly melted and started to rise up.   Add the melted marshmallows to the buttercream frosting, and whip until completely combined; the frosting should be thick and light.  Spoon the frosting into a piping bag with your favorite style tip and pipe over the cooled, glazed cupcakes.  Garnish with cherries, sprinkles, nuts or your favorite float topping.

DSC_0517

The Coca-Cola Cupcakes came out extrmely moist, and very suitable for travel.  Even a few days later the treats are still delectable.

DSC_0321

Needless to say, we had a great spring break, and a fabulous WEStival!  Hopefully Sir Sully and Lady Corree are not going to be disappointed in the next birthday party they attend.

Grapefruit Rose Marmalade

My neighbor has a grapefruit tree, one that fills our backyard with the most beautiful smell.  I often just step outside only to get a sample of the intoxicating perfumed air. I’m not sure if this tree’s aroma is the rule or an exception, in any case the scent is profound.  I really don’t care for grapefruit, it’s too bitter for me, but since becoming captivated with the trees aromatics, I have tried and tried to become a fan of the ruby colored balls.  

DSC_0040a

I’ve found that while I don’t enjoy eating a grapefruit out of its skin, I do love it’s flavor for cooking and baking.  Our neighbor leaves a sack filled with grapefruit on our front door a few times each year, which I then return to them in form of a cake or a cocktail.  This year I took inspiration from my love of marmalades and the hope of spring flowers popping up soon. 

DSC_0081a

This recipe came from Desert Candy.  The amount of rose water seems extreme, as a few drops go a very long way when dealing with rose water, but I promise it is perfect.  The most important thing to remember is to keep the pot on a very slow simmer so it caramelizes perfectly, without burning. 

Ingrediants

  • 3 large ruby red grapefruits
  • 3 cups water
  • 4 cups sugar
  • 1 vanilla bean, seeds scraped
  • 2 tablespoons rose water

 Directions

1. Set a large pot of water to boil. Cut off the peel of the grapefruits, working to get good thick slices, but leaving the inner white pith closest to the fruit still attached to the fruit. Cut the peels into strips. Blanch the peels by submersing them in boiling water for about three minutes. Drain in a colander and rinse under running water. Bring a fresh pot of water to a boil and repeat the blanching process again, this removes any bitterness. Drain and rinse again.

DSC_0001a

2. Place the peels in a large pot. Cut off all the white pith from the remaining fruits then, working over the pot, cut between the grapefruit membranes so that the fruit sections fall into the pot. Squeeze juice from the membranes and discard them. repeat with remaining fruits.

3. Add the water and sugar to the pot and bring to a boil, stirring to combine. Lower the heat to a very low simmer. Simmer until the marmalade is thick and translucent, about 90 minutes. The marmalade may still appear a touch watery- keep in mind it will thicken as it cools.

4. Add the vanilla bean seeds and simmer another five minutes. Remove from the heat, stir in the rose water (or lemon) and set aside to cool. You could can this and process in a hot water bath or simply store in jars in the fridge.

DSC_0056a

The marmalades combination of citrus and floral captures the beauty of spring; vibrant colors, lingering floral smells and balanced sweetness spell out spring on your plate.

DSC_0030a

Spread it on your toast, drape it over grilled fish or chicken, make vinaigrette for the garden greens, and even cover a scoop of vanilla ice cream with it. Then add some fresh flowers from Flowers Cork to the table and everything is complete. Spring is in the air! 

Corn Season Kick Off: Mexican Corn and Poblano Chowder

The start of all seasons is inspiring to chefs, but for me the spring and fall seasons really get me going.  Grilling and porch drinking are in full swing, taking advantage of the moderate temperature before the Florida  temperatures rise and push us indoors.   I especially love when the first crop of corn hits the market, as if it’s the symbol of all good summertime events.   Let the corn cooking begin.   

DSC_0020a

I saw this recipe in January using frozen corn and marked it for the start of corn season.  I also have recently fallen for Crema Mexican, thinner version of crème fraiche, sour cream.  The flavor is rich and provides an added depth to many dishes, with it slightly sour flavor, and resistance to breaking when heated.  It is now a stock item in our refrigerator.

DSC_0061a

Recipe has been slightly modified from Martha Stewart

Ingredients 

  • 3 scallions
  • 1 large white onion, quartered lengthwise, root end kept intact
  • 2 large fresh poblano chiles (8 ounces)
  • 3 1/3 cup corn kernels, 4 ears, divided
  • 1 tablespoon smoked sea salt
  • 4 cups plus 3 tablespoons water, divided
  • 2 tablespoons fine cornmeal or masa harina
  • Crema Mexican

20130309_184308a 

Directions 

  1. Cut dark-green tops off scallions, and finely chop. Preheat a large cast-iron skillet over medium-high heat. Place scallions, onion, and chiles in skillet, and cook, undisturbed, until charred on bottom, about 5 minutes. Turn vegetables with tongs, and cook, undisturbed, until charred on other side, about 5 minutes. (Vegetables can also be broiled on a baking sheet.) 
  2. Transfer scallions to a blender. Continue turning and charring chiles and onion until charred on all sides, 5 to 10 minutes more. Remove skillet from heat. Transfer onion to blender.
  3.  Transfer chiles to a bowl, cover immediately with plastic wrap, and let steam 15 minutes. Peel and discard charred skin from chiles, and remove stems and seeds. Halve chiles lengthwise, and slice crosswise into 1/4-inch-thick strips.
  4.  Add 2 1/2 cups corn, the salt, and 2 cups water to blender. Puree until smooth, about 1 minute. Transfer puree to skillet. Stir in remaining corn and 2 cups water. Bring to a boil over high heat, reduce heat, and simmer, stirring occasionally, until thickened slightly, about 8 minutes.
  5.  Whisk together cornmeal and remaining 3 tablespoons water. Stir into soup along with chiles, and simmer until it has the consistency of porridge, about 2 minutes.
  6.  Divide soup among 6 bowls; garnish with chopped scallion greens, and add a scoop of crema mexican. Soup can be refrigerated 2 days; let cool completely before refrigerating. Gently reheat in a covered pot over medium heat, stirring occasionally.

DSC_0028a

Back yard gardens are growing, farmer markets are getting in new local goods, sun is setting later, charcoal grills are burning, sprinklers are being run thru, cookouts are the new social scene! Cheers to all things spring blossoming!

Buffalo Chicken Balls

March Madness is screaming for its own version of tailgate food.  What a better answer then some balls!  Let’s face it; wings go with sports, all sports, they’re almost a food group.  It’s a rite of passage, watch a game and eat wings (and of course drink beer).  As with all superior food groups, chefs strive for reinterpretations and tributes to the pedestaled dish.

DSC_0106

These are surely a way to a man’s heart, and completely loved by the fussy woman that dislikes gnawing on bones.  I do have a few girl friends that hate wings because of the tiny veins found in bones and detest the dirty finger result of eating wings.  My answer- Buffalo Chicken Meatballs.

DSC_0084

Ingredients

  • 1 pound ground chicken
  • 2 ½ teaspoon buffalo wing seasoning
  • ½ teaspoon kosher salt
  • 1 egg
  • 2 tablespoon breadcrumbs
  • ¼ cup blue cheese crumbles

 Seasoned Flour

  • ¼ cup all-purpose flour
  • ¼ teaspoon buffalo wing seasoning
  • ¼ teaspoon kosher salt
  • ¼ teaspoon onion powder
  •  ¼ cup favorite buffalo sauce

*Beer

Directions

Open a beer.

Combine ground chicken, seasoning, salt, egg and breadcrumbs thoroughly.  Place the mixture in the freezer for a few minutes so the mix becomes easier to work with.  Use a small scoop to make between 14- 16 balls, the size of a ping pong ball and place on a cookie sheet.  With the back of the scoop or a tip of a spoon form a well in each ball.   Fill the wells with roughly a ¼ teaspoon of blue cheese.  Drink your beer. Gently reform the chicken into a rounded sphere, focusing on keeping the blue cheese in the center.   Return the balls to the freezer for about 15 minutes to set the shape.

wells

Preheat the oven to 350.  Combine the seasoned flour ingredients in a small bowl and place a sauté pan on the stove over medium high heat.  If you have an Aebleskiver pan use this- I love using mine for meatballs as it gives a beautiful sear all around the meatball. Take a sip of beer.  Add a tablespoon of oil to the sauté pan, or a few drops of oil to the Aebleskiver wells, while oil heats roll the meatballs in the seasoned flour coating them completely.  Place the balls in a hot pan and sear the meatballs evenly until the outside is well browned.

DSC_0069DSC_0071

Swig your beer.  In another small bowl put 2 tablespoons of buffalo sauce.  Remove the meatballs from the sauté pan and place into the buffalo sauce, rolling them around to coat evenly.  Place the balls on a baking sheet and pop into the oven for 10-12 minutes until the internal temperature reaches 165 degrees.  Remove from oven and serve.   This makes enough for 2-5 friends, depending upon the size of the appetite and the other dishes on the table!

DSC_0097

Serve with blue cheese dressing, ranch, celery, carrots or whatever you love with wings (beer).

DSC_0087

March Madness, Buffalo Chicken Balls, Clean Fingers, Happy Wife and Beer- Husbands delight!!

DSC_0128

Happy St. Patricks Day, and Happy Selection Sunday- GO ACC & SEC!!!!!!