Texas Caviar

Not too long ago we had a town hall at work in which the team, or if you work at Walt Disney World, the Cast put together a menu based on their background and heritage.  With over 60 cooks participating, you can imagine how extravagant and flavorful this lunch was.  I took away a ton of idea’s and a full belly, not to mention a recipe or two.

DSC_0162

The recipe for Texas Caviar came from another part of the kitchen team, one of the most important parts- the receiving/ordering team.  They are not chefs, but let me tell you they have more food knowledge then many cooks, form cuts of meat, vegetables in season and which fish are swimming when and where.  Just a reminder to never judge a book by its cover, that everyone you encounter has something to offer.

DSC_0223

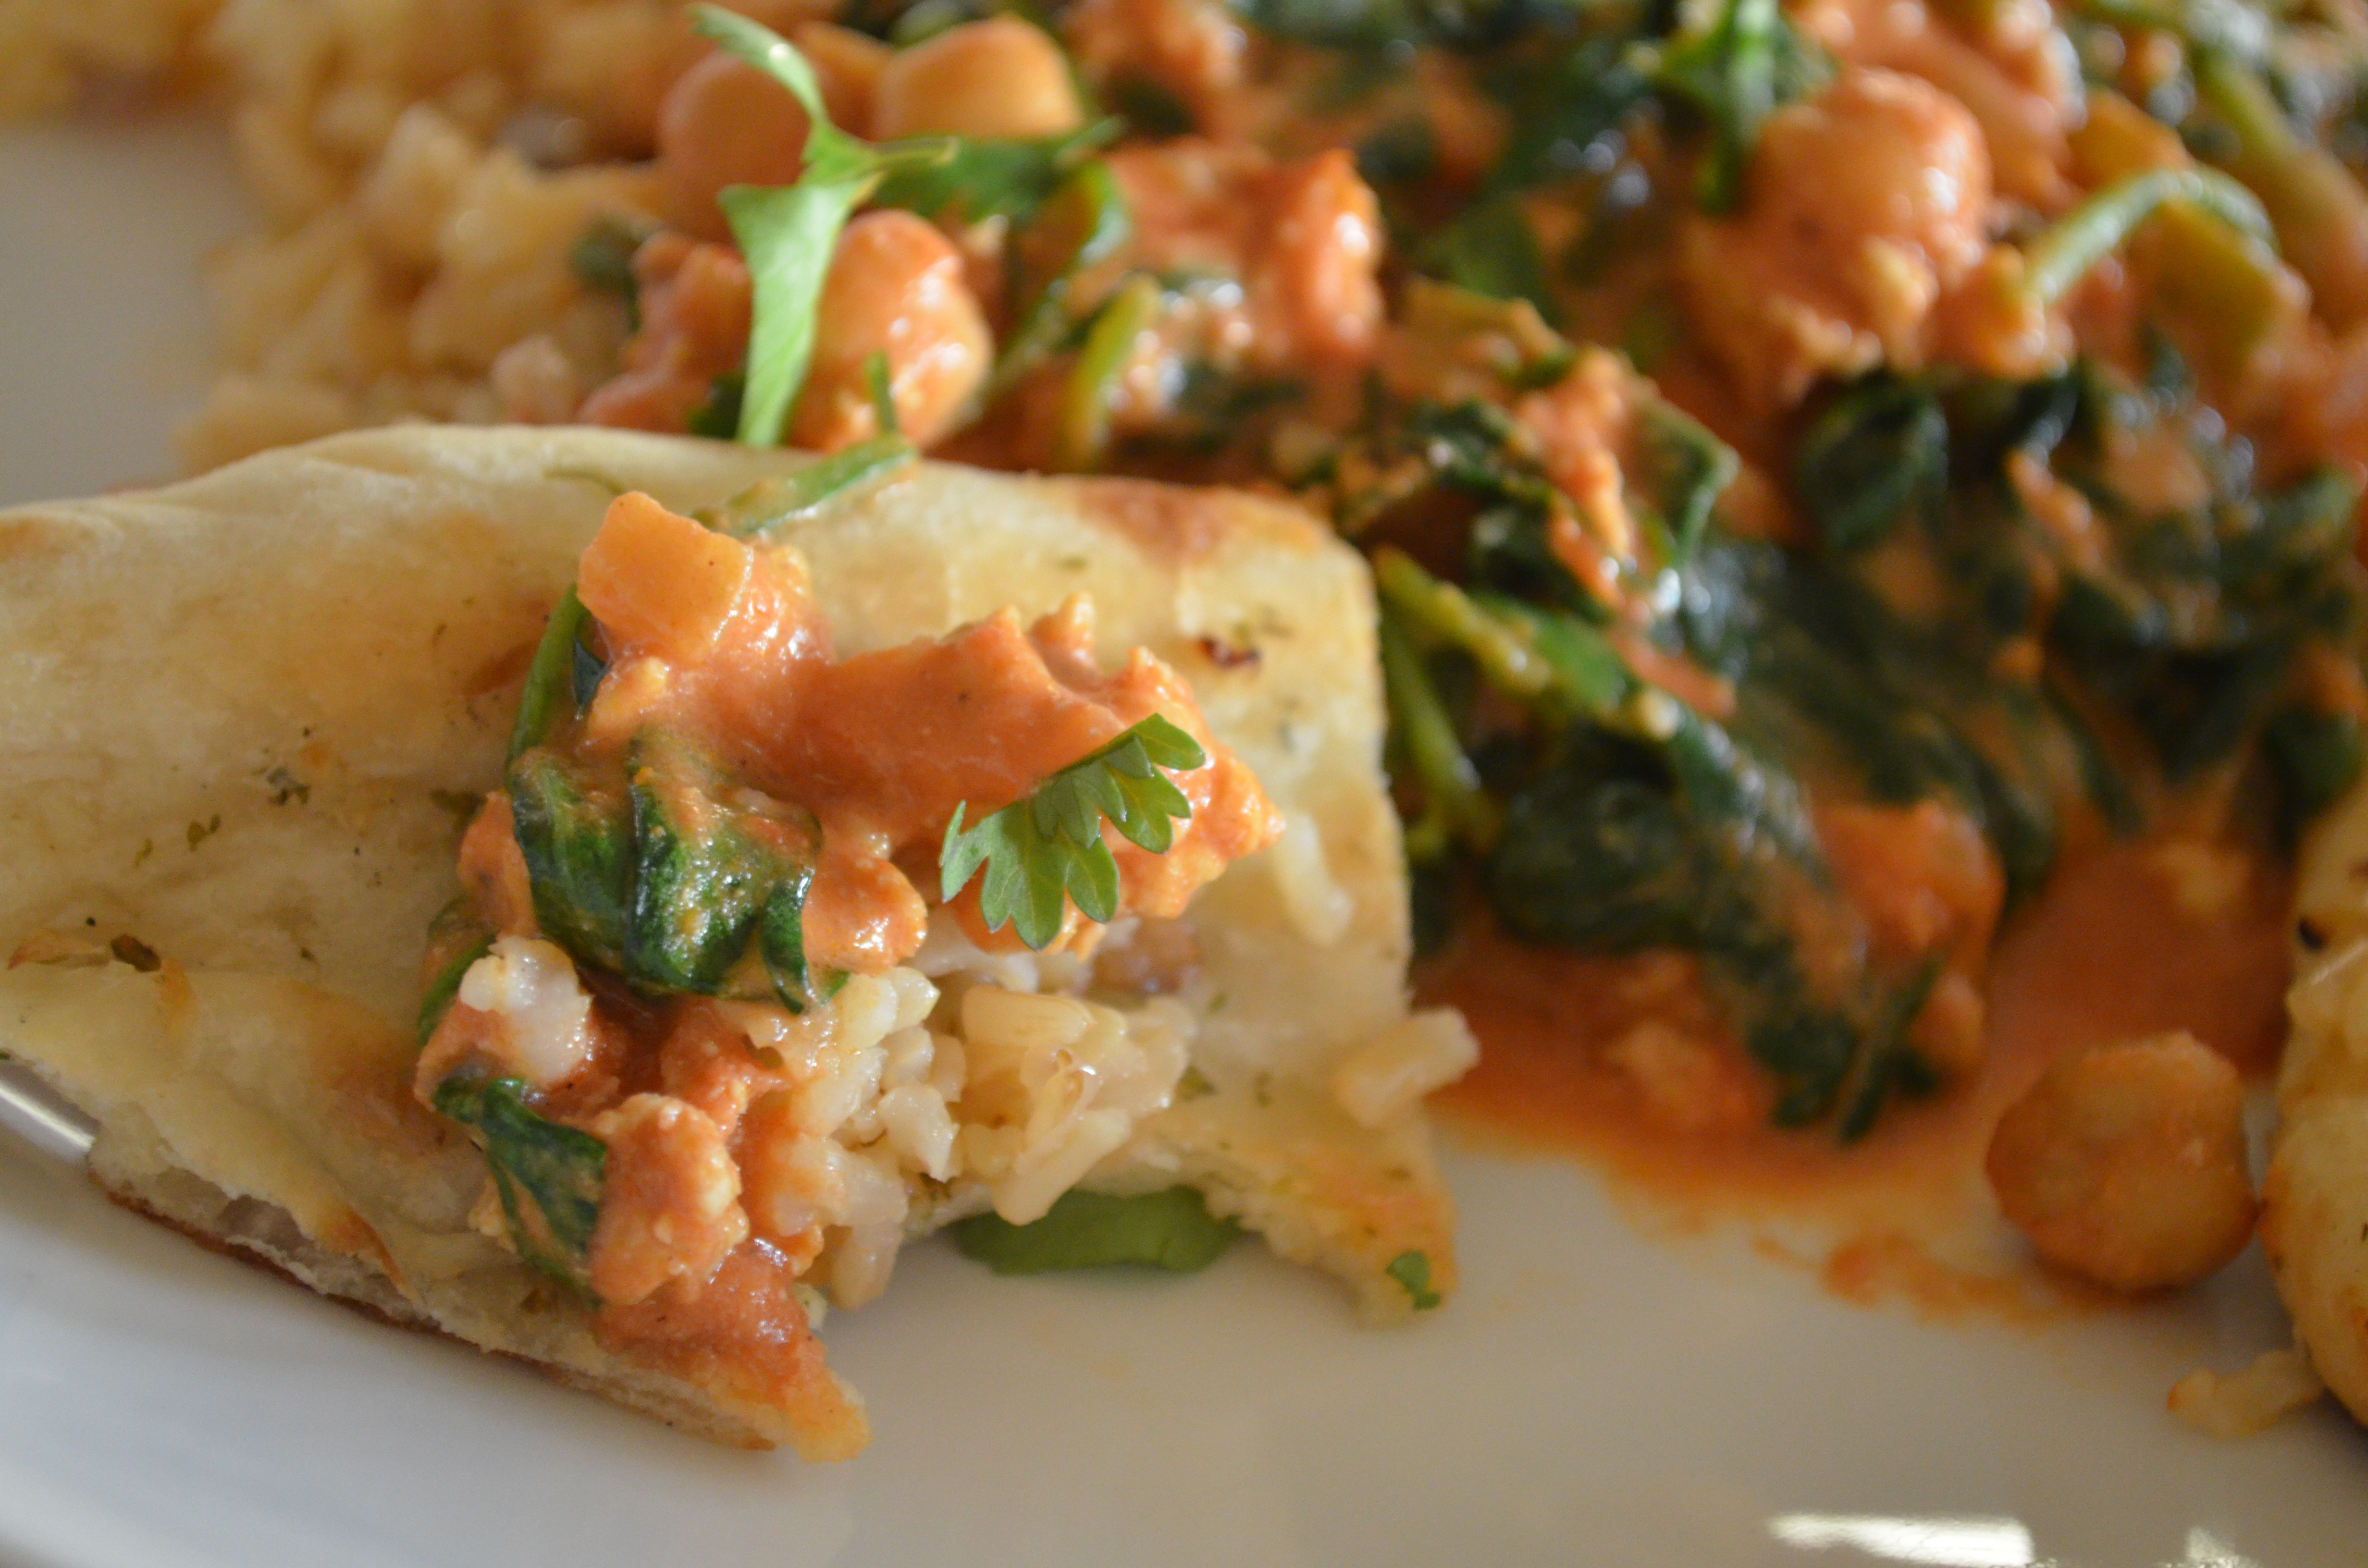
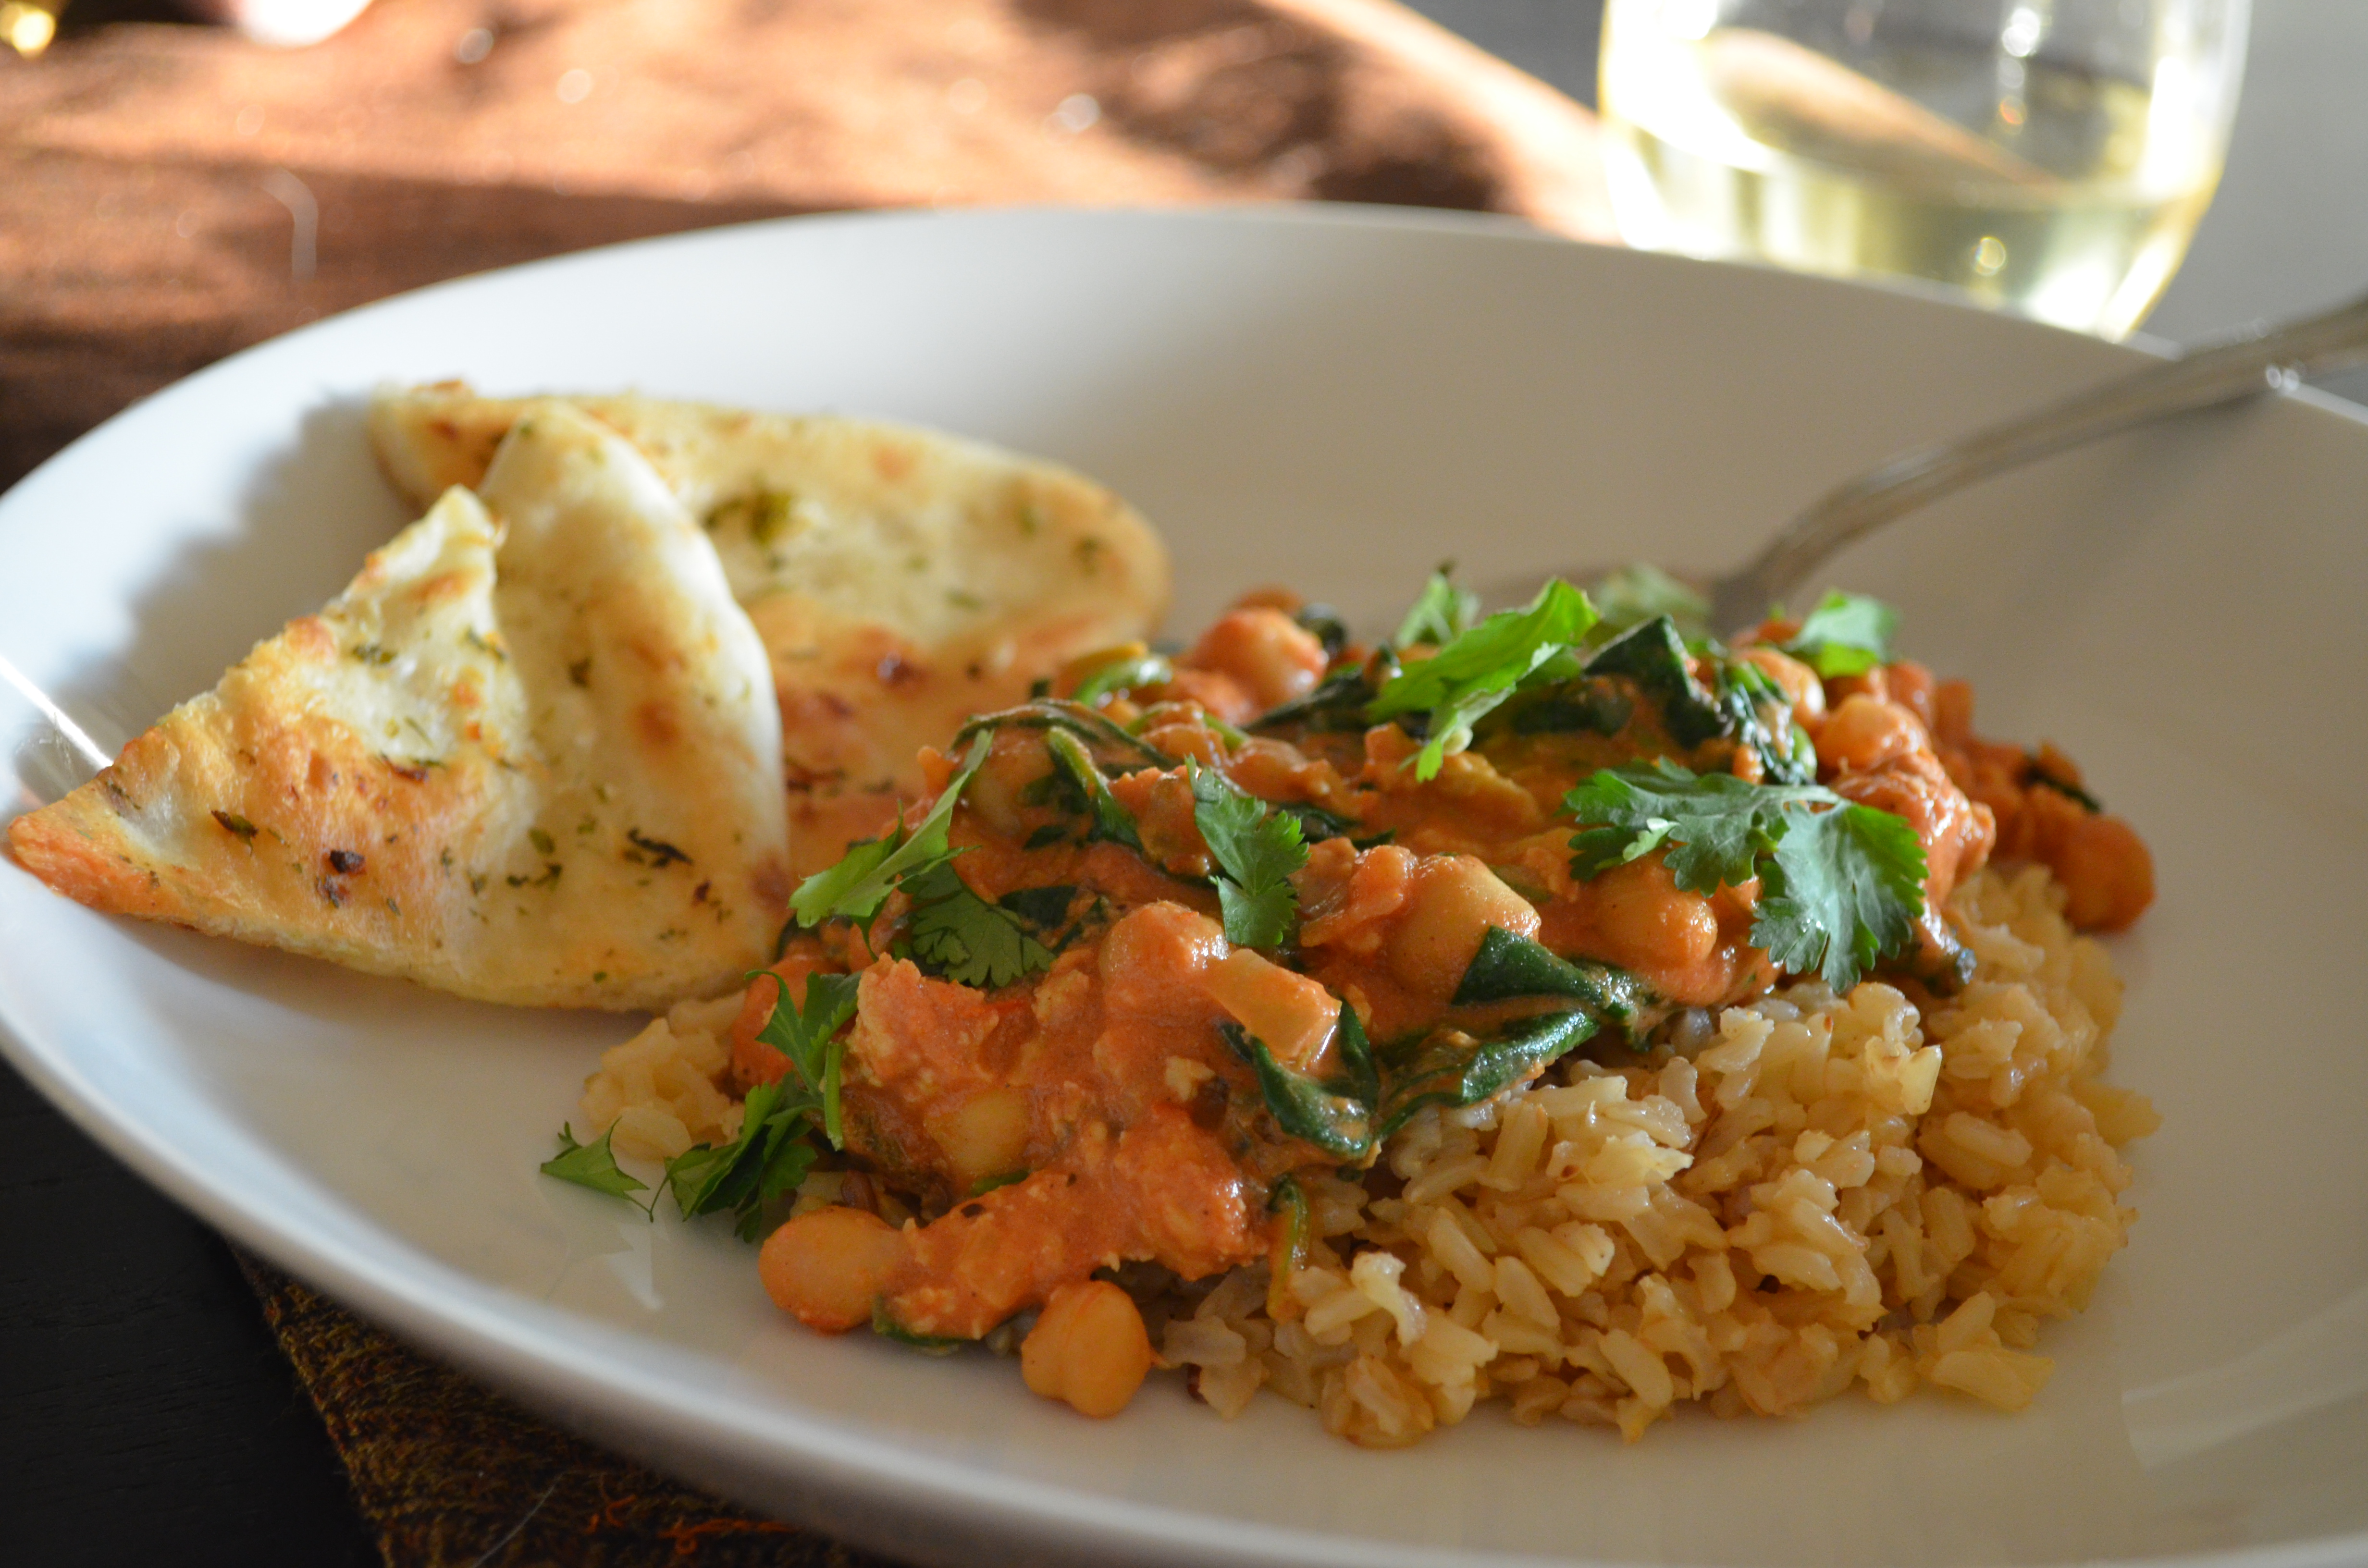
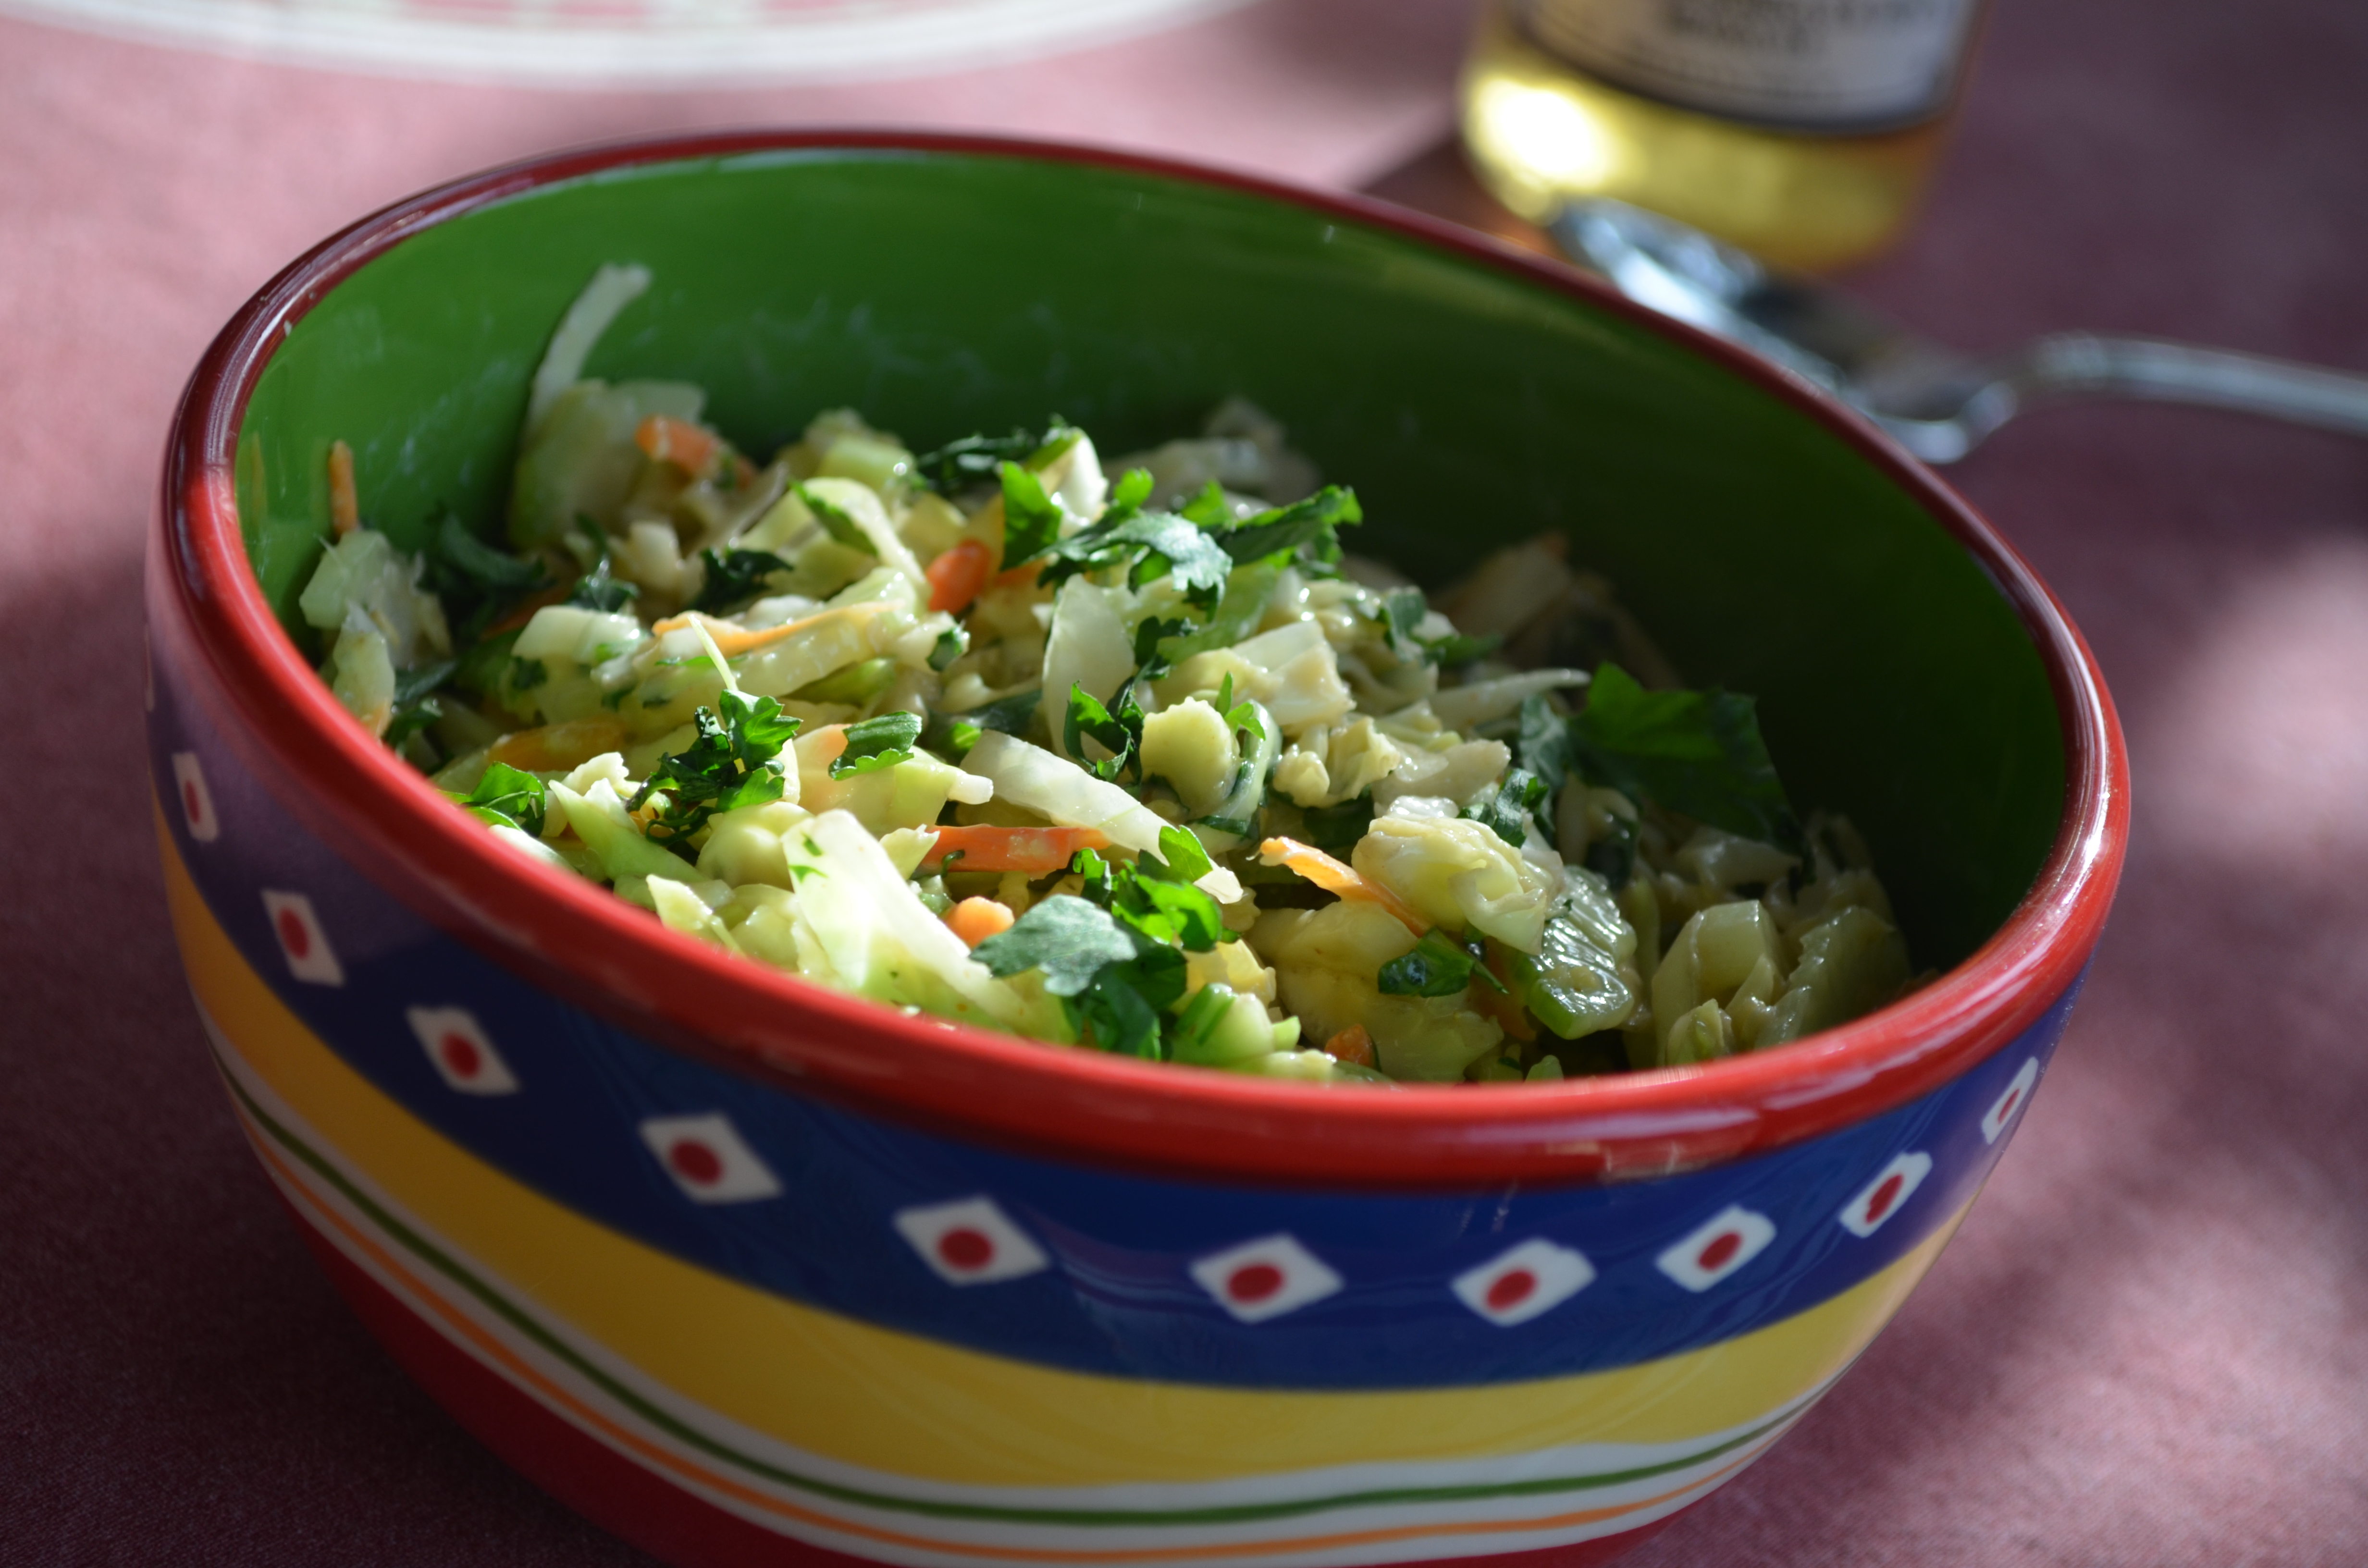
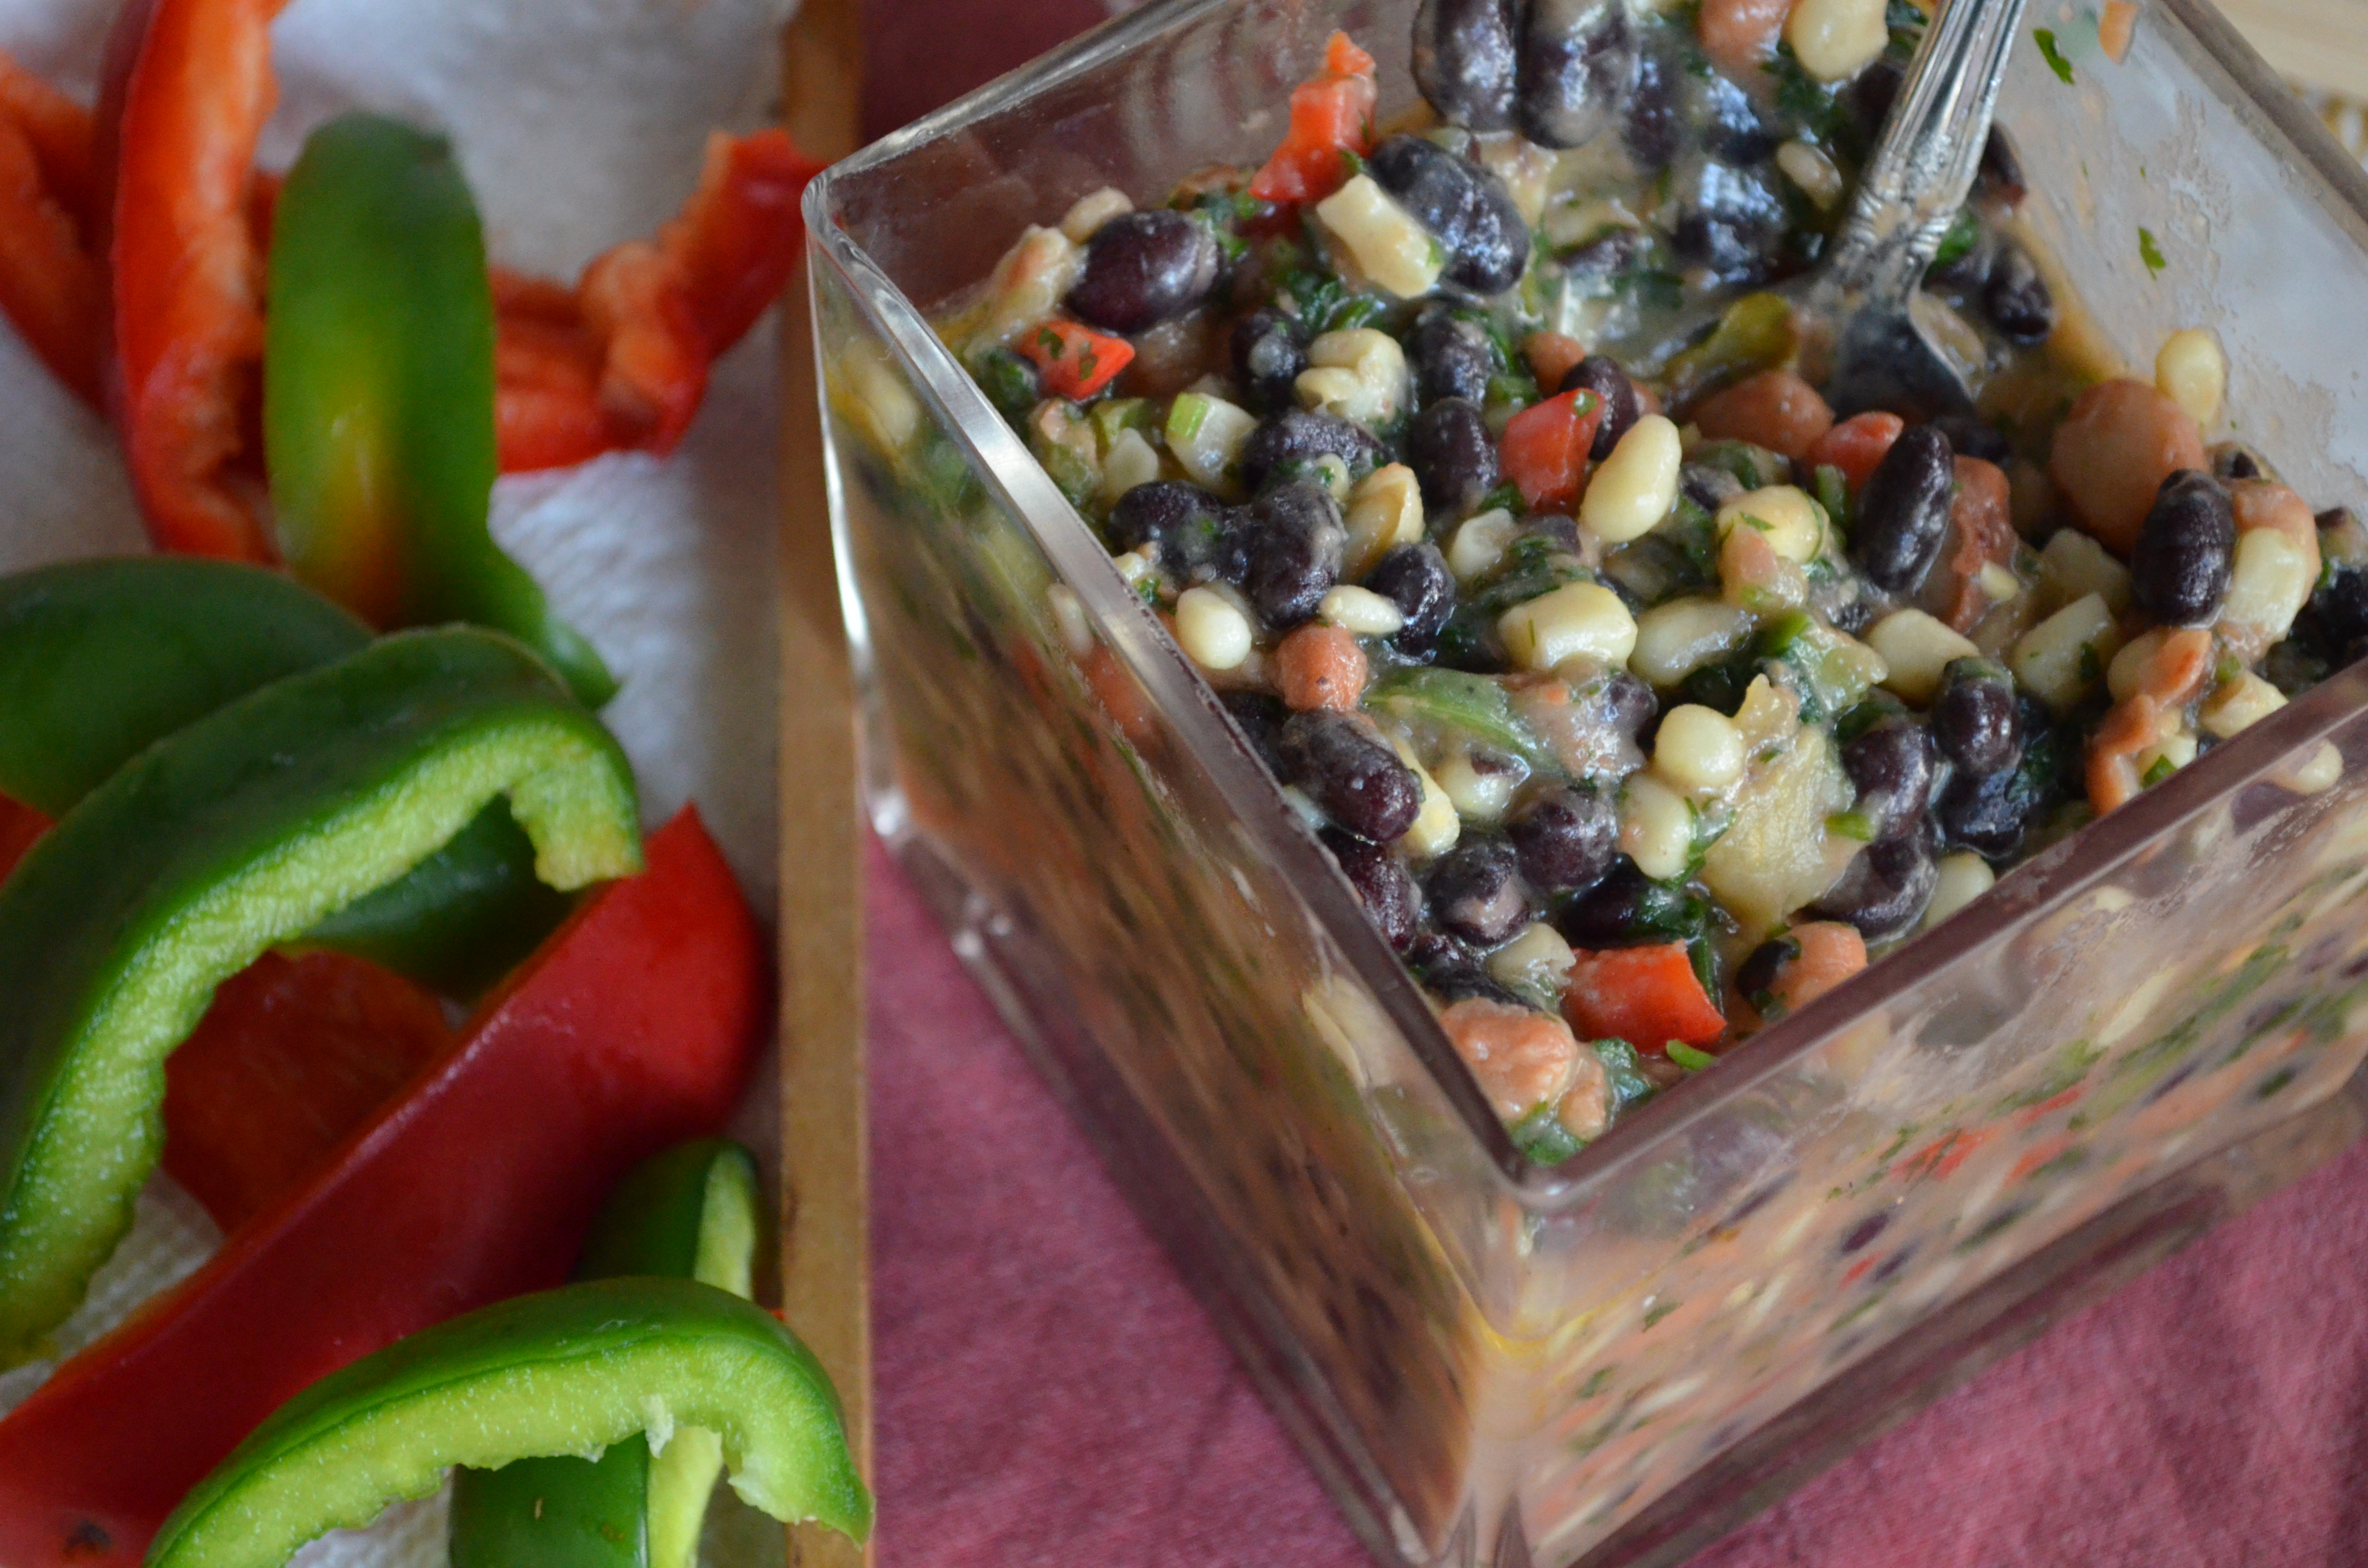
As all things in Texas, this “caviar’ offers big texture with big flavor.

DSC_0227

Ingredients

  • 1 each 15.25 ounce can reduced sodium black beans
  • 1 each 16 ounce can reduced sodium pinto beans
  • 7 ounce white corn kernels
  • 2 ounce chopped green chilies
  • 1 fresh jalapeño pepper, chopped
  • ½ each red and green bell pepper, small diced
  • ½ bunch cilantro, chopped
  • ¼ cup rice wine vinegar
  • ¼ cup olive oil
  • 2 tablespoons sugar
  • ¼ teaspoon garlic powder
  • ½ teaspoon kosher salt

Method

  • Drain and rinse beans and corn if using canned.  Combine the beans, corn and peppers in a mixing bowl.
  • Make the dressing by putting the vinegar, oil, sugar, garlic powder and salt in a small sauce pot and bring to a boil.   Immediately pour over the bean mixture and stir well.  Add the chopped cilantro and refrigerate until cool.  Serve with fresh cut veggies, tortilla chips, or over a bed of greens.

The flavors grow with time, mixing and mingling and become perfectly balanced between salty and sweet.

DSC_0194

This has moved to the top of my list for healthy reception dips/salsas.

DSC_0226

Kitchen talk has a wide range, from personal family stories, to tales of out of work shenanigans, to light to heavy teasing of one another, and of course food.  A team of over 60 can bring a lot of ideas and a ton of knowledge, and especially a lot of passion.  It’s easy to forget what a great resource is around you with all the beautiful cookbooks on the shelves and the ease of the internet in our hands or pockets.  More often than not the answers or ideas your search for is under your nose, or paperwork and order sheets in this case.

Chicken Chickpea Curry- Influenced by a Morning with Indian Cuisine Chefs

I took a quick trip to Chicago last year to learn about Indian food, it was an incredible learning experience and left me with a new favorite cuisine.  Not sure why I didn’t realize it before, it makes perfect sense- a lot of vegetarian dishes, no pork, cilantro and a ton of flavor, all things I love!

P1050577j

Being in the kitchen with 2 Indian Chefs for the morning, tasting and learning was a perfect way to understand the philosophy behind the cuisine.  Talk about using a lot of seasoning- there is no dusting or sprinkling in Indian cuisine, it is more like straight up dumping.  The more seasoning the better.   The chefs tasted and layered the flavorful stews and sauces for thru the morning, before lunch was served, adding more and more from the bags of spices.

P1050476P1050493n

I was really amazed at the exuberant amount of seasoning they added to all the food, it reminded me of a Chef I worked with when I first started cooking who didn’t believe in the “standard olive oil, salt, pepper and garlic” marinate, but more pushed us to use heavily seasoned marinates and highly flavorful sauces.  But these Indian chefs took that to a whole new level and I loved it- look at the amount of peppers prepped for one lunch- lol- crazy.

P1050457j

Needless to say, I have become a bit of a dabbler in Indian cuisine; recently I modified a Cooking Light recipe that caught my eye.  I suppose curries are equivalently comforting to me as a beef stew to someone else.

DSC_0007

Ingredients

  • 1 cup brown basmati rice, aka, Popcorn Rice (you can also use standard basmati rice)
  • 1 tablespoon canola oil
  • 1 large onion, diced
  • ¼ cup diced green pepper
  • 1 cup ground chicken
  • 2 teaspoons medium curry powder
  • 1 teaspoon ground cumin
  • 2 (15-ounce) cans chickpeas, rinsed and drained
  • 1 (28-ounce) can unsalted crushed tomatoes
  • 1 (6-ounce) package fresh baby spinach
  • 1 cup plain 2% Greek yogurt
  • 1/2 teaspoon salt
  • 1/4 cup chopped fresh cilantro

DSC_0063 

Preparation

1. Cook rice according to package directions; drain.

2. While rice cooks, heat a Dutch oven over medium-high heat. Add oil to pan; swirl to coat. Add onion, peppers and ground chicken; sauté 5 minutes or until tender, stirring frequently. Stir in curry and cumin; cook 30 seconds, stirring constantly. Add chickpeas, tomatoes, and spinach; cook 2 minutes or until spinach wilts, stirring occasionally. Remove from heat; stir in yogurt and salt. Sprinkle with cilantro. Serve over rice.

DSC_0024

We did manage to have some fun, tried a lot of great restaurants, local food, native micro brews and met a lot of friendly people!  I even had one of my lifetime goals fulfilled… (see evidence below).

P1050611jh

Oh, and one other thing I learned was Chicken Tikka Masala is commonly thought of as being from the Indian culture, but it was derived in England, where Indian food is very popular.  I suppose it is similar to Southwest United States did to Mexican food- Tex Mex…

Being able to learn from expert chefs priceless, if you get the chance be sure to soak it in!

The Art of the Grill Master- Fresh Ground Chicken Burgers with Ginger Slaw

There are a few foods that could be considered an “Art Form”, sushi, bread, soups to mention a few.  There is one that seems to be in almost every household- The Almighty Burger….often the muse of the head Grill Master.  Not every family has a Grill Master, but I bet most do.  In our case, my husband Wes is definitely holding this position. As the Head Grill Master, he doesn’t take this title lightly; every meal that come off his grill is in fact a piece of art.

DSC_0494

Wes has recently taken to grinding his own meats, so he can consider the ratio of fat to meat, the toughness of the cut, freshness of product, and type of meat, be it farm raised, local or organic or even the best deal of the week.  For real… he is in knee deep with developing the “absolute” burger.  In the meantime, we are eating superbly!

DSC_0390DSC_0387

One of his recent expeditions I was able to capture a recipe, and even add to it with a fresh made bun and slaw.

Chicken Burgers

  • 1- 3 pound whole chicken, deboned and ground
  • or
  • 2 pounds ground chicken
  • 4 teaspoons fresh sliced jalapeño
  • 2 teaspoon worcestershire sauce
  • 4 teaspoon favorite all-purpose seasoning
  • 1 teaspoon fresh ground ginger
  • 4 tablespoon chopped cilantro
  • 1 teaspoon kosher salt
  • ¼ teaspoon fresh ground black pepper

Combine all of the ingredients and mix well.  Allow the mixture to sit for a few hours to allow the flavors to blend.  Preheat your grill or prepare your charcoal while scooping 8 -½ cup (4 oz) portions and form patties.  When your grill is hot, cook burgers until they reach the safe temperature of 165.   Serve and enjoy!

DSC_0439DSC_0455

The chicken burger was packed with flavor, and very juicy.  So often burgers made with poultry tend to be dry, but he balanced the breast meat, thigh meat and skin perfectly.

DSC_0476

While Wes was preparing his inspired burgers and the dough for my buns was rising, I took to creating a salad to top the patties.  I love the crunch of a slaw on sandwiches, the texture and acidity adds a great depth.

DSC_0350

Ginger Slaw

Dressing

  • Juice of ½ lime
  • 2 teaspoon orange juice
  • 2 tablespoon mayonnaise
  • 2 tablespoon chopped cilantro

Slaw

  • 2 cups sliced cabbage
  • 3 tablespoons julienned carrots
  • 3 tablespoon sliced celery
  • 1 teaspoon fresh ground ginger

In a small bowl, add the ingredients for the dressing and stir together until creamy.  Combine raw ingredients in a mixing bowl, add the dressing and toss well.

DSC_0488

As in most art forms, the artist is rarely satisfied, but his fans are often thrilled and overwhelmed.  So while Wes continues on his search to find the “absolute” burger, and carries his reign as Grill Master, I will sit back and enjoy his artwork!

DSC_0503

I’d say this Grill Master is truly an Artist!

Everyone loves Buns- Homemade Onion Buns

Buns are often in the spotlight, gawked at and either praised or criticized!  Who doesn’t appreciate a great bun. All kinds of well made buns have their place, firm, soft, big and small included!

Sir Wes particularly loves good buns, especially when there is a burger in the middle.  I love when we fix burgers for dinner as Wes usually takes over this meal; my only responsibility is shopping for the mise en place, when I try to pick out the best looking buns in the bakery.  I recently gave Wes a grinder attachment for the Kitchen Aid, (which by the way, he loves) so when he wanted to use it for the first time to make burgers, I felt a little extra inspired to make my part more notable.  What better way than by making them fresh.

DSC_0415

I tried this recipe from King Arthur Flour a few times, and slightly adapted it to make it work a little better for a bread making novice.

Dough

  • 3/4 cup to 1 cup lukewarm water*
  • 2 tablespoons butter
  • 1 large egg
  • 3 1/2 cups King Arthur Unbleached All-Purpose Flour
  • 1/4 cup sugar
  • 1 1/4 teaspoons salt
  • 1 teaspoon onion powder
  • 1 tablespoon instant yeast

*Use the lesser amount in summer (or in a humid environment), the greater amount in winter (or in a dry climate), and somewhere in between the rest of the year, or if your house is climate controlled.

Topping

  • 3 tablespoons minced dried onion
  • 1 egg white beaten with 1 tablespoon water
  • Topping seeds: sesame, poppy, etc., optional

Directions

  • To make the dough: In a small container, combine the yeast with 3 tablespoons of warm water and allow to bloom for a few minutes.
  • Combine all of the dough ingredients, and mix and knead them—by hand, mixer, or bread machine—to make a soft, somewhat tacky dough.
  • Place the dough in a lightly greased bowl or other container large enough to allow it to at least double in bulk, cover, and let it rise for about 60 to 70 minutes, till it’s just about doubled.  Try a sunny window, or close to a heat source if you struggle with dough rising.

DSC_0283DSC_0294

  • Transfer the dough to a lightly greased work surface, and pat/roll it into a 12″ x 17″ rectangle
  • Sprinkle the dough with the minced onion, and press/roll it into the surface gently. Reserve a small amount of onion to sprinkle on top of the buns.

DSC_0310DSC_0316

  • Starting with a short (12″) end, roll the dough into a log, sealing the ends and side seam.
  • Cut the log into eight slices. A pair of scissors works very well here.
  • Place the buns on a lightly greased or parchment-lined baking sheet, flattening them to about 3″ wide. Cover them, and allow them to rise till they’re very puffy, about 1 hour. Towards the end of the rising time, preheat the oven to 375°F.

DSC_0319

  • Uncover the buns, brush them with the beaten egg white/water, and sprinkle with seeds, if desired.
  • Bake the buns for 20 to 25 minutes, until they’re golden brown and feel set when you poke them.
  • Remove them from the oven, and cool on a rack. When completely cool, wrap in plastic, and store at room temperature.

DSC_0377

It’s fun to take a favorite family meal and make it a bit more special by making something fresh.  Maybe it’s grinding the meat, or making the buns, fresh tortillas or pasta, or even just making a new marinade.  Taking chances in the kitchen is what makes it fun, and also how you grow into a better chef.

DSC_0432

Cheers to each and every one finding the perfect bun!!

Smores Brownies

Ahhhh, the Florida winter weather.  Let me pick out what shorts to put on today, ones that match my favorite tan flip flops.  All while I am watching the news reports of the snow storm that has struck the northeast United States.  Piles of snow, city transportation suspended, flights cancelled, tired commuters sleeping on the airport floor- how many Facebook snow related pictures are on your news feed?   Admittedly, I am super jealous- would love to take a sled ride down the hill I grew up with in my Philadelphia back yard.

DSC_0114

Camping season, fire pit season, or even just soft blanket season come unexpectedly in Florida, and is gone before you know it.  I love cool nights that justify buying leather boots or a great looking jacket.  Sitting outside by our fire pit that has only been used a handful of times is a great way to end the day.  When there is a chance of winter visiting Florida, I grab on tight-  boots, fires, blankets, comfort dinners and how could Smores be ignored.

DSC_0124

Generally there is a box of brownie mix in our cabinet, stemming from my inability to resist 2 for 1 at the grocery.  Pastry Chefs may balk, but honestly, I have yet to meet a bad brownie.  Bad Cookies, cakes, ect- yes, I have tasted several that I put down with displeasure, but not the brownie.  Brownies are simply never bad.    With a cool night upon us, I pulled out the box mix and grabbed the smores components that I keep for in hopes of an impromptu fire pit evening.  They came out delicious!  A tall glass of ice cold milk and every bite was a treat.

DSC_0157

Ingredients

  • ½ stick butter, melted
  • 1 cup graham crumbs, about 6 crackers
  • ¼ cup brown sugar
  • 1 box favorite brownie mix, or make your favorite recipe
  • 2 cups mini marshmallows

Directions

Preheat oven to 325.  Combine the melted butter, graham crumbs and brown sugar in a bowl and blend well.  Coat 9×9 brownie pan with cooking spray and spread graham crust evenly on the bottom of the pan.  Prepare brownies as directed on the box or in the recipe and pour on top of graham crust.  Bake  33-36 minutes or as directed.  Remove from oven when the center of the brownies is cooked, try sticking a toothpick in to see if it comes out clean.  Turn the oven to broil and sprinkle the marshmallows around the pan.  Place the pan back in the oven and watch until the marshmallows are evenly toasted.  Remove from oven and allow to cool.  Cut into squares as small or big as you like and enjoy!

DSC_0130

There may not be any sleds or even firepits in my plans for the weekend but the memories of multiple snow suit changes, mugs of hot cocoa and races down the hill will bring a smile when I see the 100th picture of snow in my Facebook feed.

May you enoy the snow or escape the snow this weekend- either way, stay warm in the heart!

South Carolina Deep Dish Pizza

This is a dish from my brother, Sir Ryan’s South Carolina kitchen that has been talked about for a few years.  Over time he has worked on convincing me to give it a try, and though it sounded fabulous and I wanted to make it, it just never happened.  While Ryan and his family were visiting over the Christmas holiday he put one together and proved that this pie was all that.  We couldn’t resist giving it another try ourselves a few weeks later and for once the tables turned and I found myself calling the novice chef brother of mine for advice.

DSC_0188

Make this as simple or complicated as you like, buy premade dough or make it fresh yourself, buy pizza sauce or create your own.  For me this is a fast, decadent meal, and I prefer to keep it that way.  Maybe if I had some Jersey tomatoes available I would make my own sauce.

DSC_0085

  • 3 tablespoons olive oil
  • 1 ½ ounce grated parmesan cheese
  • 1# Pizza Dough, make it fresh or buy premade from the market
  • 10 ounces pizza sauce
  • 2 cups shredded mozzarella
  • 2 ¼ ounces turkey pepperoni
  • 4 ½ ounces (1 cup) cooked turkey sausage crumbles
  • 1 green pepper, small diced
  • 1 medium yellow onion, small diced
  • 1 tablespoon chopped garlic
  • 2 tablespoons julienned basil

DSC_0098DSC_0104

Preheat oven to 350.  Sauté the garlic, peppers, onions and basil until fragrant and set aside. Gather the remaining mise en place and 9” spring form pan, or another deep round pan you have in your kitchen arsenal.  Coat the pan with olive oil and dust the parmesan cheese evenly around the surface.  Place the dough ball in the pan and push the bulk of the dough towards the edges.  Start the layering process with a sprinkling of shredded mozzarella, followed by the pizza sauce and then the meat and vegetable toppings.  Apply pressure to the toppings, causing the dough to move towards the edge and grow up the pan.  Top with cheese and layer in the same order, each time pushing down to move the dough up the sides of the pan.  End the layering with a healthy amount of cheese and a dusting of parmesan.  Bake for 60- 70 minutes, getting the top to be bubbly, golden, mouthwatering perfect.

DSC_0134

This is a pretty massive deep dish, certainly enough for 4 filling servings.  After removing it from the pan (the spring form pan makes the removal so easy), the pie just looks sinfully irresistible.

DSC_0207

Easy for a big game, a Friday family night or even a hump-day perk.

Just a reminder that you can learn from anyone- Thanks Sir Ryan for treating us to this amazing pie!

Buffalo Bacon Chips

I’ve always like to step out of my comfort zone, to avoid what is safe and expected, and to try never to be a stick in the mud.   In an effort to do so, and in appreciation of all the Bacon Fans that I am surrounded by, at home, at work, on Twitter and Facebook, ect. I like to try out new bacon involved recipes, though I don’t typically consume it.  So mostly for my husband and my brother, and anyone else passionately dedicated to both  bacon and Buffalo Chicken Wings, I present you with  Buffalo Bacon Chips.

DSC_0017

This pretty simple- not much of a recipe, just some directions.

  • Center Cut Thick Sliced Bacon (amount is up to you, and the appetite of your guests)
  • Flour
  • Buffalo Sauce

DSC_0001

Preheat the oven to 400.  Place rimmed baking sheet in oven to preheat. Cut bacon slices into 1/4’s and gently dredge them thru flour.  Arrange on the preheated baking sheet and return to oven for 6 minutes.   After the 6 minutes, remove the baking sheet from the oven and flip bacon to opposite sides.  Return to the oven and continue cooking for about 6 minutes, or until crisp.  Place the buffalo sauce in a shallow bowl.  Carefully pull out the bacon from the oven and with tongs dip the chips into the buffalo sauce.  Arrange the bacon chips on a plate and serve immediately.

DSC_0056

Sir Wes and I did go back and forth over the size to cut the bacon, he of course liked the bigger, longer cuts (cutting a slice in 1/3s) but I gravitated to the more squared off chip.  I also tried to consider that one may not be able to have just one….  thinking of your belt holes Honey…

DSC_0020

A great Superbowl snack- super easy and possibly the most exciting part of the 2013 Superbowl (aside from the commercials possibly).

Enjoy and Happy Pigging out!

Port Wine Cherry Cordial Cookies- #FBCookieSwap

Coffee and/ or cereal for breakfast, on your own for lunch and cookies for dinner.  This was our household meal plan for the last few weeks.  What outstanding timing for The Great Food Blogger Cookie Swap to happen, it was the same time Sir Wes and I were both barreling thru our busiest weeks of the year.  Three deliveries of cookies landed on our doorstep, perfectly synched to provide our nourishment thru Crazytown.

fbcookieswap_white

Cookies for dinner, for two weeks, and I am not even embarrassed.  These gems were fantastic.  Rachel from Kvell in the Kitchen made us Iced Whiskey Ginger Cookies (great week for whiskey), we got a batch of Chai Snickerdoodles that I loved (a couple made it into my morning coffee) and Traci from Burnt Apple’s cookies landed last- melt in your mouth butterscotch delights.

I recruited a few chefs that I work with to help me brainstorm what kind of cookie to make, the idea list got pretty long and I have a few of them planned in the future- but we finally landed on the perfect cookie to sip a glass of wine with.  Chocolate Cherry Cordial Cookies, made with port wine, 70% dark chocolate chunks and sun dried cherries. 

DSC_0101

Inspired by a couple of great chefs and slightly modified from the Food Network

Ingredients

  • 1 1/2 cups all-purpose flour
  • 3/4 cup good quality cocoa powder
  • 1 teaspoon salt
  • 1 teaspoon baking soda
  • 1 stick butter, softened
  • 3/4 cup granulated sugar
  • 3/4 cup packed brown sugar
  • 1 large egg
  • 1 teaspoon vanilla extract
  • 1/2 cup port wine
  • 6 ounces dark chocolate, broken into chunks
  • 1/2 cup dried tart cherries

 Directions

 Preheat oven to 375 degrees F.

 Combine flour, cocoa powder, salt and baking soda in a bowl. In a bowl of an electric mixer, or with a handheld mixer, combine butter and sugars until fluffy. Add egg, vanilla, and wine and combine. Slowly in batches add the flour mixture until just combined. Fold in the chocolate and cherries. On a nonstick cookie sheet, place a heaping tablespoon of dough for each cookie about 2 inches apart from each other. Bake 8 to 10 minutes, or until tops are still soft looking but edges look firm. 

DSC_0050

The cookie swap this year was a ton of fun- I can’t wait to see all the posts and get my cookie baking on!!  Thanks to Lindsay from Love and Olive Oil and Julie from The Little Kitchen for organizing such an enormous event.  And a huge shout out to the participants that all supported a great cause- Cookies for Cancer.  I can’t wait to see how much The Great Food Blogger Cookie Swap collected for such an important cause! 

DSC_0074

Cheers to all the cookie monsters out there- and though it isn’t a diet I would recommend for any length of time- remember, cookies for dinner are OK.  (sometimes)

Chili Butterscotch Squash Truffles

It tis the season…Pumpkin season.  I had to get in one pumpkin recipe before the Christmas extravaganza started.   At one time I loved all things pumpkin, but I am almost, a tiny bit, almost.., sick of all the pumpkin going on.   Anyone else feel that way?  Pumpkin is the fall version of Sliders….You can’t escape it.  Fortunalty I am only “kinda” tired of it, I still have some love for the orange squash.

Truffles are a great way to play with flavor combinations.  Small enough to not commit to entire desserts, and at the same time big enough to be impactful with strong flavor profiles.

Chili Pumpkin Truffles- Modified from Whole Foods recipe

  • 2 ½ cup white chocolate chips
  • 1/3 cup finely chopped gingersnaps, about 6 cookies
  • ¼ canned pumpkin puree
  • ¼ cup finely chopped graham crackers, 2 whole wafers
  • 1 tablespoon confectioner sugar
  • ¼ teaspoon chili powder
  • ¼ teaspoon kosher salt
  • 2 ounces cream cheese
  • Butterscotch morsels

Start by melting 1/2 cup of the chocolate in a double boiler over medium-low heat, stirring often to keep the chocolate from burning. Transfer to a large bowl.  Combine gingersnap crumbs, pumpkin, graham cracker crumbs, sugar, chili powder, salt and cream cheese and beat with an electric mixer until smooth. Transfer to a shallow bowl, cover and chill until just solid enough to roll into balls, at least 2 hours.

Line a large sheet tray with parchment paper. Melt remaining 2 cups chocolate and transfer to a small, deep bowl. Roll 1 heaping teaspoon of the pumpkin mixture into a ball in your hands, then drop into the chocolate. Working quickly, gently spoon chocolate over to coat. Using a small spoon or fork, lift the truffle out of the chocolate, shake off excess and transfer to prepared sheet tray. Dollop a bit of extra chocolate on any parts that remain exposed, then sprinkle a few gingersnap or graham cracker crumbs over the top, if you like. Repeat process with remaining pumpkin mixture and chocolate, then chill truffles until chocolate is completely set, about 1 hour. Melt Butterscotch morsels and drizzle over top of truffles.

Truffles are fun for the kids to help with as well, rolling balls and dipping into the chocolate.  Great way to keep them occupied while the game is on!

Hopefully you aren’t “pumpkinned” out yet and left room for one more recipe!!  Great idea for hostess gifts over Thanksgiving!

Halloween Bacon Oreo Bark

I know friends are starting to talk in amazement about Christmas decorations going up, and Black Friday Sales being advertised before Halloween has come and gone.  But I’m still stuck in wonderment that Halloween is this week- How did that happen??  Correct me if I am wrong but weren’t we enjoying a long Labor Day weekend a few days ago?? 

Obviously it’s been busy and here we are going to a Halloween party tonight- Bring your best treat.  Awesome.   When it comes to “on the fly” treats, one of the best options is the bark road.  If you have even a little bit of a sweet tooth you are likely to have a bag of chocolate in your house.  Melt that chocolate and throw in whatever looks good- candy, salty snacks, herbs, dried fruits, cereal, marshmallows, ect and you’re done in 15 minutes.  I did this in shorter time then it took Sir Wes to fill out his absentee ballot this morning.

The kiddos are able to help with making bark as well- I know my niece and nephew, Lady Corree and Sir Sully would love it! 

Ingredients

  • 12 ounce semi-sweet chocolate chips
  • 1 teaspoon vegetable shortening
  • 10 Halloween Oreo’s, crushed
  • 4 slices cooked bacon, rough chopped

Method

Line a 9×13 baking pan with aluminum foil or parchment paper.  Place pot with water on stove over medium heat, and place a metal bowl on top creating a double boiler.  Add chocolate and vegetable shortening and stir while the chocolate slowly melts.  When the chocolate is smooth add the crushed Oreo’s and bacon and mix well.  Pour onto the lined pan and spread evenly.  Pop in the refrigerator until set and then break into pieces. 

Serves 1-8 people, depending how piggy!

Here is to hoping Thanksgiving still happens and we don’t just skip to Christmas!  Because we all know- Thanksgiving is the best food holiday!